Role Privileges
Overview
Role privileges in the portal define the specific permissions and access levels assigned to different user roles within the system. These privileges determine what actions users can perform, such as creating or managing accounts, accessing sensitive data, modifying settings, or viewing reports. By establishing clear role privileges, portal ensures that users have the appropriate level of access based on their responsibilities, enhancing security and operational efficiency. This feature allows administrators to tailor user experiences, ensuring that individuals can perform their tasks without compromising the integrity of the system or sensitive information.
In this section, you can explore topics such as:
Adding new role
To add a new role in the portal, follow these steps:
-
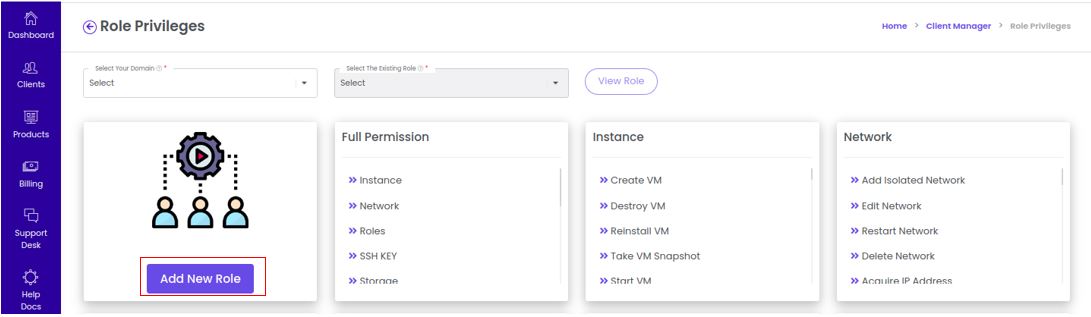
Navigate Through the Menu: Begin by locating the Clients section on the portal's main navigation menu. Click on it to expand the options available under this category. From there, select Role Privileges. This section is specifically designated for managing user roles and their associated permissions.
-
Access Role Management: Once in the Role Privileges section, you will be presented with a list of existing roles and their details. This is where you can view and manage the permissions assigned to different user roles.
-
Initiate Role Creation: To create a new role, look for the Add New Role button, typically positioned prominently on the page. Clicking this button will redirect you to a form page where you can define the new role's attributes, such as the role name, description, and specific privileges that should be assigned to it.
-
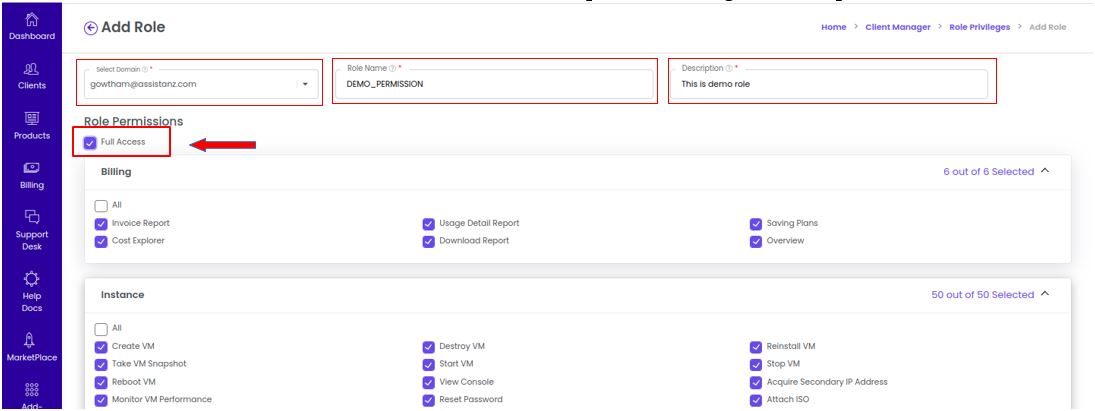
Select the Domain: Begin by choosing the appropriate Domain from a dropdown menu or list. The domain represents the specific area or context within which the role will operate. Selecting the correct domain is crucial because it determines where the role's permissions will apply.
-
Enter the Role Name & Description: - Next, provide a Role Name. This should be a clear and concise identifier for the role that reflects its purpose or the tasks it will manage.
- Alongside the role name, enter a Description. This text should elaborate on the role's responsibilities and functionalities, helping users understand its significance and scope. A well-defined description is beneficial for future reference and for other administrators who may work with the role later.
-
Assign Role Permissions: After entering the role name and description, you will need to specify the permissions associated with the role. This involves selecting the appropriate actions or capabilities that users assigned to this role will have. The permissions may include options such as read, write, delete, or administrative capabilities, depending on what is relevant to the tasks users in this role will perform.
-
Setting Full Permissions: If you wish to grant users with this role full access to all functionalities within the selected domain, simply click the Full Access button. This option is useful for roles that require unrestricted capabilities, such as administrative or superuser roles. Selecting this option automatically assigns all available permissions to the role.
-
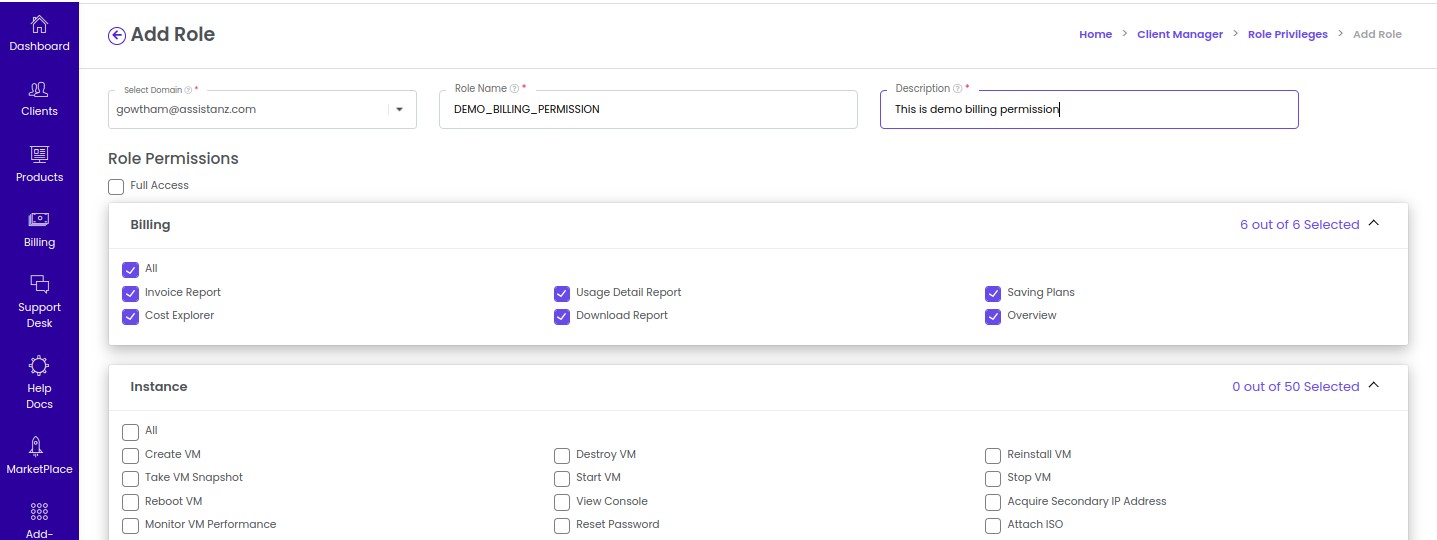
Assigning Specific Roles: Alternatively, if you need to assign only certain specific permissions rather than full access, click the Specific Roles button. This option allows you to fine-tune the capabilities of the role by selecting only the permissions that are necessary for the users assigned to this role.
After configuring the specific permissions, finalize the creation of the role by clicking the Create Role button. This action will save the new role with the specified name, description, and permissions, making it available for assignment to users.

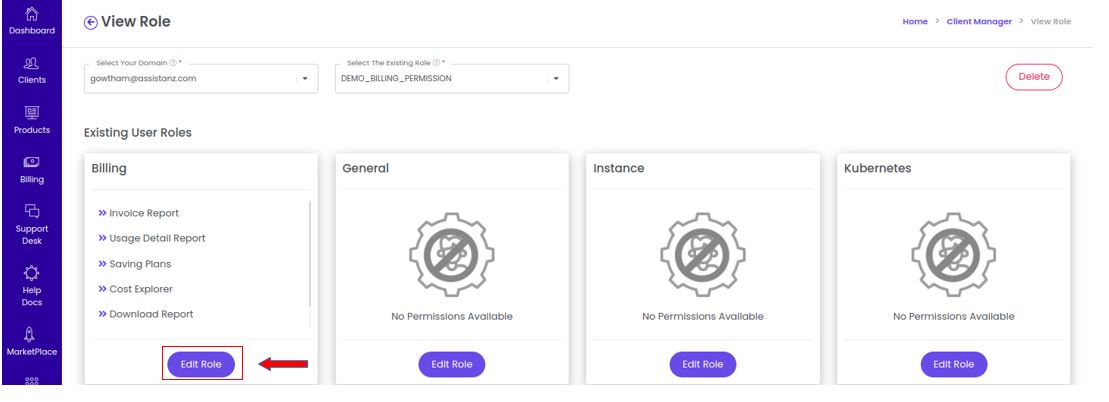
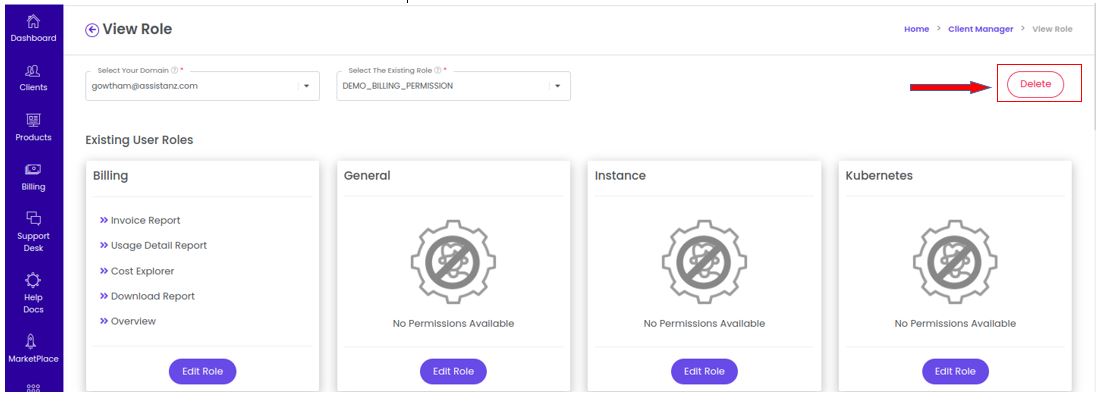
View Role
To view a new role in the portal, follow these steps:
-
Clients: Start by accessing the "Clients" section of the portal. This is where you manage all client-related information and settings.
-
Role Privileges: Next, click on "Role Privileges." This option allows you to view and manage the roles assigned to users, including what permissions are associated with each role.
-
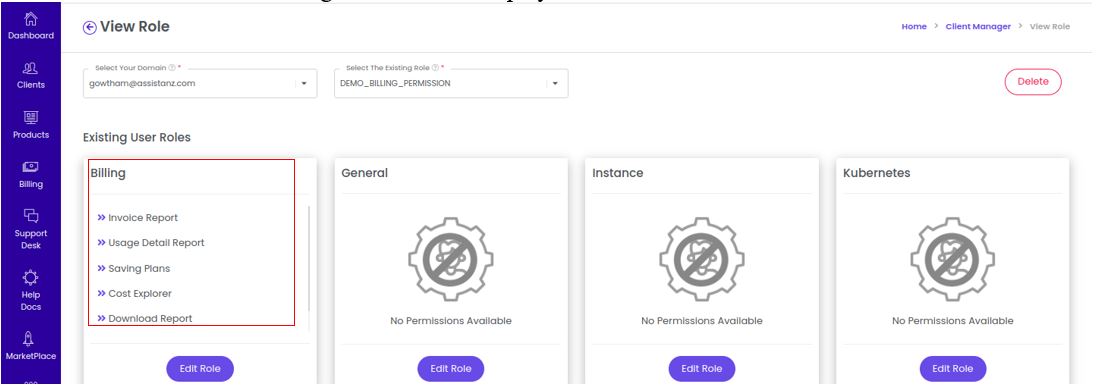
Select Your Domain: After reaching the Role Privileges section, you will need to select the specific domain associated with the user roles you wish to manage. This step is crucial, as roles can vary by domain, affecting which users can access certain features and data.
-
Select the Existing Role: Once you've selected the appropriate domain, a list of existing roles will be displayed. Choose the role you wish to view. This could be a role such as "Admin," "User," or any other custom role that has been defined.
-
Click View Role Button: After selecting the role, click on the "View Role" button. This action will take you to a detailed view of the role's permissions and settings, allowing you to see what access the role grants and make any necessary changes.

Edit Role
-
Clients: Start by accessing the "Clients" section of the portal. This is where you manage all client-related information and settings.
-
Role Privileges: Next, click on "Role Privileges." This option allows you to view and manage the roles assigned to users, including what permissions are associated with each role.
-
Select Your Domain: After reaching the Role Privileges section, you will need to select the specific domain associated with the user roles you wish to manage. This step is crucial, as roles can vary by domain, affecting which users can access certain features and data.
-
Select the Existing Role: Once you've selected the appropriate domain, a list of existing roles will be displayed. Choose the role you wish to view. This could be a role such as "Admin," "User," or any other custom role that has been defined.
-
Edit Role: Once you are viewing the details of the selected role, you will have the option to edit it. By clicking on the "Edit Role" button, you can make adjustments to the role's permissions, such as adding or removing specific access rights. This step is crucial for ensuring that user roles align with the organization's current needs and security policies.
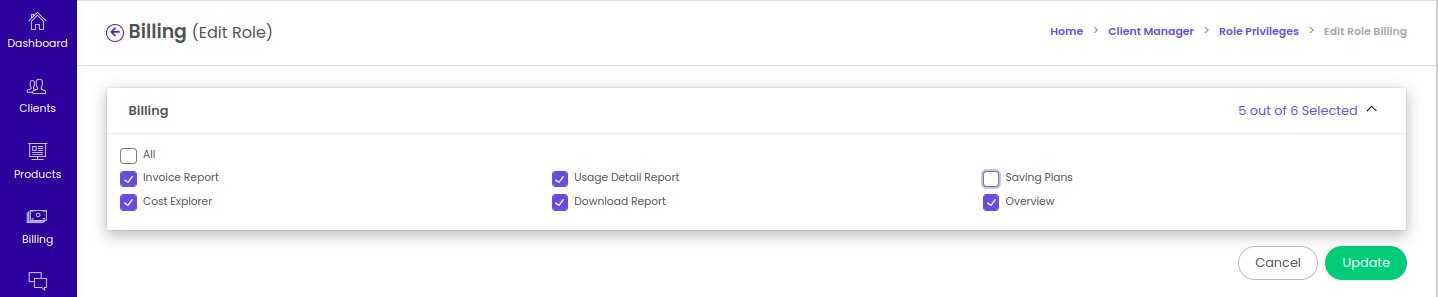
- Redirected to Edit Role Screen: After clicking the "Edit Role" button, the page will be redirected to the Edit Role screen. This interface provides the tools necessary for modifying the existing role.
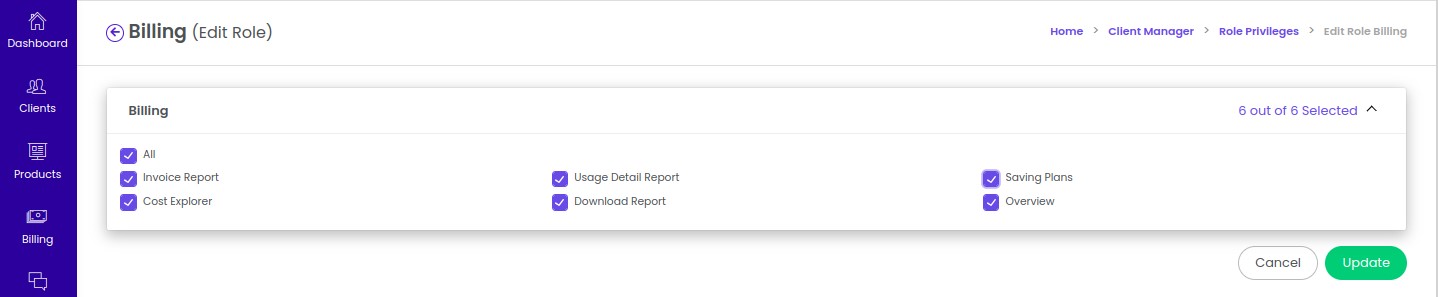
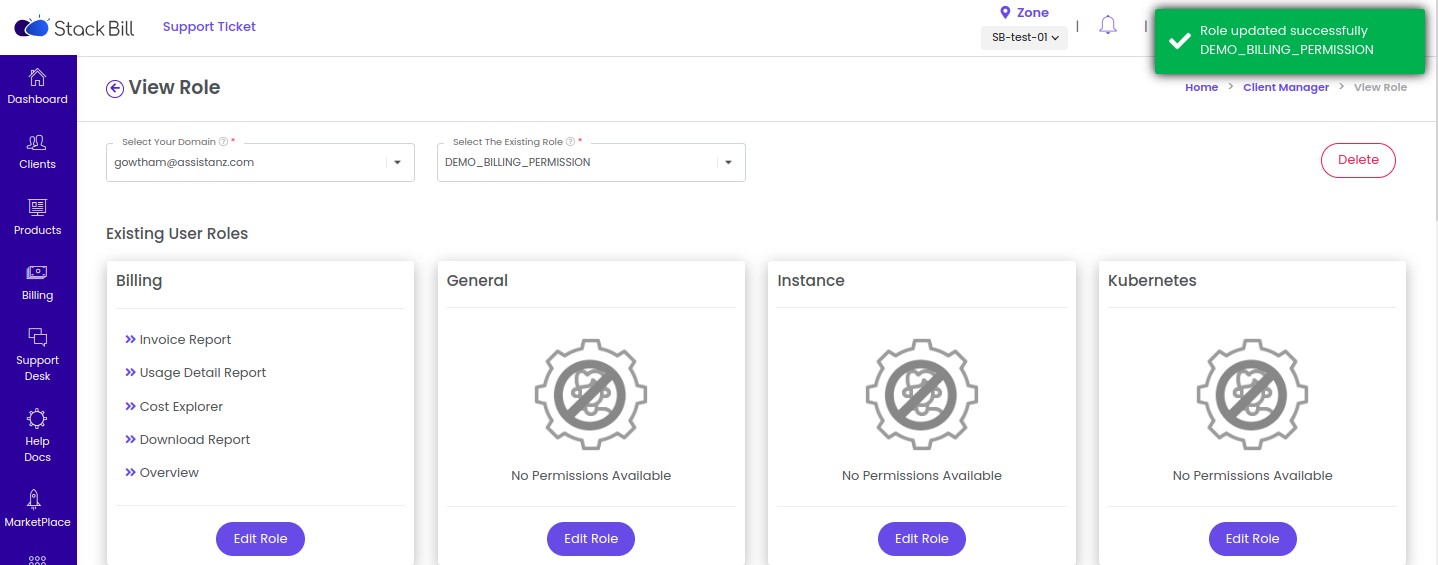
- Edit and Update Roles: In the Edit Role screen, you can make the necessary changes to the roles. Once you have made your adjustments, be sure to click the "Update" button to save your changes. This final step ensures that the updated permissions are applied and that the role reflects any new requirements or modifications.
Delete Role
-
Clients: Start by accessing the "Clients" section of the portal. This is where you manage all client-related information and settings.
-
Role Privileges: Next, click on "Role Privileges." This option allows you to view and manage the roles assigned to users, including what permissions are associated with each role.
-
Select Your Domain: After reaching the Role Privileges section, you will need to select the specific domain associated with the user roles you wish to manage. This step is crucial, as roles can vary by domain, affecting which users can access certain features and data.
-
Select the Existing Role: Once you've selected the appropriate domain, a list of existing roles will be displayed. Choose the role you wish to view. This could be a role such as "Admin," "User," or any other custom role that has been defined.
-
Click View Role Button: After selecting the role, click on the "View Role" button. This action will take you to a detailed view of the role's permissions and settings, allowing you to see what access the role grants and make any necessary changes.
-
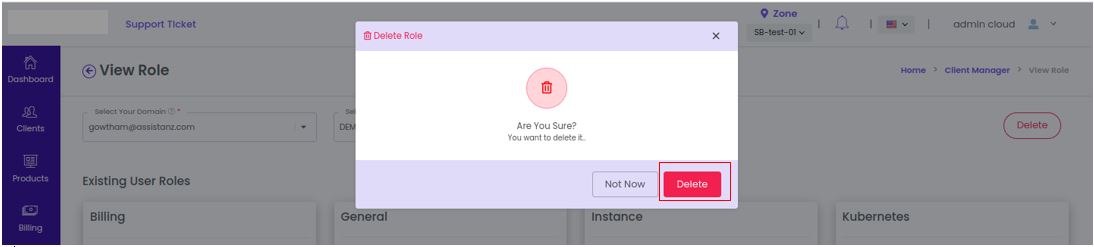
Delete Role: Within the role detail view, you will find the option to delete the role. By clicking the "Delete Role" button, you initiate the process of removing this role from the system. This action is significant as it permanently removes all associated permissions and settings linked to that role.
- Confirm Deletion: After clicking the "Delete Role" button, a confirmation prompt will typically appear to ensure that you genuinely intend to delete the role. This safeguard is essential to prevent accidental deletions. Carefully read the prompt, and if you are certain that you want to proceed, click the "Delete" button to confirm your action.
- Successful Deletion Notification: Upon confirmation, the portal will process the request, and you will receive a notification indicating that the selected role has been successfully deleted. This confirmation reassures you that the role and all associated permissions have been removed from the portal, ensuring that any users assigned to that role will no longer have access to its permissions.
