ISO Template
ISO Templates in the admin portal are used for managing bootable ISO files that can be deployed to create virtual machines (VMs). An ISO image contains the entire contents of an installation disc, often used to install operating systems or other software. By leveraging ISO templates, administrators can offer various operating systems or software installations that are bootable directly from an ISO.
Key Features of ISO Templates:
-
ISO Template Development:
-
An ISO Template refers to a virtualized bootable image file that can be used to install an operating system or software on a VM.
-
These templates are standard formats that allow administrators to publish a wide range of proprietary, industrial, and commercial applications.
-
ISO templates can be created from bootable media (such as installation CDs or DVDs) and configured for deployment to VMs within the cloud infrastructure.
-
How to Navigate to ISO Templates:
-
Login into the admin portal.
-
From the portal menu, select the Marketplace icon.
-
To browse ISO templates in the marketplace, click the ISO templates icon.
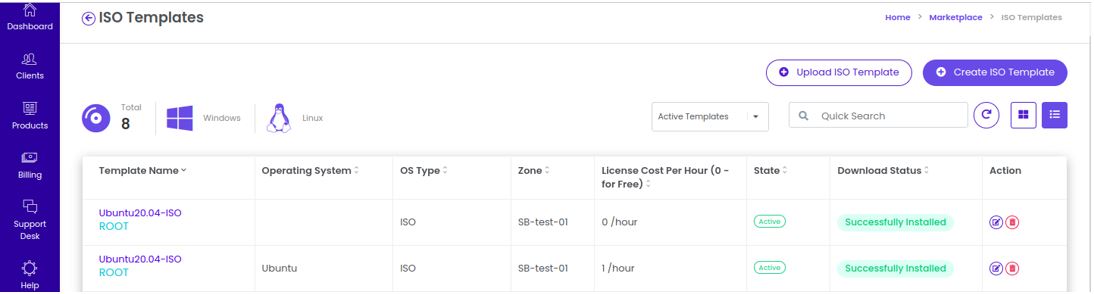
ISO Template List :
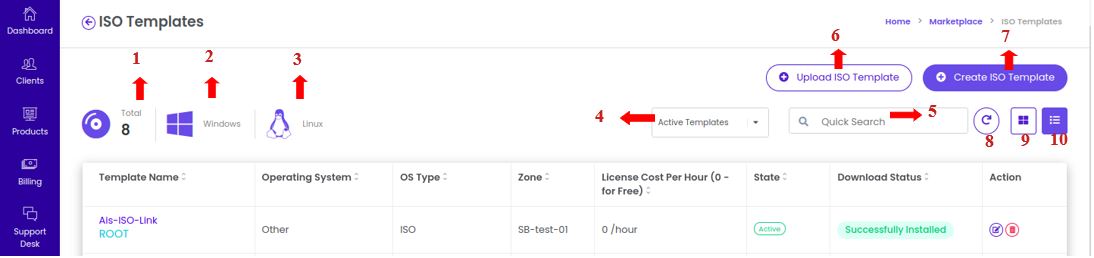
The ISO Templates List Page in the admin portal allows administrators to view, manage, and organize bootable ISO templates available for deployment in the cloud environment. This interface provides several options to filter, search, and manage ISO templates efficiently.
The main components of the ISO Templates List Page are elaborated upon below:
1. Total Number of ISO Templates :
- This shows the total count of all the ISO templates available in the marketplace. It includes only the active ISO templates, providing a high-level overview of the number of ISO images that can be used to create or configure virtual machines.
2. Total Number of Windows ISO Templates :
- This count highlights the number of ISO templates specifically related to Windows operating systems. These are bootable ISO files containing various versions of the Windows OS, ready for deployment.
3. Total Number of Linux ISO Templates :
- Similar to the Windows count, this displays the total number of ISO templates that contain Linux-based operating systems. It helps in quickly identifying how many Linux distributions are available for VM deployment.
4. Active / Deleted ISO Templates Filter :
- This filter allows administrators to view Active or Deleted ISO templates. The Active templates are those that are available for immediate use, while Deleted templates have been removed from the active list but can still be accessed.
5. ISO Templates Quick Search Field :
- This feature allows administrators to search for specific ISO templates by entering keywords, names, or other identifiers. It enables quick access to the required templates without manually navigating through the entire list.
6. Upload ISO Template Button :
- The Upload ISO Template button is used to upload new ISO files from the local machine to the marketplace. This is where admins can add new ISO templates to the cloud environment by selecting the appropriate bootable image from their system.
7. Create ISO Template Button :
- The Create ISO Template button allows the admin to create an ISO template using a URL or remote link. Instead of uploading a file from the local machine, admins can specify a URL to the ISO file, which the system will use to fetch and create the ISO template.
8. Refresh Page Icon :
- The Refresh Page Icon allows administrators to manually refresh the list of ISO templates, ensuring that any new uploads or changes made to the templates are reflected immediately. This helps keep the page updated with the latest information.
9. Grid View Template List :
- The Grid View displays ISO templates in a grid format, providing a visual representation of templates with thumbnails. This view is useful for quickly scanning through templates, especially when managing a large number of ISO images.
10. List View Template List :
- The List View displays the ISO templates in a list format, showing key details like template name, OS type, size, and more. This view is more compact and useful for administrators who prefer to see detailed information in a structured format.
Upload ISO Template :
The Upload ISO Template option in the admin portal allows administrators to upload ISO files from their local machine and configure them as templates for virtual machine (VM) creation and deployment. This section provides a detailed overview of the necessary configuration fields and options to customize the ISO template.
1. Navigate to ISO Template :
-
Login into the admin portal.
-
From the portal menu, select the Marketplace icon.
-
To browse OS templates in the marketplace, click the ISO template icon.
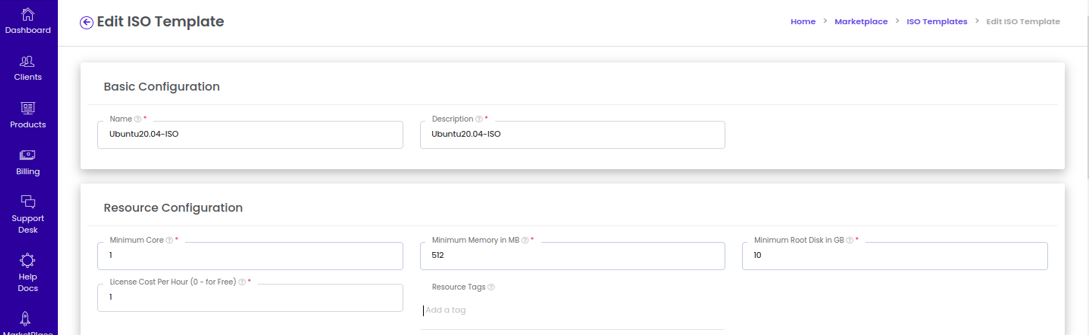
2. Add the Basic Configuration :
-
Template Name: Enter a name for the ISO template that will help identify it in the marketplace.
-
Template Description: Provide a short description to clarify what the ISO template contains, such as the operating system version or features.
-
Select the Zone: Choose the zone where the ISO template will be available. This ensures the template is accessible in the right geographical area.

3. Add the Resource Configuration :
-
Minimum Core: Define the minimum number of CPU cores required to use this ISO template.
-
Minimum Memory (MB): Specify the minimum amount of memory (RAM) needed to deploy the template.
-
Minimum Root Disk (GB): Set the required root disk space to host the OS when deploying from this ISO.
-
License Cost: Optionally, you can define the cost of using this ISO template.
-
Optional: Add Resource Tags: Add resource tags to categorize the ISO template or associate metadata for better organization and management.

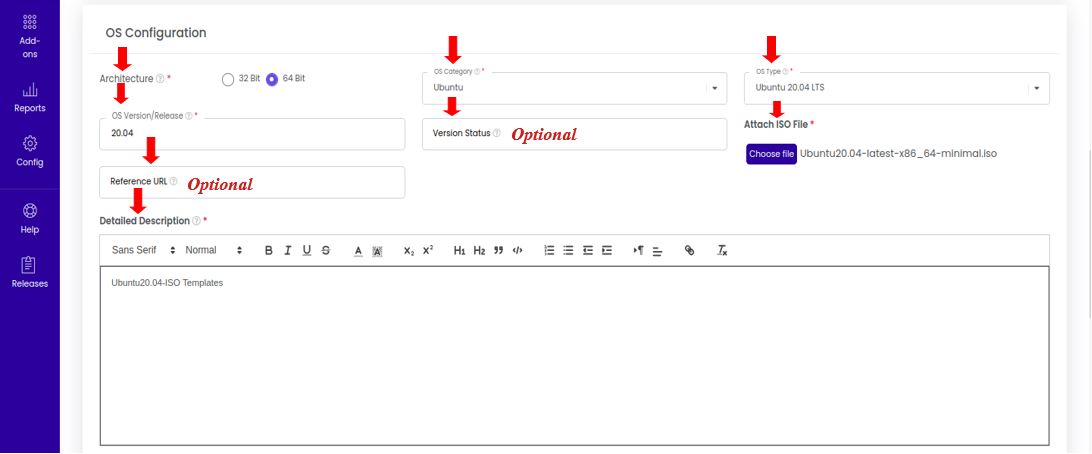
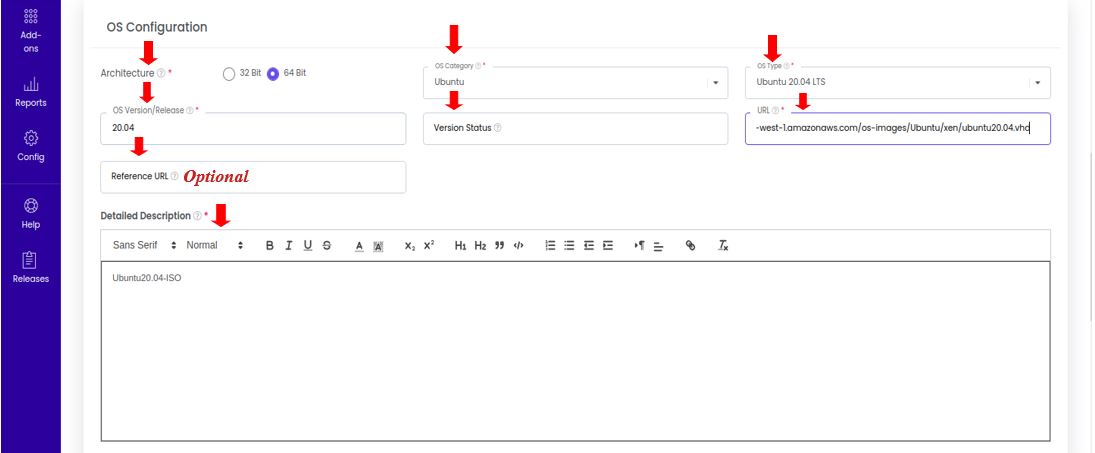
4. Add the OS Configuration :
-
Architecture: Select whether the ISO template is for a 32-bit or 64-bit architecture.
-
OS Category: Choose the operating system category such as Windows or Linux to classify the ISO.
-
OS Type: Specify the type of operating system (e.g., Ubuntu, CentOS, Windows Server).
-
OS Version / Release: Enter the version or release information for the operating system in the ISO.
-
Optional: Add Version Status: You can include details about the version status (e.g., Stable, Beta, Experimental).
-
Attach the ISO Template: Upload the ISO file from your local machine that will be used as the bootable template for creating virtual machines.
-
Add the ISO Template Detailed Description: Provide a detailed description that gives more in-depth information about the ISO template.
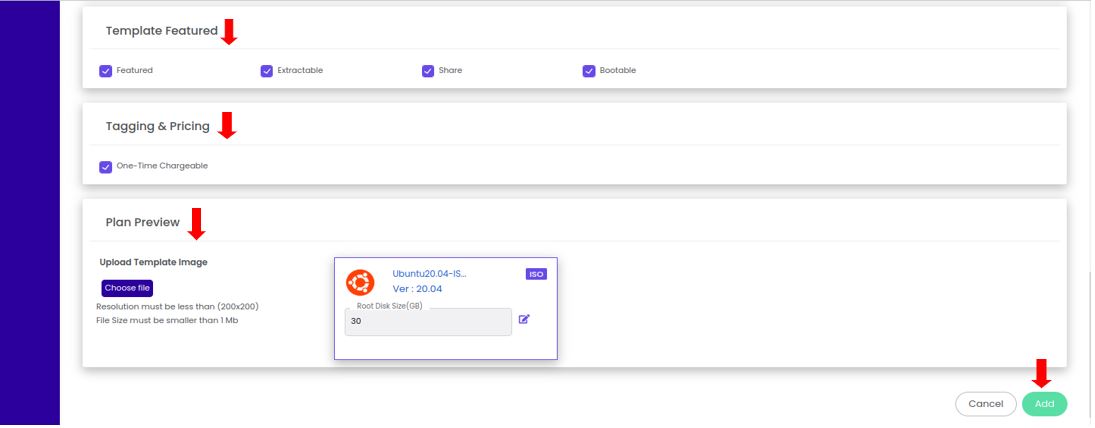
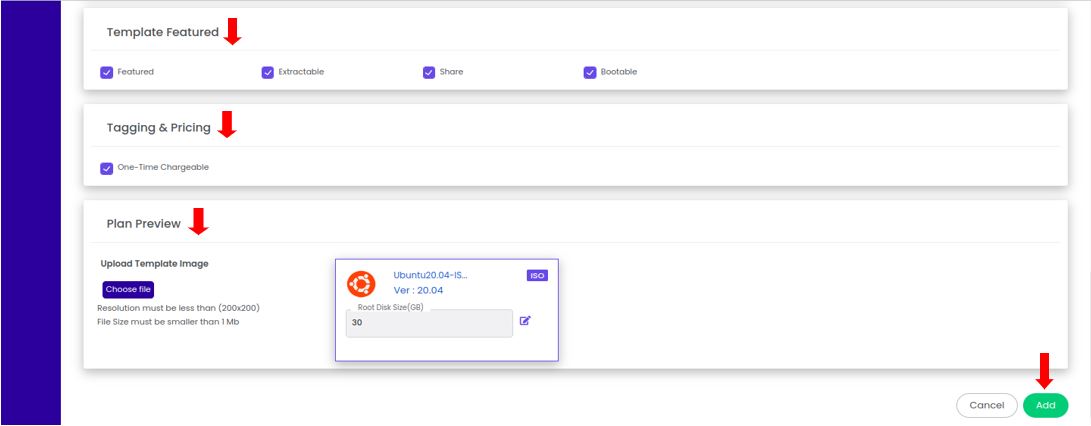
5. Template Features :
-
Featured: Select this option if you want the template to be listed as a Featured Template in the marketplace for higher visibility.
-
Extractable: This option allows users to download the ISO images from their end.
-
Share: Choose this option to make the template publicly shareable so other users in the system can access it.
-
Bootable: Indicate that the ISO template is bootable, meaning it can be used to create a new virtual machine and boot the operating system from the ISO file.
6. Tagging & Pricing :
- One-Time Chargeable: This option allows you to set a one-time charge for the ISO template usage. It defines how the template is priced for deployment.
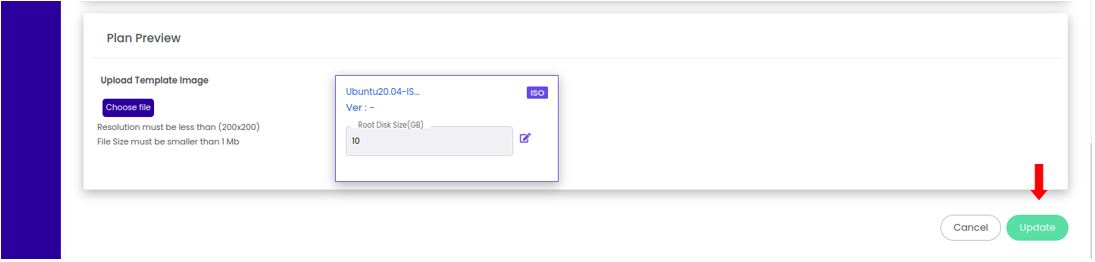
7. Plan Preview :
-
Upload Template Image: Add a preview image of the template, which must meet specific file size restrictions.
-
Click Add Button: Once all configurations are complete, click the Add button to upload the ISO template.
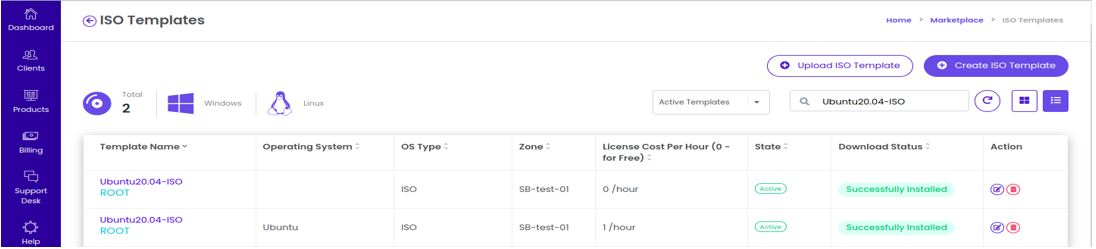
8. ISO Template Upload Process :
- After clicking Add, the ISO template will be uploaded, and the status will be marked as In-progress.

- Once the upload completes, the ISO template will be available in the marketplace for deployment.
9. Upload Successfully :
- After several minutes, you will see an download status as download complete in the admin portal.
Create ISO Template :
The Create ISO Template option in the admin portal allows administrators to create ISO templates using a URL link. This process involves specifying configuration details for the template, including resource allocation, OS configuration, and pricing options.
Below is an elaboration of the steps and options involved in creating an ISO template:
1. Navigate to ISO Template :
-
Login into the admin portal.
-
From the portal menu, select the Marketplace icon.
-
To create a new OS template from the marketplace, click the Create ISO template icon.
2. Add the Basic Configuration :
-
Template Name: Enter a descriptive name for the ISO template. This name will be displayed in the marketplace for users.
-
Template Description: Provide a short description to explain what the ISO template includes, such as the type of operating system or its intended use.
-
Select the Zone: Choose the zone where this ISO template will be available. This ensures that the template is accessible from the appropriate geographical area.

3. Add the Resource Configuration :
-
Minimum Core: Define the minimum number of CPU cores required to run the ISO template.
-
Minimum Memory (MB): Specify the minimum amount of memory (RAM) required to deploy this template.
-
Minimum Root Disk (GB): Set the minimum disk space needed to use the ISO template for a virtual machine.
-
Template License Cost: You can define the cost associated with using this ISO template.
-
Optional: Add Resource Tags: Add metadata tags to categorize or label the ISO template for better organization and searchability.

4. Add the OS Configuration :
-
Architecture: Select the architecture type (either 32-bit or 64-bit) that the ISO supports.
-
OS Category: Choose the category of the operating system, such as Windows, Linux, etc.
-
OS Type: Specify the exact operating system (e.g., Ubuntu, Red Hat, Windows Server).
-
OS Version / Release: Enter the version or release of the operating system that this ISO template contains.
-
Optional: Add Version Status: Optionally, you can add information about the status of the version, such as whether it is a Stable, Beta, or Experimental release.
-
Add the ISO Template URL: Provide the URL link to the ISO file that will be used to create the template. This URL allows the system to access and download the ISO file.
-
Add the Template Detailed Description: Provide a detailed description of the ISO template, giving more information about its use case, features, or specifications.
5. Template Features :
-
Featured: Select this option if you want the ISO template to appear as a Featured Template in the marketplace for increased visibility.
-
Extractable: This option allows users to download the ISO images from their end.
-
Share: Select this option to make the template shareable, allowing public access.
-
Bootable: Check this option if the ISO template is Bootable, meaning it can be used to create virtual machines that boot directly from this ISO.
6. Tagging & Pricing :
- One-Time Chargeable: If desired, you can set a one-time charge for using this ISO template. This allows for a single payment model for users who want to deploy VMs using the template.
7. Plan Preview :
-
Upload Template Image: You can upload a preview image representing the template in the marketplace. The image must meet any file size restrictions specified by the system.
-
Click Add Button: After filling out the required fields and uploading the template image, click the Add button to create the ISO template.
8. ISO Template Creation :
-
Once you click Add, the ISO template will be created. The status will be marked as In-progress until the ISO file is successfully added.
-
After that, the ISO template will be available for use within the selected zone.
9. Upload Successfully :
- After several minutes, you will see an download status as download complete in the admin portal.
Edit ISO Template :
In the admin portal, the Edit Action allows administrators to modify existing ISO templates within the marketplace. This feature provides the ability to update the template's configuration, resource allocation, OS settings, and template features, ensuring that the template stays relevant and aligned with user needs or changes in the infrastructure.
1. Navigate to ISO Template :
-
Login into the admin portal.
-
From the portal menu, select the Marketplace icon.
-
Click on the ISO Templates which will lists all available ISO templates that have been uploaded or created in the system.
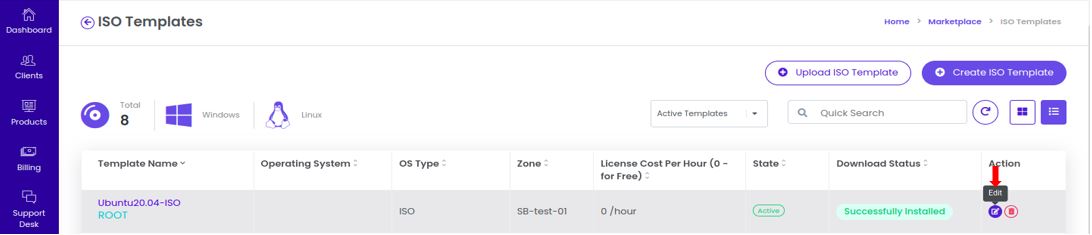
2. Edit Action :
-
Identify the ISO template you want to modify from the list. You can either scroll through the list or use the search filters to locate it quickly.
-
In the Action menu, select the Edit option. This will open the edit template screen, where you can make changes to the ISO template's configurations.
3. Update the ISO Template Details :
In the Edit ISO Template Screen, administrators can update different aspects of the template such as Basic Configuration, Resource Configuration, OS Configuration & Template Featured Options
4. Click Update Button :
After making the necessary changes to any of the sections (basic configuration, resource configuration, OS configuration, or template features), click the Update button to save the changes.
5. Confirmation :
-
Once the updates are submitted, you will receive a confirmation message stating, "ISO Template has been updated successfully."
-
This indicates that the changes were successfully applied and the ISO template is now available with the updated configurations for the users.
Delete ISO Template :
The Delete Action in the admin portal provides a way for administrators to remove existing ISO templates from the marketplace. This action is essential for managing the available templates, ensuring that only relevant and up-to-date options are presented to users.
1. Navigate to ISO Template :
-
Login into the admin portal.
-
From the portal menu, select the Marketplace icon.
-
Click on the ISO Templates which will lists all available ISO templates that have been uploaded or created in the system.
2. Select the ISO Template to Delete :
-
In the ISO Templates list, find the specific template you wish to delete.
-
This can be done by browsing through the list or using the search functionality to locate it quickly.
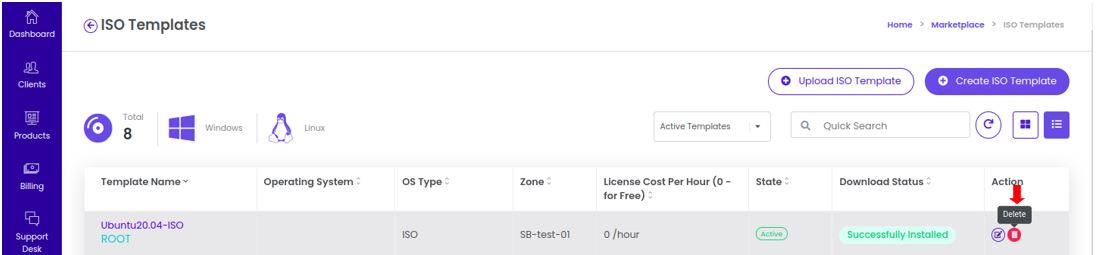
3. Choose the Delete Option :
- From the Action section click the Delete option. This will trigger a confirmation prompt to ensure that the administrator really intends to delete the selected template.
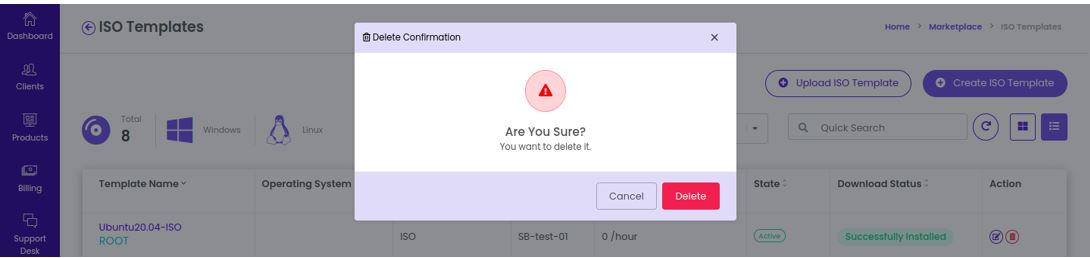
4. Confirm the Deletion :
-
The confirmation popup screen will typically ask for verification before proceeding with the deletion.
-
To proceed with the deletion, click the Delete button on the confirmation prompt. This action confirms your intent to remove the selected ISO template from the system.
5. Completion of Deletion :
- After confirming and clicking the Delete button, the ISO template will be permanently removed from the marketplace.
- Typically, you will receive a notification or confirmation message indicating that the deletion was successful. This message reassures you that the selected ISO template has been deleted from the system.