Compute Instance Offerings
Introduction:
The Compute Offering category is essential in cloud services as it deals with the virtual compute resources that power your applications, workloads, and services. These compute resources are the foundation of cloud infrastructure and are delivered in the form of virtual machines (VMs), instances, and other compute-related components. Here's a detailed breakdown:
1. Virtual Machines (VMs):
- Virtual machines are virtualized instances of physical computers. They emulate real hardware and can run various operating systems and applications.
- VMs are highly flexible and allow users to provision compute power dynamically, making them ideal for running applications, hosting websites, and managing workloads.
- Compute Offerings typically include a selection of VM types tailored for different use cases, such as general-purpose VMs, memory-intensive VMs, or compute-optimized VMs.
2. CPUs and GPUs:
- CPUs (Central Processing Units) are the primary processors that handle general computing tasks, whereas GPUs (Graphics Processing Units) are specialized for handling intensive graphical and parallel computing tasks (e.g., AI/ML workloads).
- A compute offering includes options for selecting the number of CPU cores and the type of CPU (standard or high-performance).
- GPU-powered instances allow users to handle workloads like machine learning, video rendering, scientific simulations, etc.
3. Instances:
- Instances are pre-configured units of virtualized compute resources that include CPU, memory, storage, and network capacity.
- Users can select instances that match their resource needs, allowing for the creation and management of applications or services.
- Compute offerings typically provide predefined instance plans (e.g., small, medium, large) or allow users to customize instances based on their desired CPU, RAM, and storage needs.
4. Predefined Plans:
- Many cloud platforms offer predefined compute plans that package together a set amount of CPU, memory, and storage to simplify the process of deploying VMs or instances.
- These plans cater to various levels of use, such as:
- General-purpose compute plans, suitable for common workloads like web hosting.
- Memory-optimized plans, suited for memory-intensive tasks like database operations.
- Compute-optimized plans, which offer enhanced processing power for CPU-bound tasks like scientific computations or data processing.
5. Customizable Options:
- In addition to predefined plans, compute offerings usually allow for custom configurations, giving users the freedom to allocate the exact amount of resources they need for their specific use case.
- For example, users can select the number of vCPUs (virtual CPUs), amount of RAM, and storage space according to their application’s requirements.
6. Cloud Scalability & Flexibility:
- One of the biggest advantages of cloud compute offerings is their scalability. Resources can be scaled up or down based on workload demands.
- Auto-scaling features may also be available in some compute offerings, automatically increasing or decreasing compute resources based on real-time usage metrics.
7. Deploying and Managing Compute Infrastructure:
- Compute offerings typically include user-friendly dashboards or APIs for provisioning, managing, and monitoring virtual machines and instances.
- Users can manage the lifecycle of their compute resources, such as starting, stopping, rebooting, or deleting VMs and instances.
- The cloud provider handles the underlying physical infrastructure, so users don't have to worry about hardware maintenance or upgrades.
Compute Offering features
The Compute Offer List page in the cloud portal is where you can view, create, and manage various compute plans and offerings available to users. These plans are typically predefined sets of virtual machine configurations or instance types that are ready to be deployed for different workloads. Below is a more detailed breakdown of the process of navigating and understanding the Compute Offer List page:
Steps to Access the Compute Offer List Page:
-
Navigate to the Products Menu:
- To begin, login to the admin portal.
- From the main dashboard, navigate to the Products section. This is where all the product-related configurations and offerings can be managed.
-
Access the Compute/Instance Offerings:
- Within the Products menu, locate and click on Compute / Instance Offerings.
- This will take you to the Compute Offer List page, where all the available compute plans and offerings will be listed.
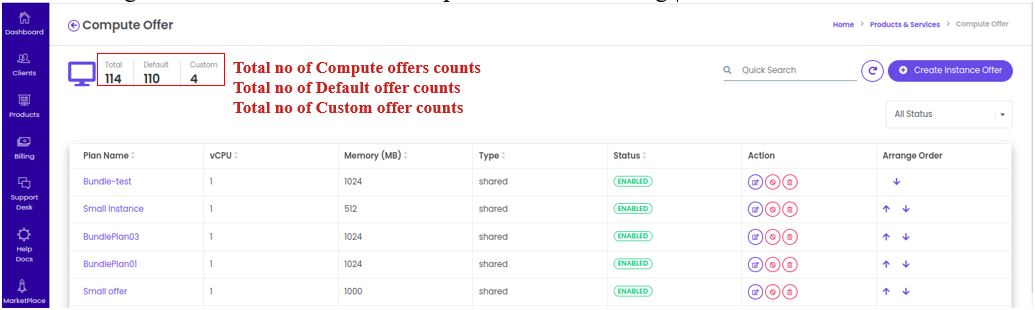
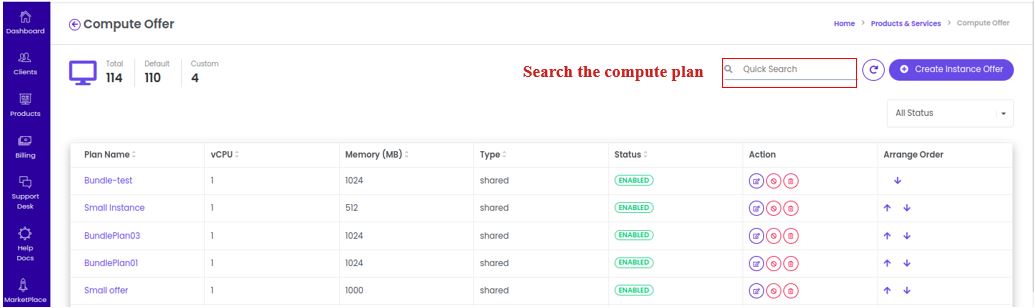
- Search filter for offering:
- If there are numerous offerings in the list, a search filter can be used to quickly locate the necessary items.
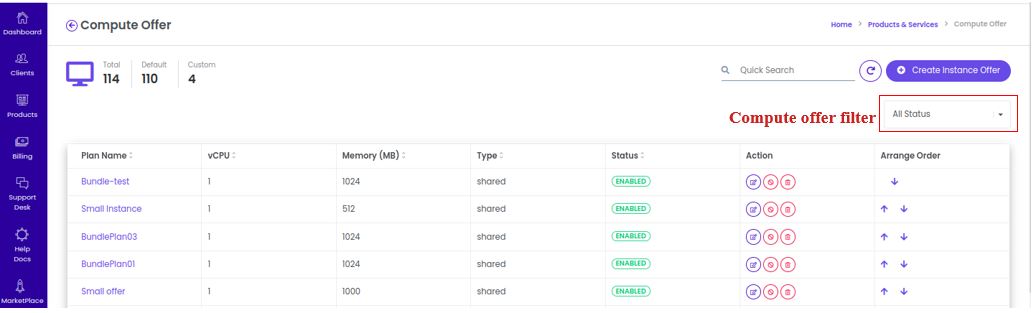
- Offer Filtering:
- Additionally, there is a compute offer filter that allows you to narrow down the list of offerings based on their status, such as enabled or disabled.
Editing a Compute Plan in the Portal
In this section, you are guided on how to edit an existing compute or instance offering within the cloud platform's Compute / Instance Offerings section. This functionality is crucial for administrators who may need to update resource configurations, pricing, or other aspects of existing compute plans based on evolving business or customer needs.
-
Navigate to the Compute / Instance Offerings:
- Start by logging into the admin portal.
- From the dashboard, go to Products in the main navigation menu.
- In the Products section, click on Compute / Instance Offerings. This is where all the available compute plans or instance types will be listed.
-
Select the Compute Plan:
- On the Compute / Instance Offerings page, you will see a list of available compute plans.
- Search for the compute plan you wish to modify. You can either scroll through the list or use any available search or filter options to quickly locate the plan.
-
Click on the Edit Action:
- Once you've identified the compute plan you want to modify, look for an Action button or menu next to the plan. This button typically contains options for managing the selected plan.
- From the Action menu, click the Edit option to open the editing interface for that compute plan.

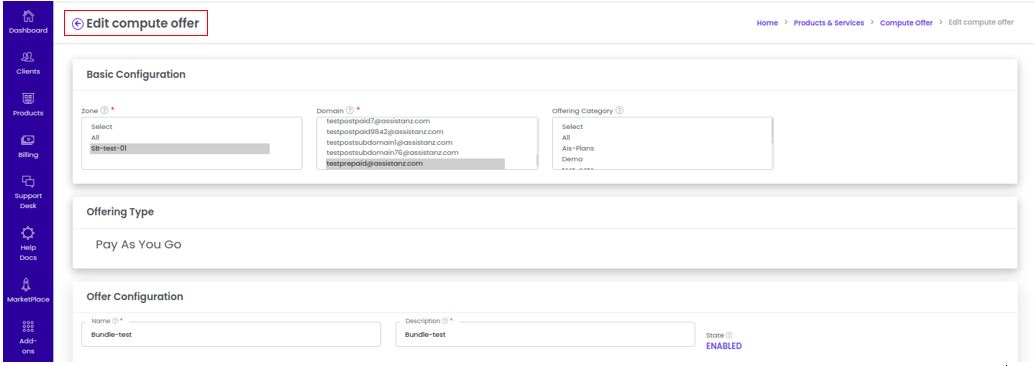
- What You Can Edit in the Compute Plan:
Once you're in the Edit Compute Plan interface, there are several sections you can modify.
-
Zones - Change the zone that this computing offering is supposed to be offered in.
-
Domains - An specific user can also be given the computing offer. The edit option allows you to change this.
-
Offer Name: Update the name of the compute plan if necessary.
-
Offer Description: Modify the description that provides an overview of the compute plan's features and intended use cases.
-
Offer Pricing : The pricing that is currently associated with the compute offering can be modified.
- Save Changes:
-
After you have made all the necessary edits to the compute plan, click the Update button to apply the changes.
-
The portal will validate the inputs and apply the updates to the selected compute plan.
- Confirmation of Update:
- Once the updates have been applied successfully, you should see a confirmation message such as "Selected compute plan has been updated successfully."
- This indicates that the changes have been saved, and the compute plan is now available with the updated configuration and pricing.

Enabling or Disabling a Compute Plan
The process of enabling or disabling a compute plan in your cloud management portal allows you to control which compute plans are actively available for users to select when deploying instances. Disabling a compute plan will prevent it from being used to create new instances, while enabling it will make it available again. This feature is useful for temporarily suspending a compute plan, phasing out deprecated offerings, or enabling new plans when they’re ready for use.
- Select the Compute Plan:
-
On the Compute / Instance Offerings page, locate the compute plan that you wish to enable or disable.
-
You can either scroll through the list of available plans or use any available search/filter options to quickly find the compute plan you're looking for.
- Click on the Enable/Disable Action:
-
Next to the compute plan, there should be an Action button or menu. This contains various management options for the selected compute plan.
-
Click on the Action menu and select the Enable/Disable option, depending on the current state of the plan. If the compute plan is currently enabled, the option will display as Disable, and if the plan is currently disabled, the option will display as Enable.

- Confirm the Action:
-
After selecting the Enable/Disable action, a confirmation prompt will likely appear to prevent accidental changes.
-
Review the confirmation prompt, and if you’re sure, click the Disable or Enable button, depending on the action you are performing.

- Success Confirmation:
-
Once the action is completed, you should see a success message such as "Selected compute plan has been disabled/enabled successfully."
-
This indicates that the compute plan’s status has been updated, and it is now either available or unavailable for use depending on the action taken.

Deleting a Compute Plan
- Select the Compute Plan:
-
On the Compute / Instance Offerings page, locate the compute plan that you wish to enable or disable.
-
You can either scroll through the list of available plans or use any available search/filter options to quickly find the compute plan you're looking for.
- Click on the Delete Action:
-
Next to the selected compute plan, there will be an Action button or menu. This provides several options for managing the compute plan.
-
From the Action menu, click on the Delete option to initiate the deletion process.

- Confirm the Deletion:
-
Once you click on the Delete action, a confirmation prompt will likely appear to ensure that the deletion is intentional.
-
Carefully review the confirmation message, as deleting a compute plan is a permanent action.
-
If you are certain you want to proceed, click the Confirm or Delete button to finalize the deletion.

- Success Confirmation:
-
After the deletion is processed, you will see a success message, such as "Selected compute plan has been deleted successfully."
-
This message indicates that the compute plan has been permanently removed from the system.

Compute Offer Arrangement
The option for arranging the compute plan order list is designed to allow administrators to define the order in which compute plans are displayed to users. This helps you prioritize certain offerings, making it easier for users to find and select the most relevant or popular compute plans based on your preferred arrangement.
Purpose of Arranging the Compute Plan Order List:
When multiple compute plans are available in your cloud management portal, it can be beneficial to arrange them in a specific order, especially if some plans are more commonly used or should be prioritized. The arrangement may influence how users perceive or select plans, such as placing higher-performance or cost-effective plans at the top of the list.
Steps to Arrange the Compute Plan Order List:
-
Log in to the Admin Portal:
- Use your admin credentials to log in to the stackbill portal.
-
Navigate to Compute/Instance Offerings:
- Go to the Products section in the portal.
- Click on Compute / Instance Offerings option.
-
Look for the Arrange/Order Option:
- In the list of compute offerings, there will be an option to arrange or reorder the plans.
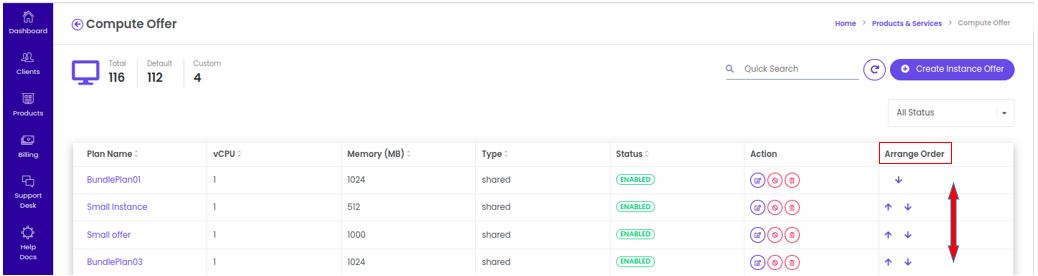
- Rearrange the Compute Plans:
- Use the available tools to adjust the position of each compute plan. For example, if there are three plans:
- Plan A (basic), Plan B (standard), and Plan C (premium).
- You may want to move Plan C to the top if you want users to see the premium plan first, or Plan A might be prioritized if you're encouraging more basic, budget-friendly offerings.
Compute Offer creation
The various compute offer creation types will be explained in this section. We offer three different kinds of offerings on our webpage. They are: Bundle offering, Pay-as-you-go & Reserved offering.
In this part, we will show you the process of creating a Pay-As-You-Go compute plan in the portal, which charges users based on actual usage rather than fixed rates.
Creating a Pay-As-You-Go Compute Plan:
This set of steps outlines the process of creating a Pay-As-You-Go compute plan in the stackbill portal, which charges users based on actual usage rather than fixed rates. Here is a detailed breakdown of each step and its purpose:
1. Navigate to the Compute/Instance Offerings Section:
- Path: Products > Compute / Instance Offerings > Create Instance Offer.
- This step involves logging into the admin portal and going to the section where compute or instance offerings are managed.
- You are about to create a new instance offer that will be available to users.
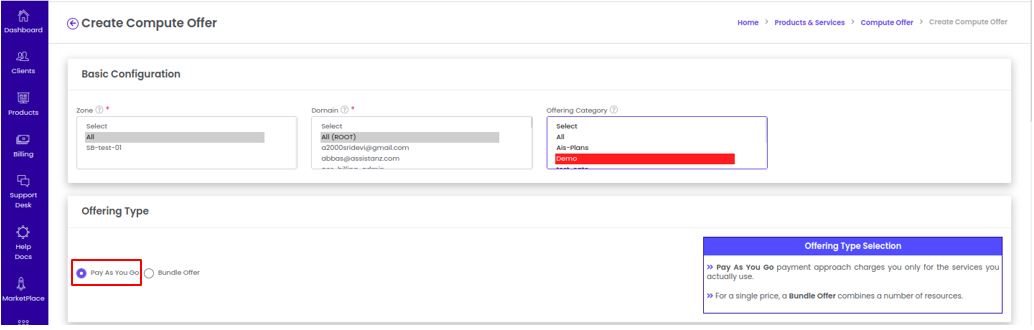
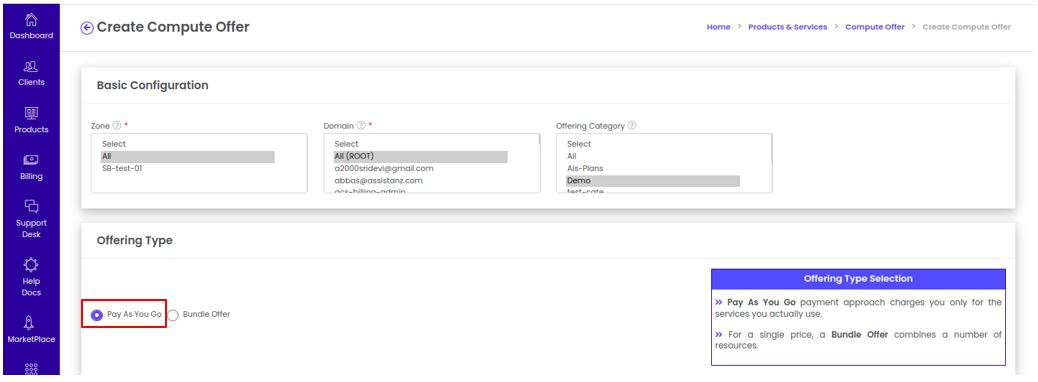
2. Zone Selection:
- Select the zone. You can either choose a specific zone, which limits the offer to that particular geographic location or infrastructure zone (or) select All, which makes the offer available across all zones.
3. Domain Selection:
- Select the domain. You can either choose a specific domain, which limits the offer to that particular domain client group (or) select All, which makes the offer available to all domains.
4. Offering Category Selection:
- Select the offering category. You can either choose a specific offering category, which categorizes the type of service (or) select All, which applies the offering to all categories.
5. Offering Type:
- Select Pay As You Go. Pay-As-You-Go (PAYG) means that users will be billed based on the resources they use, like CPU, memory, or storage, rather than being charged a flat rate. This model is ideal for users who need flexibility and don't want to commit to a fixed resource usage.
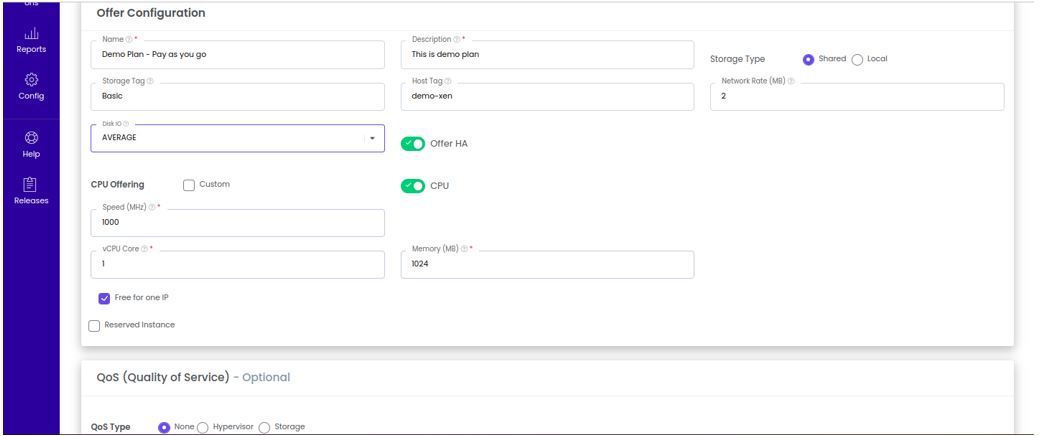
6. Name and Description:
- Enter: The name and description of the compute plan.
7. CPU, vCPU, and Memory Specifications:
- Enter:
- CPU Offering Speed (MHz): Define the speed of the virtual CPU offered.
- vCPU Core: Specify the number of virtual CPU cores allocated for this plan.
- Memory (MB): Specify the amount of memory (RAM) to be allocated, measured in megabytes.
8. Optional Fields:
- The following fields are optional, meaning you can configure them if needed, but they are not mandatory:
- Storage Type: Define the type of storage whether its shared or local type. By default, you can select the shared type.
- Storage Tag: Specify a tag that categorizes storage for easy management.
- Host Tag: Specify a tag to categorize the host for better tracking.
- Network Rate (MB): Define the network bandwidth rate in megabytes.
- Disk IO: Configure disk input/output performance.
- Offer HA (High Availability): Enable or disable high availability for the offering.
- CPU - Decide whether to impose a limit on CPU usage, even when additional capacity is available.
- Free for one IP: Offer free usage for one IP address.
- Reserved Instance: Option to make the instance a reserved instance (pre-paid, fixed usage for a term).
- QOS (Quality of Service) Type: Configure the quality of service for the instance.
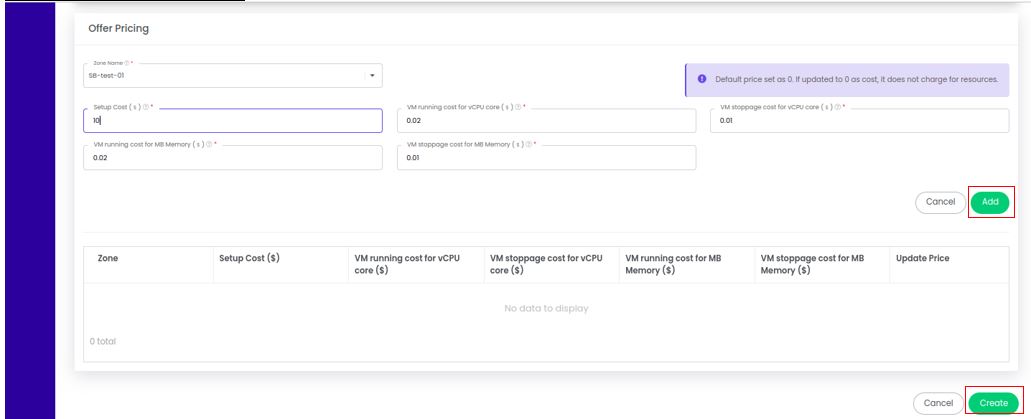
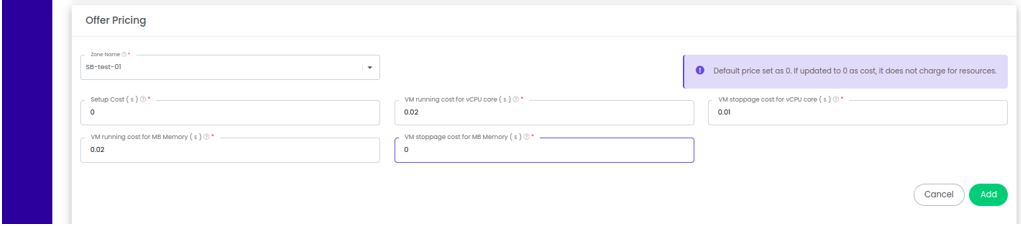
9. Zone, Cost, and Pricing Configuration:
- Select the zone name and enter the following cost details:
- Setup cost: One-time setup fee, if applicable.
- VM Running Cost for vCPU Core: The cost for running the virtual machine based on vCPU usage.
- VM Stoppage Cost for vCPU Core: The cost when the virtual machine is stopped but not terminated.
- VM Running Cost for Memory: The cost for running the virtual machine based on memory usage.
- VM Stoppage Cost for Memory: The cost when the virtual machine is stopped but the memory allocation is not released.
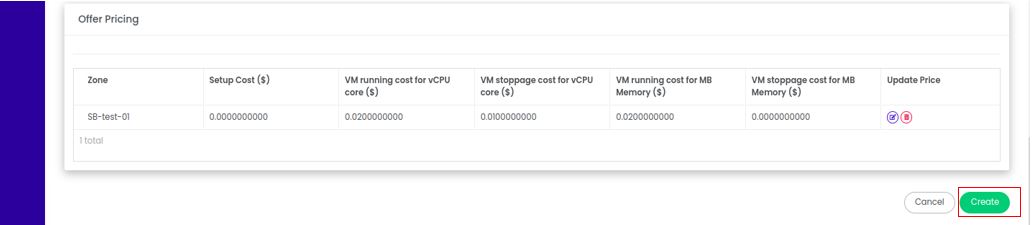
10. Create the Compute Offering:
- Click Add: After entering all the necessary details, click the Add button to proceed.
- Confirmation: Confirm all the entered values to ensure they are correct.
- Click Create: Finally, click the Create button to finalize the creation of the compute offering.
11. Success Message:
- After clicking the create button, a success message will confirm that the new Pay-As-You-Go compute plan has been created successfully.

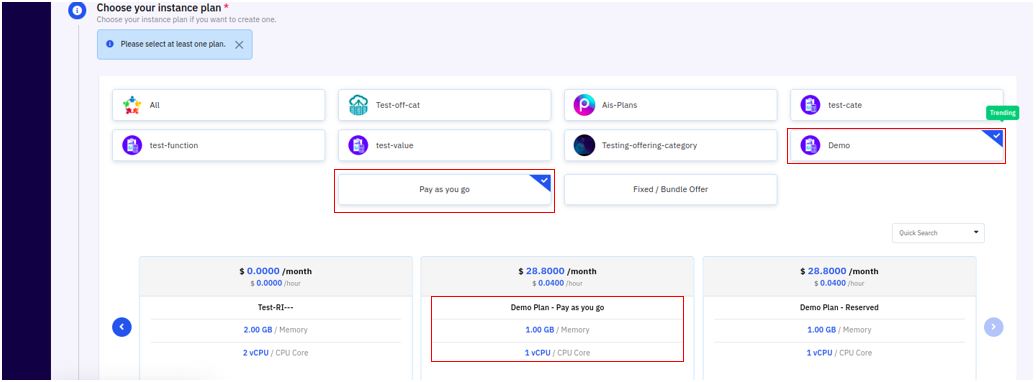
12. User Portal Display:
-
- As seen in the screenshot below, when you create an instance, you will see the offering in the user portal.
Creating a Bundle offer Compute Plan:
In this part, we will show you the process of creating a Bundle offer compute plan in the portal.
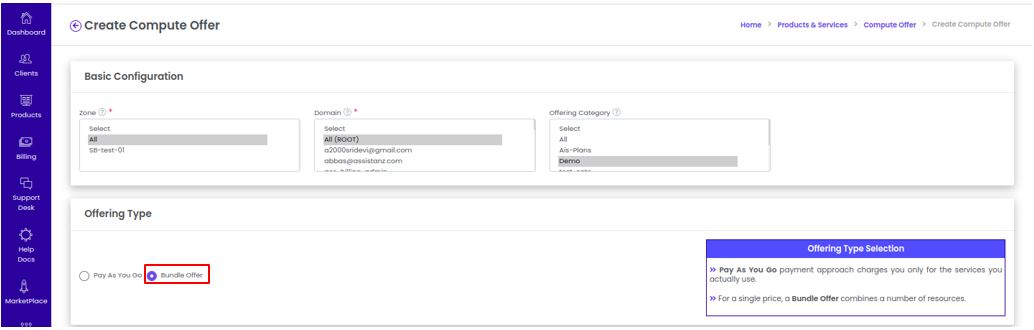
1. Navigate to the Compute/Instance Offerings Section:
Path: Go-to Products > Compute / Instance Offerings > Create Instance Offer.
- This step involves logging into the admin portal and going to the section where compute or instance offerings are managed.
- You are about to create a new instance offer that will be available to users.
2. Select the Zone :
- Choose the specific zone where the resources will be deployed. You can either select a specific zone or choose the "All" option to make the offer available in all zones.
3. Select the Domain:
- Pick the domain to which this offering applies. Similar to the zone, you can either specify a particular domain or select "All" to apply the offer to all domains.
4. Select the Offering Category:
- Choose the category to classify this offering. You can either pick a specific category or select "All" to apply it across all offering categories.
5. Select the Offering Type: Bundle Offer:
-
A Bundle Offer is a type of plan that combines multiple resources (such as CPU, memory, storage, and network) into a single offering with a unified price.
-
Users are charged a single payment for this combined set of resources, rather than paying individually for each component.
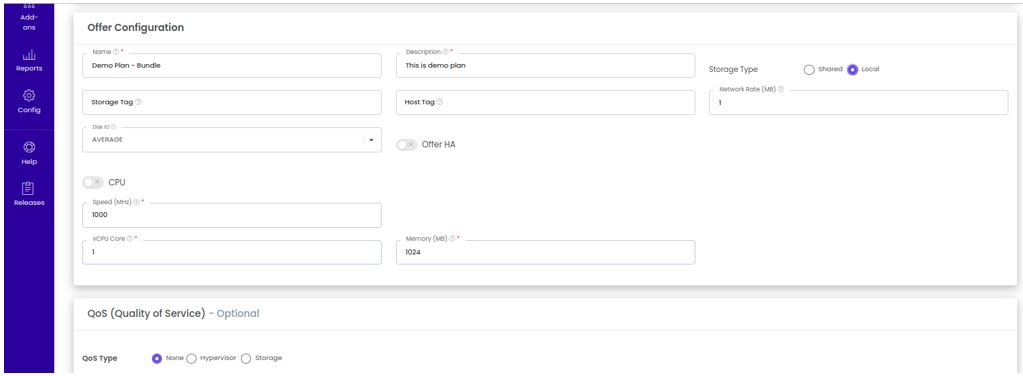
6. Enter Name and Description:
- Provide a unique name and a brief description to identify and describe the bundle offering.
7. Enter the CPU Offering Speed (MHz), vCPU Core, and Memory (MB):
- Define the CPU speed in MHz, the number of virtual CPU cores, and the amount of memory in MB that will be provided as part of the offering.
8. Optional Fields:
-
Storage Type, Storage Tag, Host Tag, Network Rate (MB), Disk IO, Offer HA (High Availability), CPU, and QoS (Quality of Service) type are additional configurations you can include if needed, but these are not mandatory.
-
These options allow you to further refine the offering based on storage, networking, and availability preferences.
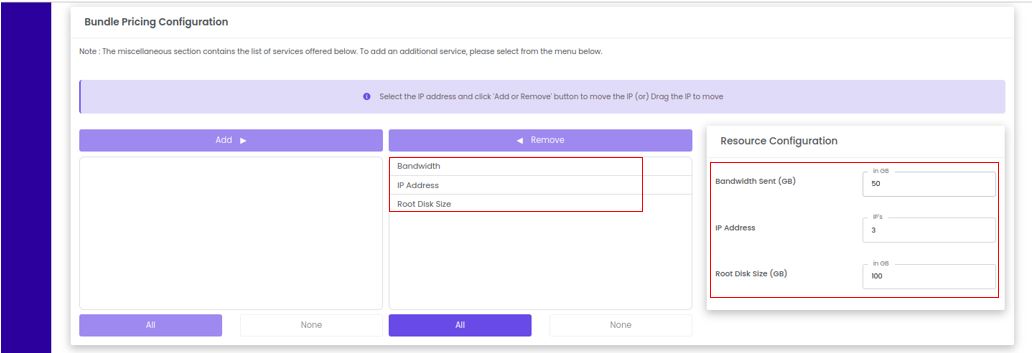
9. Creating Resources within the Bundle Plan:
-
You can bundle together additional resources such as bandwidth, IP addresses, and root disk size into this offer.
-
Add the necessary resources and input their specific configuration values.
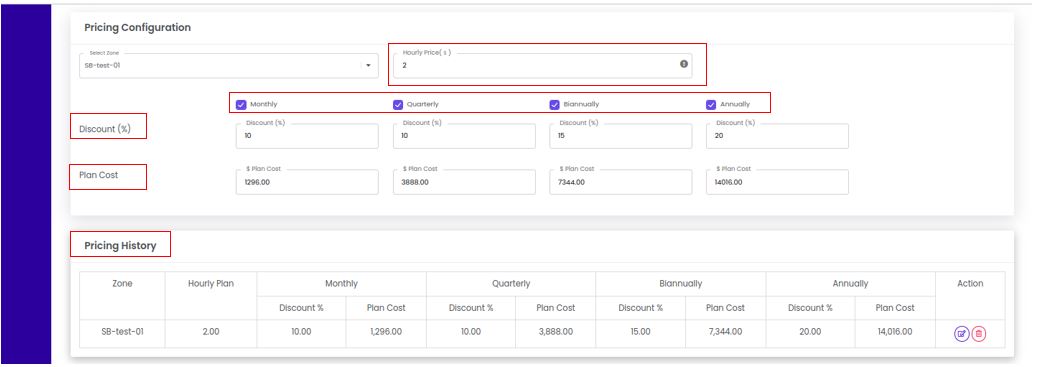
10. Pricing Configuration:
-
Choose the zone from the drop-down list.
-
Set the hourly price for the compute plan.
-
Choose the billing term options such as Monthly, Quarterly, Biannually, or Annually. Ensure you select at least one billing term.
-
If you wish to offer a discount on the bundle, input the discount percentage or amount. The system will automatically adjust the total plan cost to reflect the discounted price.
11. Click Create Button:
- Once you've confirmed everything, click the Create button to finalize the creation of the new bundle-type compute plan.
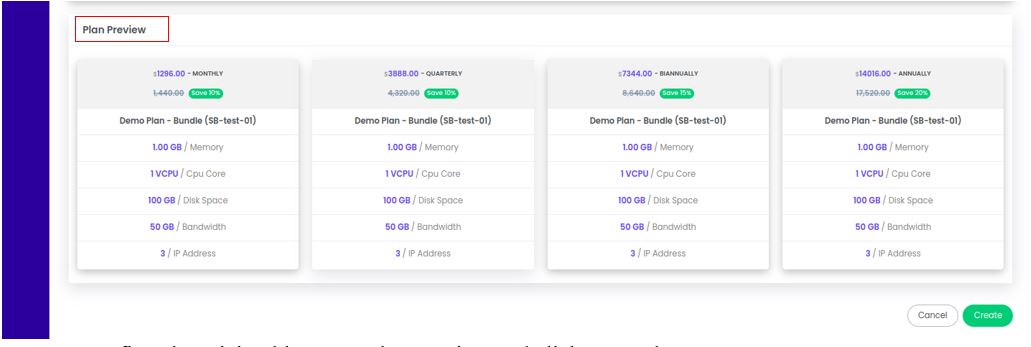
- A new compute plan of the "Bundle Offer" type has now been successfully created, allowing users to purchase a pre-configured set of resources in one unified plan.

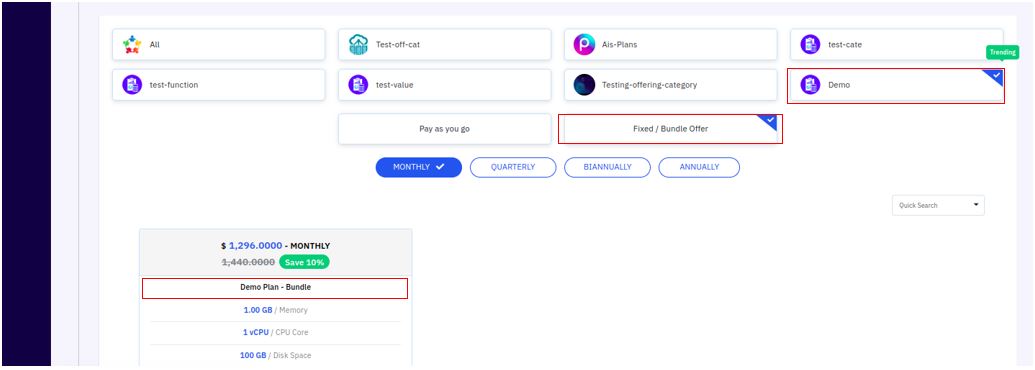
12. User Portal Display:
- As seen in the screenshot below, when you create an instance, you will see the offering in the user portal.
Reserved offering :
In the cloud portal, a Reserved Offering refers to a pricing model where customers commit to using a specific amount of cloud resources over a set period (typically one or more years) in exchange for a discounted rate compared to on-demand pricing. Reserved offerings are beneficial for businesses that have predictable workloads and can commit to a certain level of usage for the long term.
Key Features of Reserved Offering:
Commitment for a Long Term:
-
Unlike Pay-as-you-go models where resources are billed based on actual usage, reserved offerings require the customer to commit to using a certain amount of resources (like virtual machines, CPUs, memory, or storage) for an agreed period (usually 1 to 3 years).
-
This commitment allows customers to take advantage of lower rates, as the cloud provider offers a discount in exchange for the long-term commitment.
-
Discounted Pricing:
- The primary benefit of the reserved offering is the cost savings. Customers typically receive a significant discount compared to on-demand pricing for the same resources because they commit to using the resources over a longer period.
- Discounts may vary depending on the length of the commitment, resource type, and region.
-
Predictable Billing:
- Reserved offerings provide predictable billing, as the customer knows in advance how much they will be charged for the reserved resources over the contract duration. This allows for easier budget planning.
Creating a Reserved offering Compute Plan:
1. Navigate to the Compute/Instance Offerings Section:
- Path: Products > Compute / Instance Offerings > Create Instance Offer.
- This step involves logging into the admin portal and going to the section where compute or instance offerings are managed.
- You are about to create a new instance offer that will be available to users.
2. Zone Selection:
- Select the zone. You can either choose a specific zone, which limits the offer to that particular geographic location or infrastructure zone (or) select All, which makes the offer available across all zones.
3. Domain Selection:
- Select the domain. You can either choose a specific domain, which limits the offer to that particular domain client group (or) select All, which makes the offer available to all domains.
4. Offering Category Selection:
- Select the offering category. You can either choose a specific offering category, which categorizes the type of service (or) select All, which applies the offering to all categories.
5. Offering Type:
- Choose the Offering Type as Pay As You Go (PAYG). In this case, the reserved plan works under the Pay As You Go model but with reserved resources.
- Pay As You Go typically means users are charged based on their actual usage. However, when combined with the Reserved Instance option, the customer reserves resources for a fixed period and makes a single upfront payment for the combined allocated resources.
6. Name and Description:
- Enter: The name and description of the compute plan.
7. CPU, vCPU, and Memory Specifications:
- Enter:
- CPU Offering Speed (MHz): Define the speed of the virtual CPU offered.
- vCPU Core: Specify the number of virtual CPU cores allocated for this plan.
- Memory (MB): Specify the amount of memory (RAM) to be allocated, measured in megabytes.
8. Optional Fields:
- The following fields are optional, meaning you can configure them if needed, but they are not mandatory:
- Storage Type: Define the type of storage whether its shared or local type. By default, you can select the shared type.
- Storage Tag: Specify a tag that categorizes storage for easy management.
- Host Tag: Specify a tag to categorize the host for better tracking.
- Network Rate (MB): Define the network bandwidth rate in megabytes.
- Disk IO: Configure disk input/output performance.
- Offer HA (High Availability): Enable or disable high availability for the offering.
- CPU - Decide whether to impose a limit on CPU usage, even when additional capacity is available.
- Free for one IP: Offer free usage for one IP address.
- Reserved Instance: Option to make the instance a reserved instance (pre-paid, fixed usage for a term).
- QOS (Quality of Service) Type: Configure the quality of service for the instance.
9. Select Reserved Instance Option:
- Enable the Reserved Instance option. This indicates that the plan will be based on a reserved resource model, where the customer commits to a certain resource allocation for a set period.

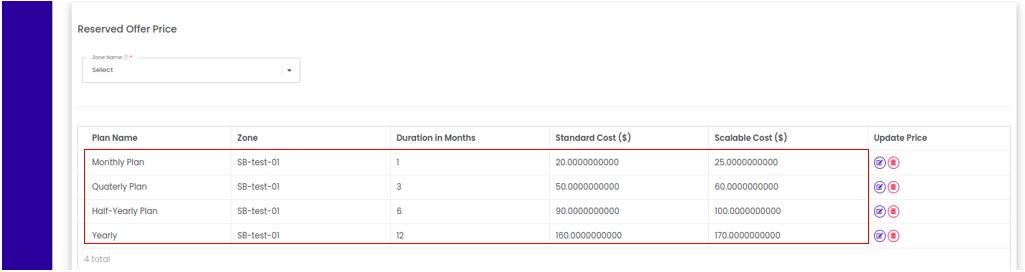
10. Enter Zone and Plan Name:
- Specify the Zone Name again to confirm where the plan will be deployed.
- Provide the Plan Name, which helps to uniquely identify the reserved compute plan.
11. Enter the Duration Value:
- Define the Duration for the reserved offering. This is the length of time the resources will be reserved (e.g., 1 month, 3 months, 12 months).
12. Set Pricing for Reserved Offering:
-
The cloud portal offers two types of pricing for reserved offerings: standard cost and convertible cost. If a user creates a virtual machine using a reserved offering with the standard cost option, they will not be able to resize or modify the VM’s configuration and must continue with the initially selected compute plan. However, with the convertible cost option, users have the flexibility to resize or adjust their compute plan whenever necessary
-
Standard & Scalable Cost: Enter the costs associated with the reserved plan.
-
Click the Add button after entering each pricing detail.

13. Zone, Cost, and Pricing Configuration:
- Select the zone name and enter the following cost details:
-
Setup cost: One-time setup fee, if applicable.
-
VM Running Cost for vCPU Core: The cost for running the virtual machine based on vCPU usage.
-
VM Stoppage Cost for vCPU Core: The cost when the virtual machine is stopped but not terminated.
-
VM Running Cost for Memory: The cost for running the virtual machine based on memory usage.
-
VM Stoppage Cost for Memory: The cost when the virtual machine is stopped but the memory allocation is not released.
-
Click Add: After entering all the necessary details, click the Add button to proceed.
-
Confirmation: Confirm all the entered values to ensure they are correct.
-
14. Verify and Create:
-
Review all the entered details, including the reserved resources, pricing, and configurations.
-
Once you’ve verified that all information is correct, click the Create button to finalize the plan.
15. Success Message:
- Once the reserved type compute plan has been successfully created, you will see a confirmation message indicating that the plan is now available for use in the specified zones and domains.

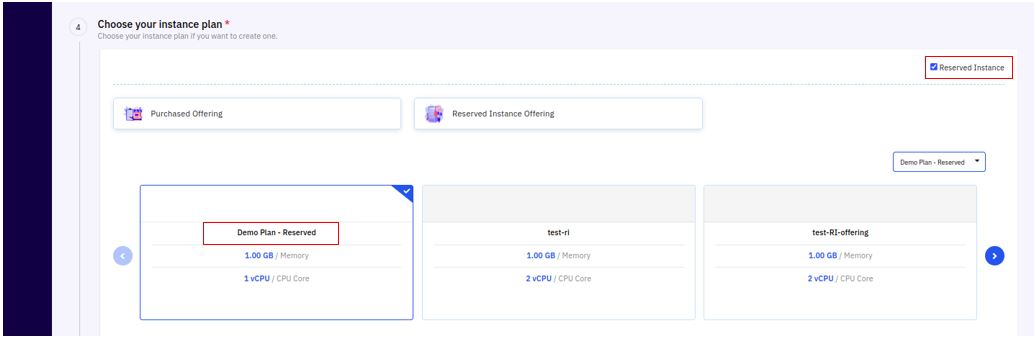
16. User Portal Display:
-
Go to User Portal > Compute > Instance > Add Instance > Advanced Deploy > Select your instance plan
-
As seen in the screenshot below, when you create an instance, you will see the offering in the user portal.