Offering Category
In this section, we will explain the organization and grouping of product offerings into different categories to streamline management and improve the user experience in a cloud services or hosting platform.
This feature allows you to classify and group different products and services into logical categories. Grouping offerings simplifies the process of managing and assigning products to clients and also makes it easier for clients to navigate and select services. There are four types of categories available in the portal. They are: App Marketplace offering, Compute offering, Storage offering and VM grouping
-
App Marketplace offering : This refers to a specific category of product offerings related to an Application Marketplace. This offering allows users to browse and deploy various pre-configured applications and software solutions directly from a marketplace within the platform. The App Marketplace could include a range of applications like CMS (Content Management Systems), developer tools, databases, and more.
-
Compute offering: This category focuses on virtual compute resources, such as virtual machines (VMs), CPUs, GPUs, and instances. It includes predefined plans or customizable options for deploying and managing compute infrastructure in the cloud.
-
Storage offering: This category includes different types of storage solutions such as block storage, object storage, file storage, etc. It provides options for setting pricing and allocation for these storage services based on user needs.
-
VM grouping: VM (Virtual Machine) grouping refers to the ability to categorize VMs under different groups or categories for better organization. It allows users to manage multiple VMs by grouping them based on project, department, workload, or any other criteria. This helps in monitoring, scaling, and billing more efficiently.
Offering category Features
-
Login to the Admin Portal: First, you need to access your admin portal.
-
Go to the "Products" Section:
- On the left-hand side of the dashboard, you will see a menu panel.
- From this panel, locate and click on the "Products" tab. This will redirect you to a list of product-related options.
-
Select "Offering Category":
- Under the "Products" section, there will be an option labeled "Offering Category".
- Click on Offering Category to access the page where you can manage various categories of product offerings.
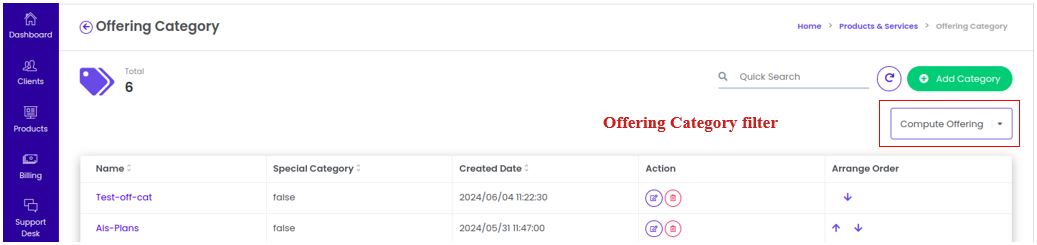
- Under the total column, you can view the total amount of offering categories that are currently available.

- You can use the search filter to narrow down the list and locate the necessary category.
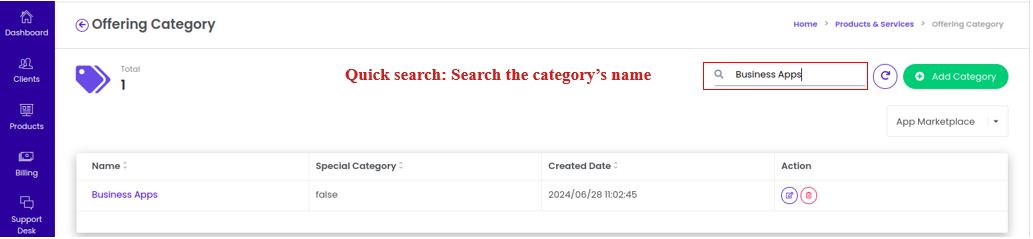
- In addition, the category filter allows you to get a list of every service that falls within the chosen category.
How to create an offering category
-
Login to the Admin Portal: Access your Stackbill admin portal or the relevant dashboard.
-
Go to the Products Section:
- On the left-hand side menu, click on "Products". This will bring up product-related options.
-
Click on Offering Category:
- Within the Products menu, click on the "Offering Category" option. This will take you to the page where existing offering categories are listed.
-
Click on the "Add Category" Button:
- On the Offering Category page, you’ll find an "Add Category" button. Click this button to begin creating a new product offering category.
-
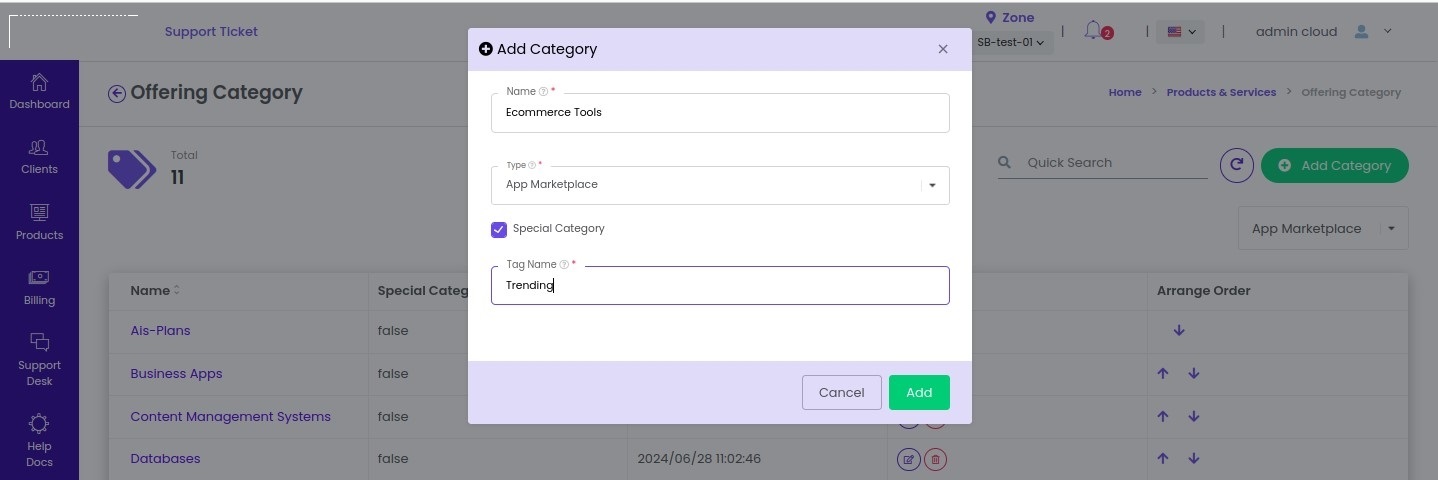
Enter Category Name:
- A form will appear where you need to provide a name for the category you are creating. This should reflect the type of offerings this category will include (e.g., "Compute Offering", "Storage Offering", or "VM Grouping").
-
Select the Category Type:
- There will be a drop-down menu labeled "Type". From this drop-down, select the appropriate type of category. The available options might include:
- App Marketplace: For application-related products.
- Compute Offering: For compute resources such as virtual machines or CPU resources.
- Storage Offering: For cloud storage-related offerings.
- VM Grouping: To categorize virtual machine groups.
- There will be a drop-down menu labeled "Type". From this drop-down, select the appropriate type of category. The available options might include:
-
Using the Special Category Option:
- There will be an optional field labeled "Special Category". This option is used if you want to highlight this category on your portal, meaning it could be more visible or featured in some way to users. This is typically used for promotional or key offerings.
-
Add a Tag Name:
- If you check the Special Category option, you will be required to enter a Tag Name for the category. This tag could be something like "Featured" or "Premium" that will indicate to users that the category has some special status or importance.
-
Finalize the Category:
- After entering all the necessary information (category name, type, and special category tag if applicable), click the "Add" button to finalize the creation of the new category.
-
Completion:
- Once the process is completed, the new category will be added to the list of available offering categories. You can then proceed to assign specific products or services to this category.
- To add the other offering category from the portal, follow the same procedures.
Offering Category Mapping
- After creating the offering category, the next step is to map this category to the services you create within the portal. In this section, we will guide you through the process. There are four types of categories available in the portal: App Marketplace Offering, Compute Offering, Storage Offering, and VM Grouping. We will demonstrate how to map each of these categories using the portal.
Marketplace category Mapping
To map the marketplace category, follow these steps.
-
Navigate to the App Marketplace:
- Log in into the admin portal.
- Go to the "Marketplace" section from the main menu.
- Click on App Marketplace.
-
Create or Select an Existing Marketplace Template:
- If you are creating a new template, click the Create button and enter the necessary details.
- Alternatively, you can choose an existing template from the list if it's already created.
-
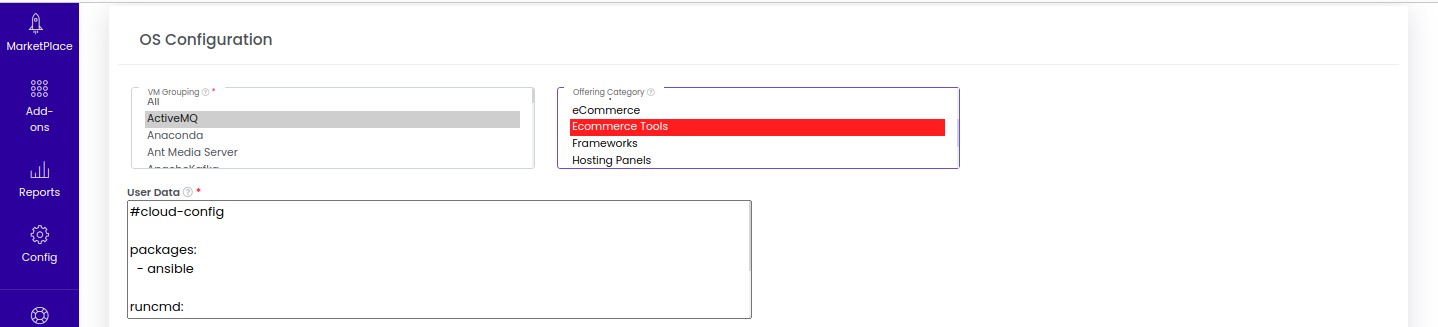
Locate the Offering Category Field:
- Once inside the template (either new or existing), find the Offering Category field within the template settings.
-
Select the Appropriate Category:
-
From the dropdown menu, select the offering category you want to map to this particular Marketplace template.
-
Categories could include options like Compute Offering, Storage Offering, or App Marketplace.
-
-
Save the Changes:
- After selecting the appropriate category, click the Update button to save your changes.
Compute Offering Mapping
- To add the compute offering category to an offering, follow the steps listed below after creating it.
- Navigate to the Compute/Instance Offerings Section:
-
First, log in to the admin portal.
-
From the main menu, click on Products to expand the list of options.
-
Then, select Compute/Instance Offerings from the options available under Products. This section is used to manage the pricing and configurations of different compute resources (like virtual machines).
- Create or Select an Existing Compute Plan:
-
On the Compute/Instance Offerings page, you'll see a list of existing compute plans.
-
To create a new plan, click on the "Add Plan" or "Create New Plan" button.
-
Alternatively, if you're editing an existing plan, simply click on the edit button the desired compute plan from the list.
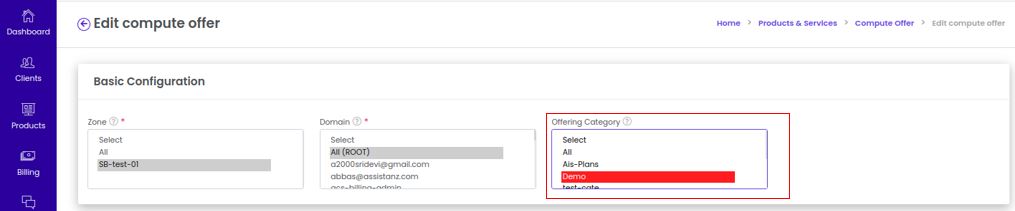
- Go to the Offering Category Field:
- After selecting or creating the compute plan, you will be taken to the configuration page where you can define the details of the compute plan (like its specifications and pricing).
- Look for the "Offering Category" field on this page. This field allows you to assign a compute plan to a specific product category.
- Select the Category:
- In the Offering Category dropdown menu, you will see a list of available categories.
- Choose the appropriate category from the list based on the nature of the compute plan.
- This step is important for organizing and grouping the compute plan under the correct product offering so that it appears in the correct section for users.
- Click the "Update" Button:
-
After assigning the category, scroll to the bottom of the page or find the Update button on the page.
-
Click the Update button to save your changes.
-
The compute plan is now updated with the selected offering category and will be grouped accordingly.
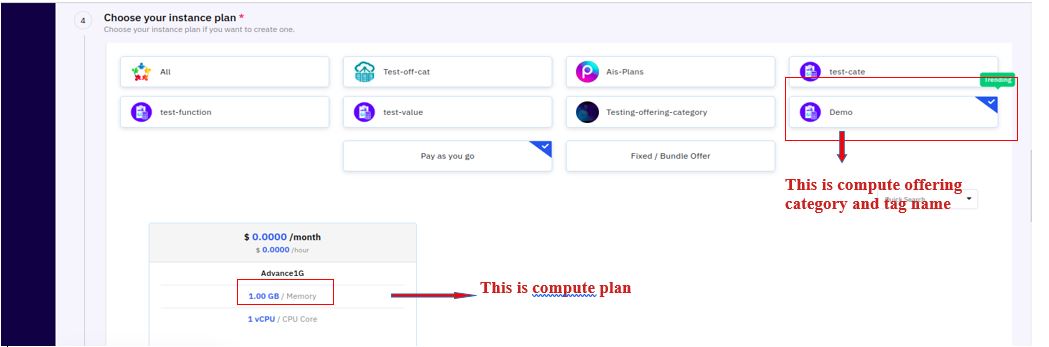
- User Portal Display
- As seen in the screenshot below, when you create an instance, you will see the offering in the user portal.
Storage Offering Mapping
- Navigate to the Storage Offerings Section:
-
First, log in to the admin portal.
-
From the main menu, click on Products to expand the list of options.
-
Then, select Storage Offerings from the options available under Products. This section is used to manage the pricing and configurations of different storage plans.
- Create or Select an Existing Storage Plan:
-
On the Storage Offerings page, you'll see a list of existing compute plans.
-
To create a new plan, click on the "Add Plan" or "Create New Plan" button.
-
Alternatively, if you're editing an existing plan, simply click on the edit button the desired compute plan from the list.
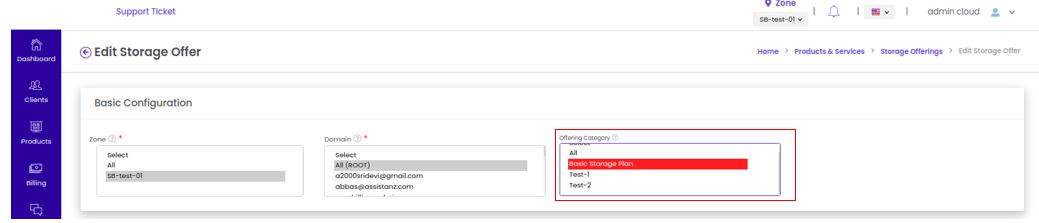
- Go to the Offering Category Field:
- After selecting or creating the storage plan, you will be taken to the configuration page where you can define the details of the storage plan (like its specifications and pricing).
- Look for the "Offering Category" field on this page. This field allows you to assign a compute plan to a specific product category.
- Select the Category:
-
In the Offering Category dropdown menu, you will see a list of available categories.
-
Choose the appropriate category from the list based on the nature of the storage plan.
-
This step is important for organizing and grouping the storage plan under the correct product offering so that it appears in the correct section for users.
- Click the "Update" Button:
-
After assigning the category, scroll to the bottom of the page or find the Update button on the page.
-
Click the Update button to save your changes.
-
The storage plan is now updated with the selected offering category and will be grouped accordingly.
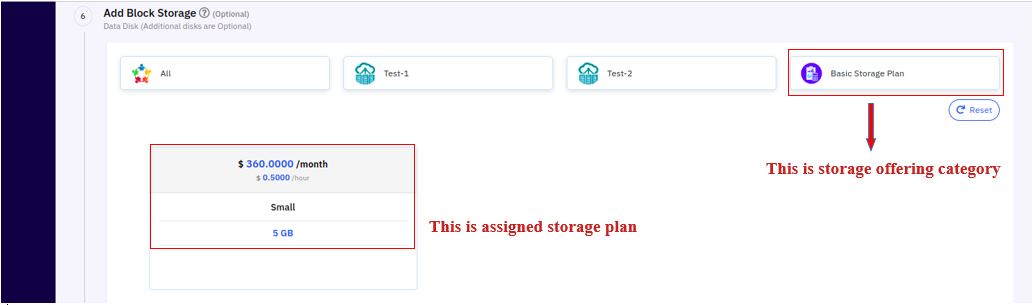
- User Portal Display
- As seen in the screenshot below, when you create an new block storage, you will see the offering in the user portal.
VM Grouping Mapping
-
Navigate to the Offering Category Section:
- Login to the admin portal.
- In the main navigation menu, click on Products.
- From the available options, select Offering Category. This section allows you to manage and configure various product categories.
-
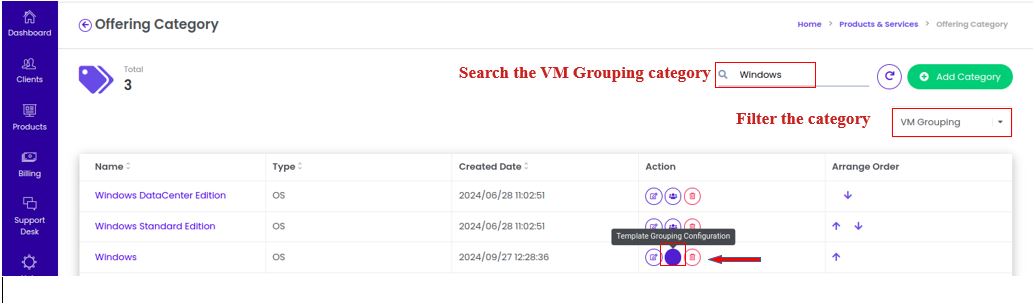
Filter for the "VM Grouping" Category:
- Once you are in the Offering Category section, you will see a list of available categories such as Compute, Storage, App Marketplace, etc.
- To specifically work with the VM Grouping category, use the Filter or Search option to locate categories that fall under VM Grouping.
- Filter the list by selecting the "VM Grouping" type to narrow down the results.
-
Select or Search the Desired Category:
- After filtering, you will see a list of VM Grouping categories.
- You can either select the category directly from the list or search for it using the search bar by entering the category name.
-
Access Template Grouping Configuration:
- After selecting the VM Grouping category, look for the Actions menu next to the category name.
- Under the Actions option
- click on Template Grouping Configuration.
- This will open a configuration screen or pop-up window that allows you to assign templates to the selected grouping.
-
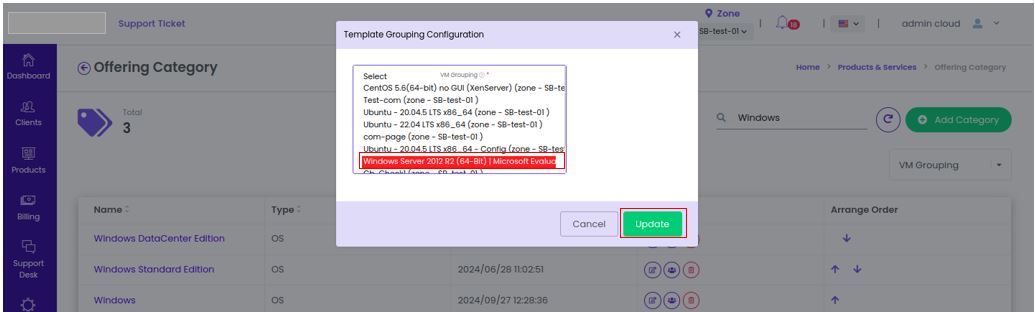
Template Grouping Configuration Pop-Up Screen:
- Once the Template Grouping Configuration pop-up screen opens, you will see a list of available templates.
- The templates refer to the virtual machine configurations or resource templates that you want to group under this category.
-
Select the Template:
- From the list of templates, select the one(s) you want to assign to the selected VM Grouping category.
- You may have the option to select multiple templates depending on your needs.
-
Click the "Update" Button:
- After selecting the appropriate template(s), scroll down and click the Update button.
- This will save your changes, and the selected templates will now be associated with the chosen VM Grouping category.

- User Portal Display
- As seen in the screenshot below, when you create an instance, you will see the offering in the user portal.
