Other Offerings
Introduction
In addition to standard offerings like compute, storage, and networking, the admin portal provides additional services such as IPs, bandwidth, load balancers, and OS templates. These services require customized pricing to ensure accurate billing for customers based on their usage or subscriptions.
Here’s a detailed explanation of how to modify the Other Offerings Cost for any service that is accessible through the admin portal.
Volume Snapshot Pricing:
A volume snapshot is a point-in-time backup of a disk (volume) used in a cloud infrastructure. It allows users to create backups of their volumes, which can later be restored if needed. In the admin portal, you can manage and update pricing for these volume snapshots based on storage consumed (measured in gigabytes) and the time the snapshot exists (typically billed per hour).
1. Navigate to the volume snapshot Section:
-
Login into the admin portal.
-
From the Products section, go to other offerings
-
- Next, choose the Volume Snapshot tab.
2. Select the zone:
- In the cost update screen, start by choosing the zone where this pricing will be available.
3. Add the Snapshot Price:
-
Cost/GB/Hour: In cloud environments, snapshot pricing is typically calculated based on the size of the volume and the time it remains in the system.
-
Cost per GB per hour: This means that the price will depend on the size of the snapshot and how long it is retained. For instance, if a snapshot is 50 GB in size and the cost is $0.001 per GB per hour, the cost for one hour would be $0.05.
- Formula: The cost is calculated by multiplying the volume size (in GB) by the duration it is kept (in hours) and the rate (in cost/GB/hour).
- Example: If a snapshot is 100 GB and it costs $0.002 per GB/hour, and the snapshot exists for 24 hours, the total cost will be:
- 100 GB * 24 hours * $0.002 = $4.80 for 24 hours.
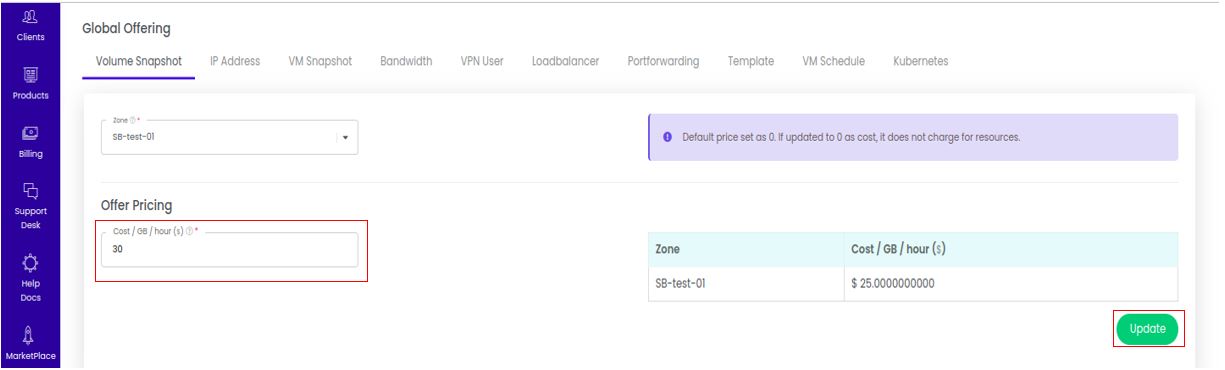
4. Click the Update Button:
- After entering the desired cost per GB per hour for the volume snapshots, you will click the Update button. This applies the new pricing to the selected zone and ensures that the system uses this pricing going forward for any new snapshots created by customers.
5. Cost History :
-
Any changes made to the snapshot pricing will not take effect immediately in the current billing cycle.
-
The newly updated prices will appear in the next month’s invoice. This ensures that customers are billed based on the pricing that was active when they created their snapshots.

- Portal keeps a record of pricing history, so if a customer had created a snapshot before the pricing change, the system uses the old price for the current billing cycle. The new price only applies to snapshots created after the price change, which will show in future invoices.
IP Address Pricing:
In cloud environments, IP addresses (especially public IPs) are a limited resource and typically come with a cost. Cloud providers charge users for the allocation and usage of IP addresses. In the admin portal, administrators can manage and update the pricing for IP addresses based on the time they are in use, calculated on a cost per IP per hour basis.
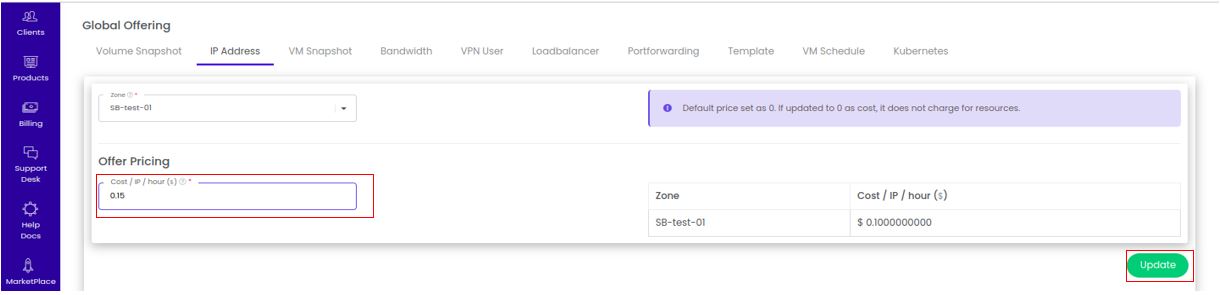
1. Navigate to the IP Address Section:
-
Login into the admin portal.
-
From the Products section, go to other offerings
-
- Next, choose the IP Address tab.
2. Select the zone:
- In the cost update screen, start by choosing the zone where this pricing will be available.
3. Add the IP Address Price:
-
Cost per IP per hour: The charge that will be incurred for every hour an IP address is in use. For example, if an IP address is allocated to a customer for 24 hours and the cost is $0.01 per IP per hour, the total charge will be $0.24 for one day.
-
Formula: The cost is calculated by multiplying the number of hours the IP is allocated by the rate (cost/IP/hour).
-
Example: If an IP address is allocated to a user for 50 hours and the rate is $0.005 per IP/hour, the total cost will be: 50 hours * $0.005 = $0.25 for 50 hours of usage.
4. Click the Update Button:
- Once you have entered the pricing for the IP addresses, you need to click the Update button. This applies the new price for the selected zone, ensuring that the next time an IP is allocated, the updated cost is reflected.
5. Cost History :
-
Any changes made to the IP pricing will not take effect immediately in the current billing cycle.
-
Portal tracks the pricing history for each resource. This ensures that any IP addresses already in use before the price change will continue to be billed at the old rate until they are released.
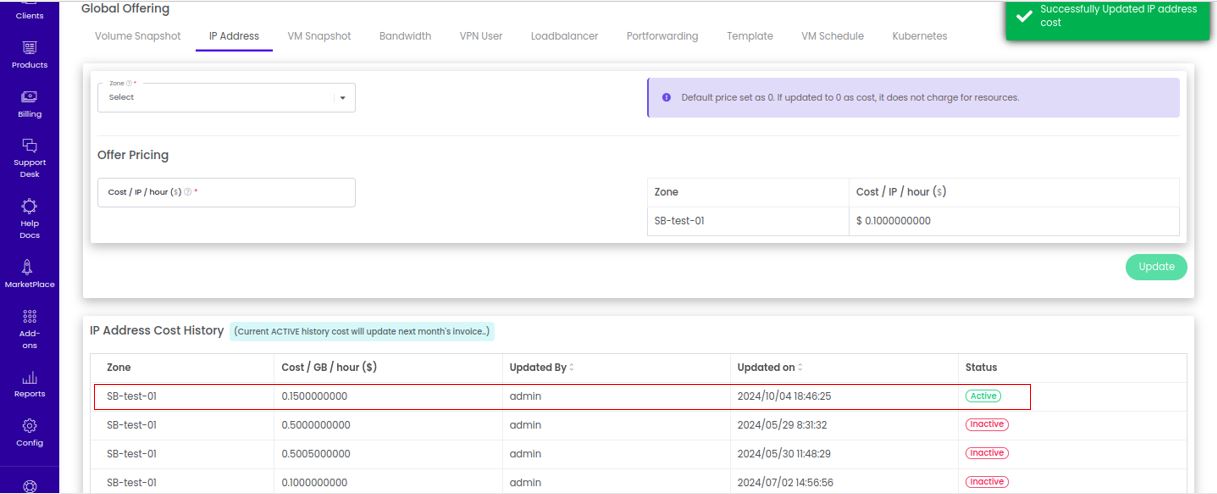
- Any new IP addresses allocated after the price change will be billed at the updated rate in the following invoice cycle. This ensures consistency and transparency in billing, preventing confusion or discrepancies.
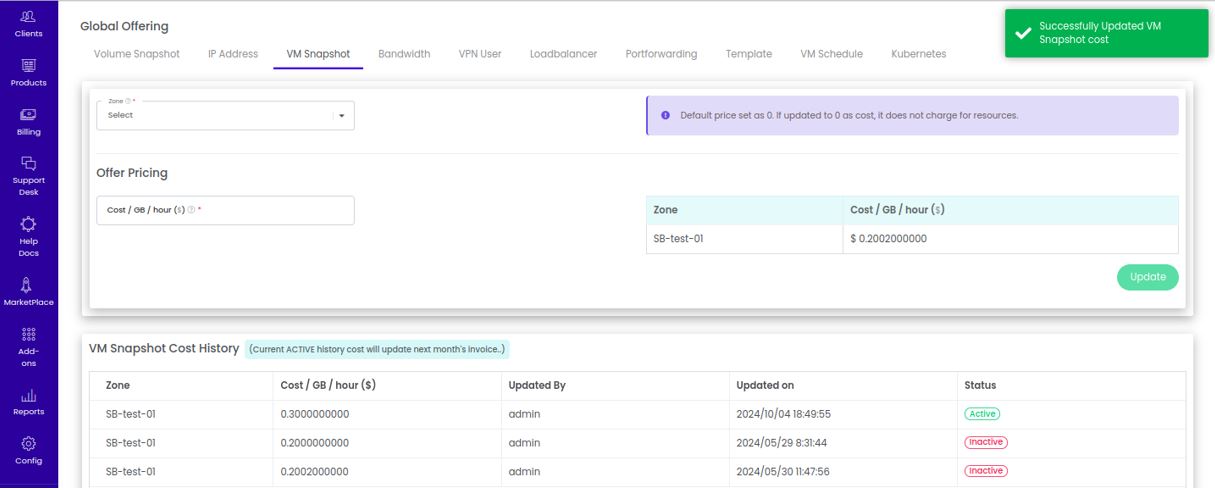
VM Snapshot Pricing
In a cloud environment, VM snapshots are an important feature used for creating point-in-time backups of virtual machines (VMs). This allows users to quickly restore a VM to a previous state in case of failure, data corruption, or any other issue. However, since snapshots consume storage resources, cloud providers usually charge based on the amount of disk space used by these snapshots.
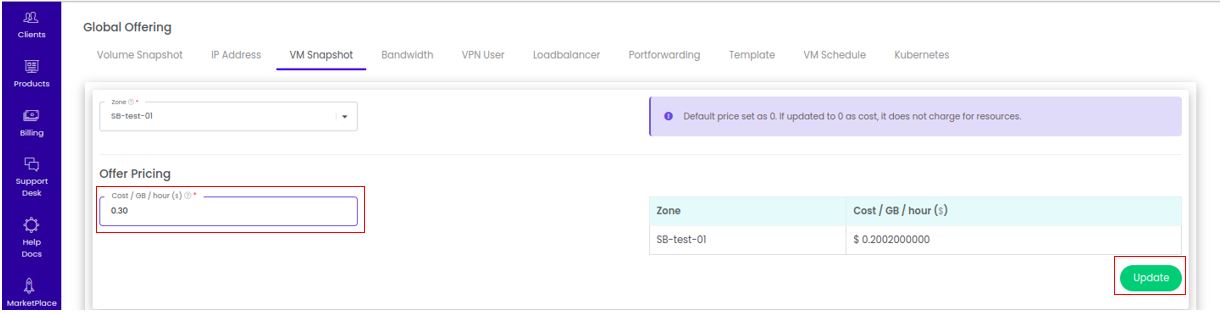
1. Navigate to the VM snapshot Section :
-
Login into the admin portal.
-
From the Products section, go to other offerings
-
Next, choose the VM Snapshot tab.
2. Select the zone :
- In the cost update screen, start by choosing the zone where this pricing will be available.
3. Add the VM Snapshot Price :
-
The pricing for VM snapshots is typically determined by the amount of storage space they consume and the time they remain active. The price is charged based on the cost per gigabyte (GB) per hour.
-
The total cost is calculated by multiplying the amount of disk space used by the snapshot (in GB) by the rate and the duration (in hours) the snapshot is kept. This is particularly important for users who take large snapshots or store them for long periods of time.
-
Example Calculation: If a snapshot consumes 50 GB of disk space and the cost is $0.002/GB/hour, the total cost for 24 hours would be:
- 50 GB * $0.002/GB/hour * 24 hours = $2.40.
-
This cost will accumulate for as long as the snapshot is stored.
4. Click the Update Button :
-
After entering the snapshot price, click the Update button to save and apply the new pricing structure.
-
This will make sure that any future snapshots created by users will be charged according to the updated price.
5. Cost History :
-
It’s important to note that changes in snapshot pricing won’t affect the current month’s bill but will be reflected in the next month’s invoice. This gives users clarity and avoids surprise charges during the current billing cycle.
-
The portal keeps track of all pricing changes under a pricing history feature. If snapshots are created before the price change, they will continue to be billed at the old rate until they are deleted. The updated price will apply to new snapshots created after the price change.
- The history log ensures transparency, helping you understand when price changes were made and how they impact customers' bills.
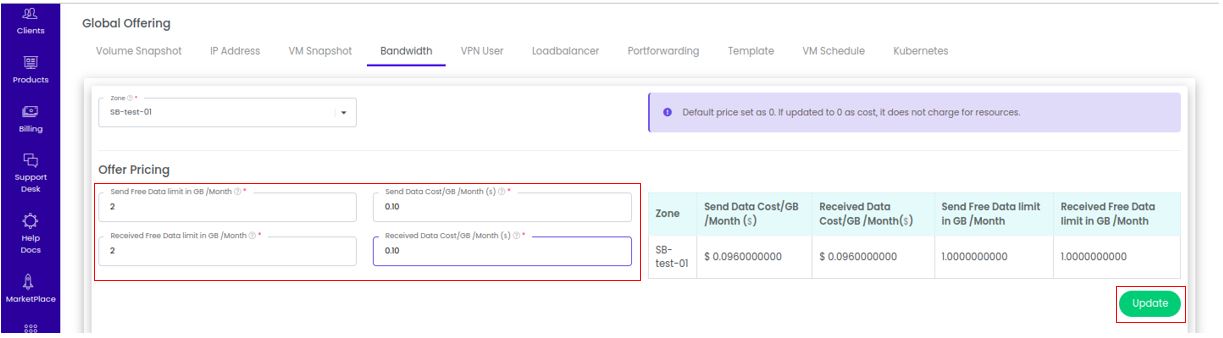
Bandwidth Pricing
In the cloud services, bandwidth refers to the amount of data transmitted to and from virtual resources (such as instances) over the network. Cloud providers often charge based on the amount of data sent (outbound) or received (inbound) by a virtual machine (VM) or other services. Managing bandwidth costs is important for both cloud providers and customers to ensure fair usage and billing transparency.
In the admin portal, bandwidth pricing can be configured based on various parameters, such as the free data limit (both for sending and receiving) and the cost per GB for data transferred beyond the free limit.
1. Navigate to the bandwidth Section :
-
Login into the admin portal.
-
From the Products section, go to other offerings
-
Next, choose the Bandwidth tab.
2. Select the zone :
- In the cost update screen, start by choosing the zone where this pricing will be available.
3. Set Free Data Limits:
-
Send Free Data Limit (GB/Month): This field lets you specify the maximum amount of outbound data (sent from the VM to the internet) that users can transfer for free each month. If users exceed this limit, they will be charged based on the price per GB.
-
Received Free Data Limit (GB/Month): Similarly, this field lets you specify the maximum amount of inbound data (received by the VM from the internet) that users can transfer for free each month. Any data received beyond this limit will incur charges based on the rate set for received data.
4. Add Price for Data Transfer :
-
Send Data Cost/GB/Month: After setting the free data limit, you need to define the price users will be charged for send data that exceeds the free limit. The cost is calculated per gigabyte (GB) of data transferred each month.
-
Example: If the free data limit is set to 100 GB and the user sends 150 GB of data in one month, the additional 50 GB will be charged based on the set rate (e.g., $0.10/GB).
50 GB * $0.10/GB = $5.00 additional cost for outbound data.
-
Received Data Cost/GB/Month: Similarly, you need to define the price for received data (data received by the VM) that exceeds the free limit.
Example: If the free data limit for receiving is 50 GB and the user receives 70 GB of data in one month, the additional 20 GB will be charged based on the set rate (e.g., $0.08/GB).
20 GB * $0.08/GB = $1.60 additional cost for inbound data.
4. Click the Update Button:
-
Once you’ve configured the free data limits and the prices for sending and receiving data, click the Update button to save and apply the new pricing structure.
-
This ensures that future bandwidth usage will be billed according to the updated rates.
5. Cost History :
-
Similar to other pricing updates in the admin portal changes in bandwidth pricing won’t affect the current month’s bill. Instead, they will be reflected in the next month’s invoice.
-
This gives users transparency and prevents unexpected charges during the current billing cycle.
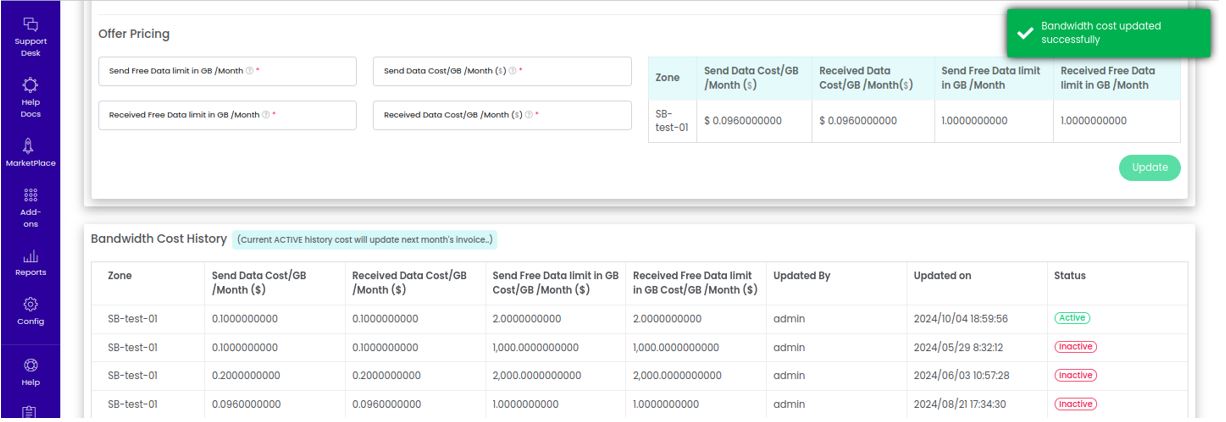
- The pricing history feature allows you to track changes in bandwidth pricing over time. If a pricing change is made, the old rate will continue to apply to the current billing cycle, and the new rate will only take effect in the next cycle.
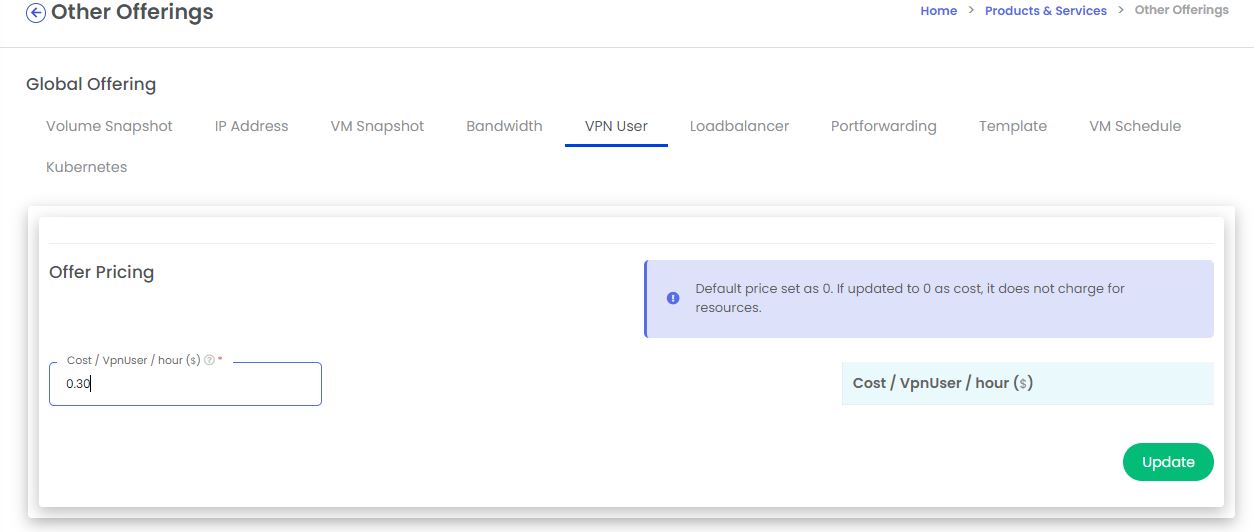
VPN User
In the admin portal, VPN (Virtual Private Network) users represent individuals or entities that can securely access the cloud infrastructure over the internet through a VPN connection. VPN services are commonly used in cloud environments to ensure secure, encrypted communication between a user's device and cloud resources, such as virtual machines (VMs), databases, or applications.
To manage VPN usage and charge users for the resources they consume, the VPN User Pricing option allows cloud administrators to define the cost associated with each active VPN user on a per-hour basis. This ensures that users are charged based on the amount of time they utilize the VPN service.
1. Navigate to the VPN user Section :
-
Login into the admin portal.
-
From the Products section, go to other offerings
-
Next, choose the VPN user tab.
2. Add Price for VPN Users :
Per User/Hour Pricing: In this step, you need to define the price that will be charged for each active VPN user on an hourly basis.
-
Example: If the cost per VPN user is set at $0.02/hour, and a user remains connected to the VPN for 10 hours, the total cost for that user would be:
- 10 hours * $0.02/hour = $0.20 for VPN usage.
-
This pricing structure ensures that users pay only for the time they are actively using the VPN service, rather than being charged a flat fee for the entire day or month.
3. Click the Update Button :
- Once you've entered the pricing details (cost per user per hour), click the Update button to save and apply the changes.
- This will ensure that future VPN user sessions will be billed according to the newly defined rates.
4. Cost History :
-
Similar to other pricing updates in the admin portal, any changes to the VPN user pricing will not affect the current month’s billing. Instead, the new rates will take effect starting from the next billing cycle.
-
The portal maintains a pricing history that records all changes to service costs over time. If you update the VPN user pricing, the previous rate will remain active for the current month, and the new rate will only apply from the next month onward. This ensures billing transparency and prevents unexpected charges during the current billing period.
Load Balancer
In the admin portal, load balancers are essential components of cloud infrastructure, designed to distribute incoming network traffic across multiple servers (or) VM's. This helps ensure that no single server is overwhelmed by traffic, thereby improving performance, availability, and reliability. Load balancers are critical for managing high-demand applications and ensuring consistent service.
The Load Balancer Pricing feature allows cloud administrators to set a cost for using load balancers on an hourly basis. This ensures that users are charged based on the duration of time their load balancer is active in the cloud environment.
1. Navigate to the Load balancer Section :
-
Login into the admin portal.
-
From the Products section, go to other offerings
-
Next, choose the Load balancer tab.
2. Select the zone :
- In the cost update screen, start by choosing the zone where this pricing will be available.
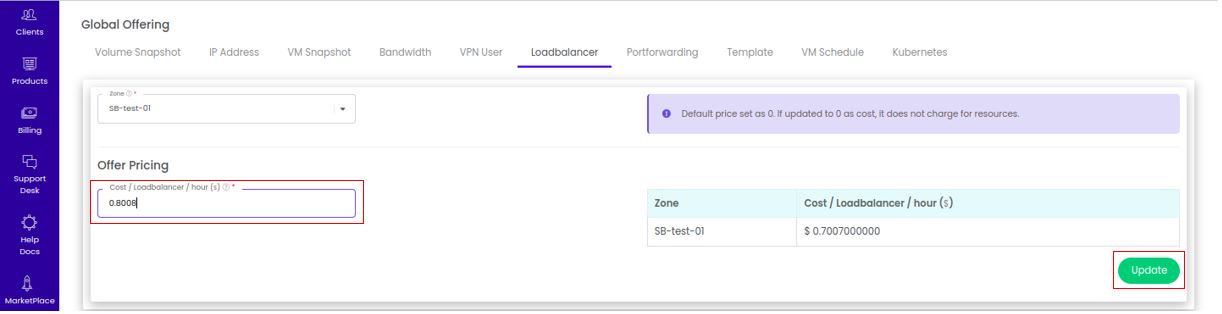
3. Add the Load balancer Price :
-
Hourly Pricing: Here, you define the cost that will be charged for using a load balancer on an hourly basis. This pricing model charges users based on how long their load balancer is active.
-
Example: If the cost per load balancer is set to $0.05/hour, and a user has a load balancer running for 20 hours, the total cost would be:
- 20 hours * $0.05/hour = $1.00 for load balancer usage.
-
This method ensures users only pay for the time they actively use the load balancer, making the cost proportional to their resource utilization.
4. Click the Update Button :
-
After entering the hourly price for the load balancer, click the Update button to save the changes.
-
Once updated, any new or ongoing load balancer instances will be billed according to the newly defined rates.
5. Cost History :
- Changes to load balancer pricing will take effect in the next billing cycle. The current month's billing will not be affected by pricing changes, as the Active History feature ensures that the new rate only applies starting from the following month. This provides users with consistent and predictable billing.

- The admin portal maintains a pricing history for all services. When a new price is set, the portal records it in the Active History section. This ensures that users can view past pricing changes, and that the new price will only take effect in the subsequent billing period.
Port Forwarding
In the admin portal, port forwarding is a feature that allows users to direct traffic from a specific public IP address and port to an internal private IP address and port within the cloud environment. This is crucial for enabling external access to services running on virtual machines or other cloud resources that would otherwise be isolated behind a firewall.
The Port Forwarding Pricing option allows cloud administrators to set a cost for using port forwarding on an hourly basis. This ensures that users who configure port forwarding rules are charged based on the duration of time the forwarding rule is active in the cloud infrastructure.
1. Navigate to the Port Forwarding Section :
-
Login into the admin portal.
-
From the Products section, go to other offerings
-
Next, choose the Port Forwarding tab.
2. Select the zone :
- In the cost update screen, start by choosing the zone where this pricing will be available.
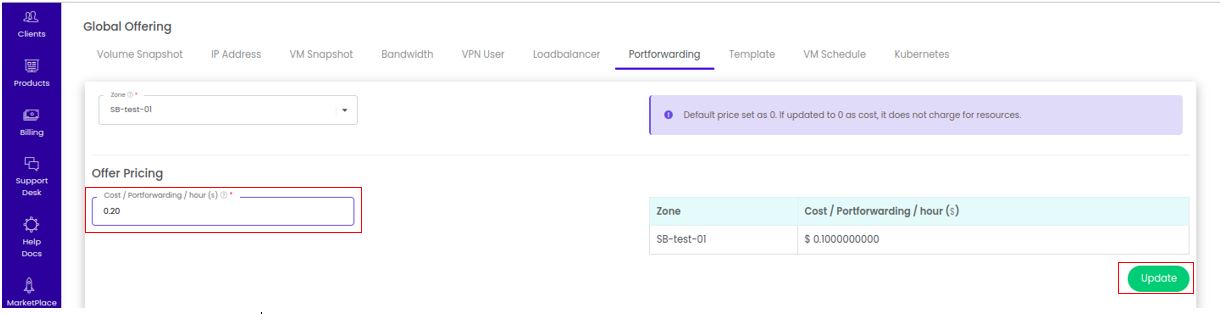
3. Add Price for Port Forwarding :
-
The pricing is based on how long the port forwarding rule is active.
-
Example: If the cost per port forwarding is set to $0.01/hour, and a user enables port forwarding for 100 hours, the total cost would be:
- 100 hours * $0.01/hour = $1.00 for port forwarding usage.
4. Click the Update Button :
- After entering the hourly price for port forwarding, click the Update button to save the changes. This will apply the new pricing for the selected zone.
5. Cost History :
- Pricing changes will not affect the current billing cycle but will take effect in the next month's invoice. This means any changes made to port forwarding costs will only reflect in the future, ensuring users are billed consistently for the current month.
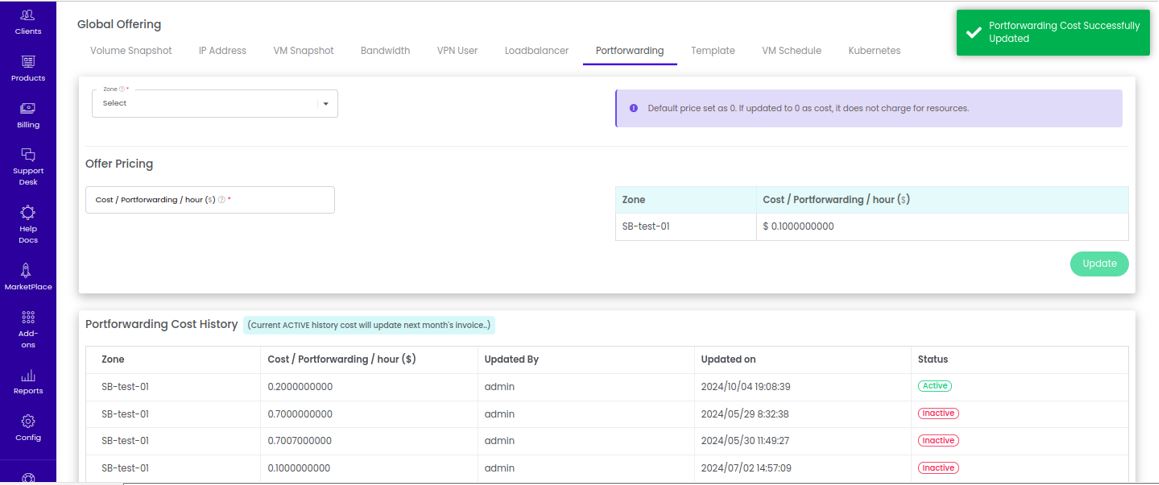
- The Active History feature ensures that changes in pricing are recorded and applied correctly. The updated price is documented in the portal’s history, allowing users and administrators to see the exact date when the pricing change occurred.
Templates
In the admin portal, cloud administrators can define pricing for different types of templates that users can deploy within their cloud infrastructure. Templates provide pre-configured environments, operating systems, or application stacks that users can use to quickly launch virtual machines or Kubernetes clusters. Each type of template incurs a cost based on the resources consumed, such as storage (GB) per hour. This ensures that users are charged for the storage they use while utilizing these templates.
1. Navigate to the Templates Section :
-
Login into the admin portal.
-
From the Products section, go to other offerings
-
Next, choose the Templates tab.
2. Select the zone :
- In the cost update screen, start by choosing the zone where this pricing will be available.
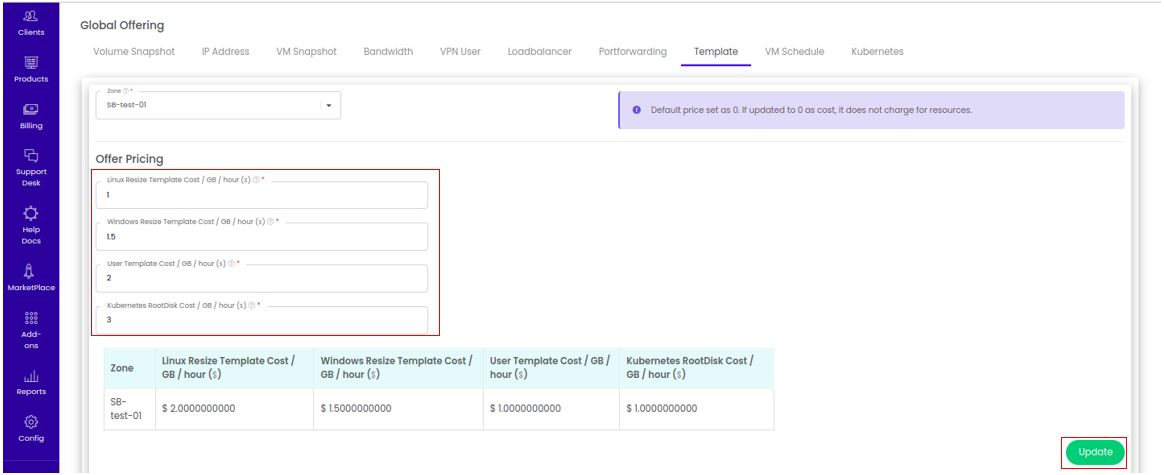
3. Add Price for Different Template Types :
-
you'll configure pricing for different types of templates based on storage consumption (in GB/hour). Each template type may serve different use cases within the cloud.
-
The price that customers will pay is determined on the amount of storage used (in GB) and is computed hourly.
4. Click the Update Button :
-
Once you have entered the appropriate pricing for each template type (Linux, Windows, User, and Kubernetes), click the Update button to save the changes.
-
This will apply the new pricing structure for the selected zone.
5. Cost History :
- As with other cost updates, changes to the template pricing will not affect the current billing cycle but will be reflected in the next month's invoice. This ensures consistency for the ongoing billing cycle and prevents any sudden price changes affecting current charges.
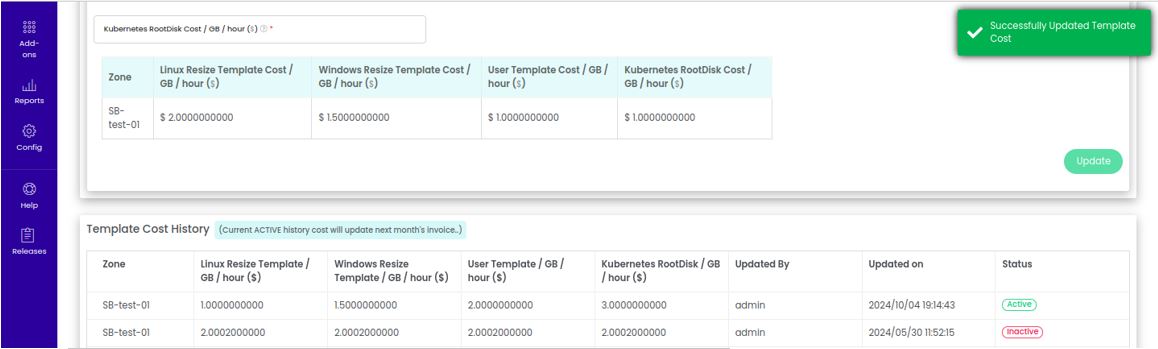
- The Active History feature allows users and administrators to track changes in pricing over time. When you update the template pricing, the system records this change in the pricing history, showing when the new cost was implemented. This ensures full transparency and allows users to see how and when pricing updates occur.
VM Schedule
The VM Schedule feature in the admin portal allows cloud administrators to configure pricing for scheduling virtual machine (VM) operations. This feature ensures that users are charged for scheduling automated actions like VM starts, stops, or snapshots at specific times. By setting a price for each scheduled operation, the cloud provider can monetize the convenience of automating VM management tasks.
1. Navigate to the VM Schedule Section :
-
Login into the admin portal.
-
From the Products section, go to other offerings
-
Next, choose the VM Schedule tab.
2. Select the zone :
- In the cost update screen, start by choosing the zone where this pricing will be available.
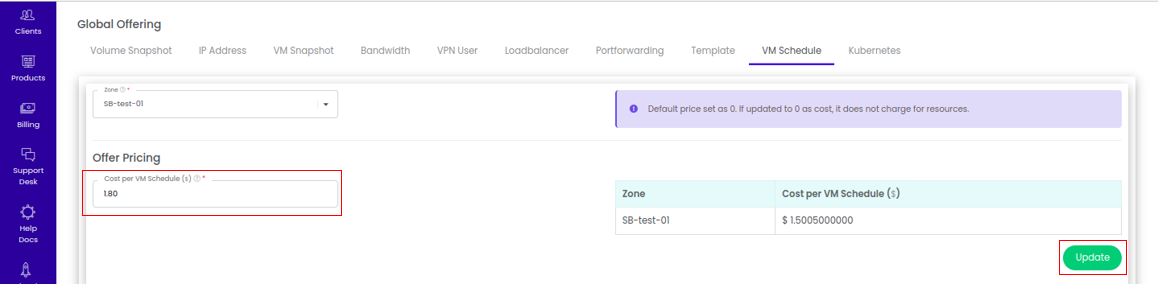
3. Add Price for VM Schedule :
Cost per Schedule: This field allows you to set the price for every VM scheduling operation that the user creates.
4. Click the Update Button:
- Once you have entered the appropriate pricing for scheduling operations, click the Update button to save the changes. This will apply the new cost structure for VM schedules in the selected zone. Any schedules created after the update will be billed according to the newly defined rate.
5. Cost History :
- The updated VM schedule pricing will not impact the current billing cycle. Instead, it will take effect in the next month's invoice. This approach ensures that changes made mid-cycle don’t disrupt ongoing charges or create confusion for users.
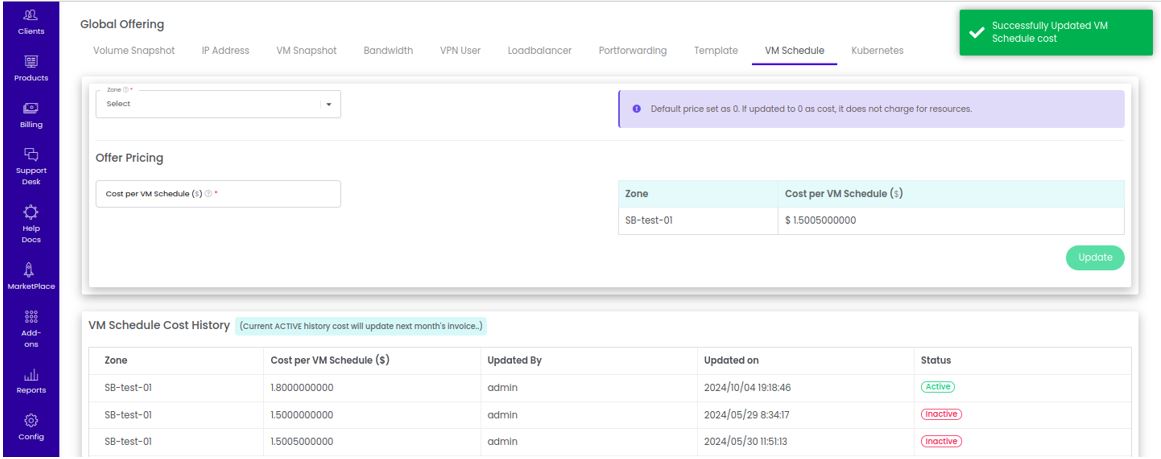
- The system records changes in pricing within the Active History log, allowing users and administrators to view past updates and when the new prices were implemented. This ensures full transparency and provides a reference point for pricing updates.
Kubernetes
In the Kubernetes section of the admin portal, administrators can configure the pricing for different versions of Kubernetes clusters that users deploy. This pricing is set per hour, reflecting the cost of running Kubernetes clusters in a particular zone. Kubernetes clusters allow users to manage containerized applications efficiently, and the associated costs ensure that users pay for the resources required to maintain these clusters.
1. Navigate to the Kubernetes Section :
-
Login into the admin portal.
-
From the Products section, go to other offerings
-
Next, choose the Kubernetes tab.
2. Select the zone :
- In the cost update screen, start by choosing the zone where this pricing will be available.
3. Add Price for Kubernetes :
Cost per Version per Hour: This refers to the price charged for using a specific Kubernetes version per hour. Different Kubernetes versions may have different features, stability levels, or security updates, which may affect pricing. The pricing here is configured based on the Kubernetes version that users choose to deploy in their clusters.
4. Click the Update Button :
- After setting the price for the Kubernetes version per hour, click the Update button to save the changes.
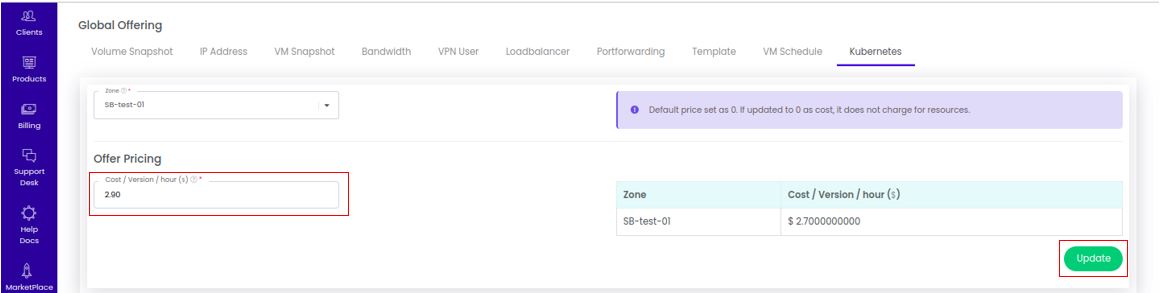
- This applies the updated pricing for the selected Kubernetes version across the chosen zone.
5. Cost History :
- The new pricing will not affect the current month's billing cycle. Instead, it will take effect from the next month's invoice, ensuring that users are not surprised by mid-cycle pricing changes.
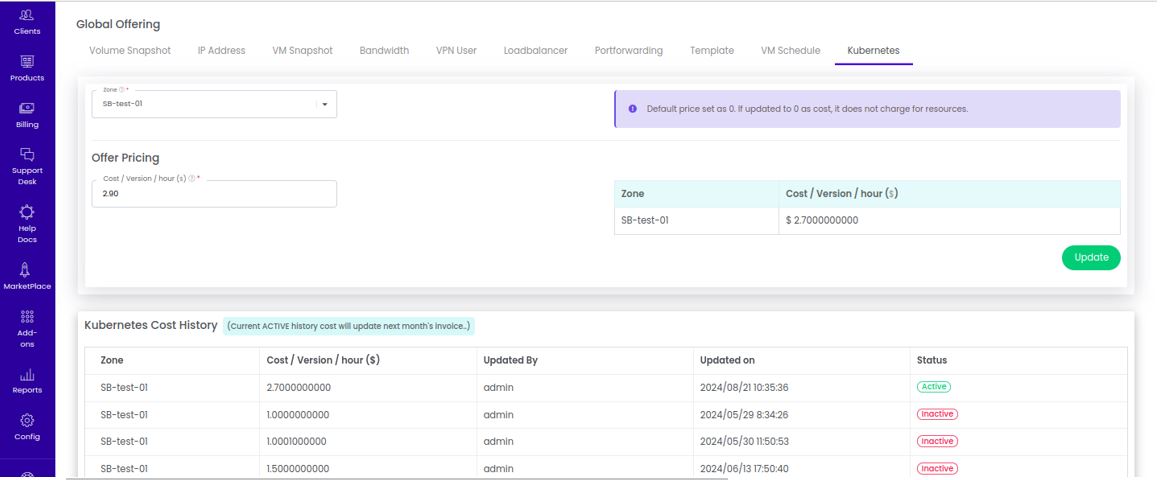
- The Active History log records any changes made to the pricing, providing transparency for both users and administrators. This log also helps track the timing of when the new prices were introduced, which can be useful for billing verification and audit purposes.