Storage Offering
Introduction
In the admin portal, Storage Offering refers to the various storage resources that can be provisioned and configured for users, such as storage volumes, disks, and other storage types. The Storage Offering section allows administrators to create and manage different storage plans, including setting up specific attributes such as size, performance, and pricing, to meet the needs of different client workloads.
Storage Offering features
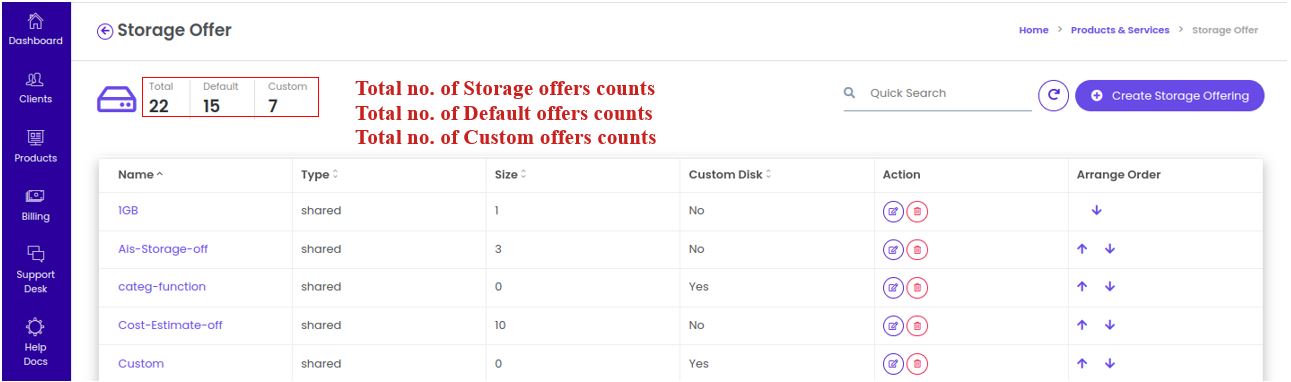
The Storage Offer list page screen in the Stackbill portal is designed to give administrators an overview of the available storage offerings that they have created or are managing. This page allows users to view, create, edit, or delete storage offerings and manage the resources they provide to clients.
Steps to access Storage Offer List Page:
-
Access the Admin Portal:
- Begin by logging into the Stackbill Admin Portal. Ensure that you have the appropriate admin permissions to view and manage products and offerings.
-
Go to Products Section:
- In the navigation panel, look for the section titled "Products". This section allows you to manage various offerings related to storage, compute, instances, and other services.
-
Select Storage Offerings:
- Once inside the Products section, locate the option labeled "Storage Offerings". This option will take you to the list of all storage offerings that have been created in the system.

Edit Storage Offer
The Edit Storage Offer function allows administrators to modify the settings and configurations of existing storage offerings in the Stackbill portal. This feature is particularly useful if you need to adjust storage pricing, configurations, or performance options to better suit the needs of your customers.
1. Navigate to the Admin Portal:
- First, ensure that you are logged in to the Stackbill Admin Portal with the necessary administrative privileges.
2. Go to the Products Section:
- In the navigation pane on the left side of the portal, find the section labeled "Products". This is where all offerings related to compute, storage, and other cloud services are managed.
3. Access Storage Offerings:
- Under the Products section, select "Storage Offerings". This will take you to the Storage Offer List Page, where all storage offerings are displayed.
4. Select the Storage Plan You Want to Edit:
-
In the Storage Offerings list, locate the specific storage plan you want to modify. You can use the search bar or filters to quickly find the offering if you have multiple storage plans.
-
From the action menu, choose the "Edit" option. This will open the Edit Storage Offering page, where you can modify various aspects of the selected plan.

5. Editable Sections of the Storage Offering :
- Once you are on the Edit Storage Offering page, there are three main areas you can modify: Basic Configuration, Offer Configuration, and Offer Pricing.

6. Review Changes:
- After making changes in the respective fields (Basic Configuration, Offer Configuration, and Offer Pricing), carefully review all the updated settings to ensure they are correct.
7. Click the "Update" Button:
- Once you're satisfied with the modifications, click the "Update" button at the bottom of the page. This will save and apply the changes to the selected storage offer.
8. Confirmation:
- After clicking the Update button, the system will confirm that the selected storage plan has been updated successfully. This confirmation message ensures that your changes have been applied correctly.

Delete Storage Offer
The Delete Storage Offer feature in the admin portal allows administrators to permanently remove an existing storage plan that is no longer required or relevant. This action ensures that outdated or unnecessary storage offerings are not available for selection by customers. However, care must be taken when using this option since the storage plan and its associated configurations will be permanently deleted and cannot be recovered once confirmed.
1. Login to the Admin Portal:
- First, log in to the Admin Portal with the required administrative credentials. Only users with the appropriate permissions can delete a storage offering.
2. Navigate to the Products Section:
- On the left-hand side of the dashboard, locate the Products section. This is where you manage all product offerings such as compute plans, storage plans, and other service offerings.
3. Access Storage Offerings:
- Under the Products category, click on Storage Offerings. This will take you to the Storage Offerings List page where all current storage plans are displayed.
4. Select the Storage Plan You Want to Delete:
- In the Storage Offerings List, identify the specific storage plan you wish to delete. You can use filters or the search function to find the desired storage offer quickly, especially if you have a large number of offers listed.
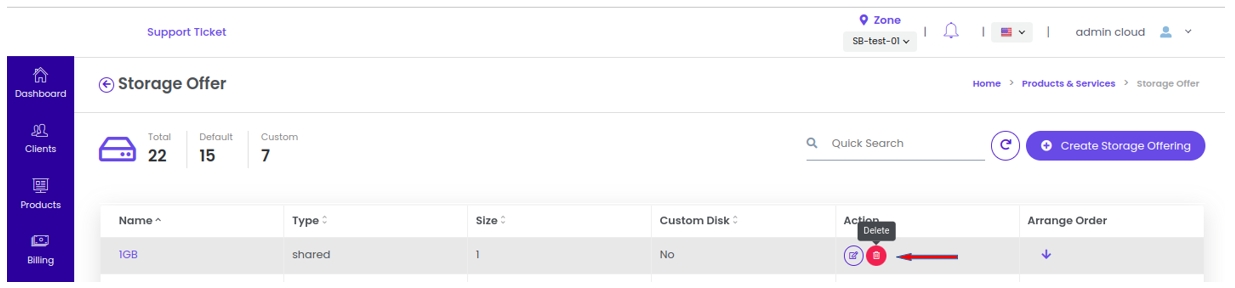
5. Choose the "Delete" Action:
- From the action menu, select the Delete option. This initiates the process of removing the selected storage plan from the system.
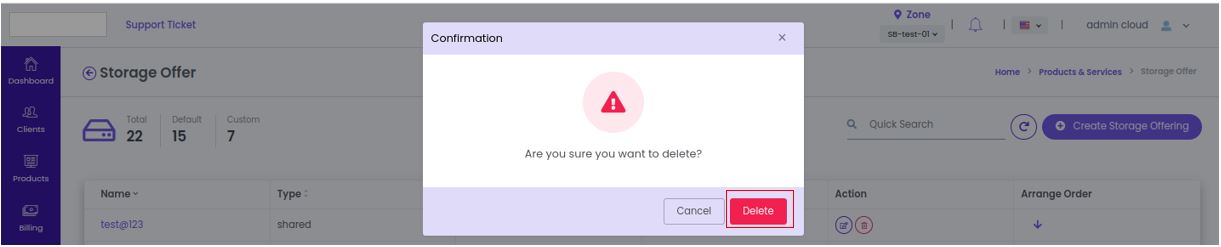
6. Confirm Deletion:
- After clicking the Delete option, a confirmation dialog will appear. This step ensures that you are fully aware of the consequences of this action, as deleting a storage plan is irreversible. Carefully review the prompt and make sure you want to proceed with the deletion.
7. Click the "Delete" Button:
- To proceed with the deletion, click the Delete button in the confirmation dialog. Once clicked, the system will remove the selected storage offer permanently.
8. Success Message:
- After the deletion process is complete, the portal will display a success message confirming that the selected storage plan has been deleted successfully. This message indicates that the action has been performed correctly and the storage offer has been removed from the system.

Storage Offer Arrangement
The Arrange Storage Offer List Order feature in the Stackbill portal allows administrators to customize the order in which storage plans are displayed to users. This function is particularly useful when certain storage plans need to be prioritized or highlighted based on their popularity, relevance, or special characteristics. By organizing the storage offers in a specific sequence, administrators can enhance the user experience and guide users toward preferred or recommended plans.
1. Login to the Admin Portal:
- Begin by logging into the Admin Portal using your administrative credentials.
2. Navigate to the Storage Offerings Section:
- From the dashboard, locate the Products section. Under this category, click on Storage Offerings. This will take you to the Storage Offer List page, where all current storage offers are displayed.
3. Access the Arrange Order Option:
- On the Storage Offer List page, there should be an option that allows you to Arrange Storage Offers.
4. Drag-and-Drop or Manual Reordering:
- There is an up/down arrows to change the order of the storage offers.

Fixed Size Storage Offer creation
1. Navigate to Storage Offerings :
- Log in to the Stackbill admin portal.
- Follow the navigation path: Products > Storage Offerings > Create Storage Offer.
2. Select the Zone :
-
Choose the zone where the storage plan will be applied.
-
You can either select a specific zone or apply the storage offer across all zones by choosing the "All" option.
3. Select the Domain:
-
Choose the domain where the storage plan will be applicable.
-
Similar to zones, you can choose a specific domain or select "All" to apply the offer to all available domains.
4. Select the Offering Category :
-
You can categorize the storage offer by selecting an offering category.
-
you can select a specific category or leave it as "All" to apply across all categories.
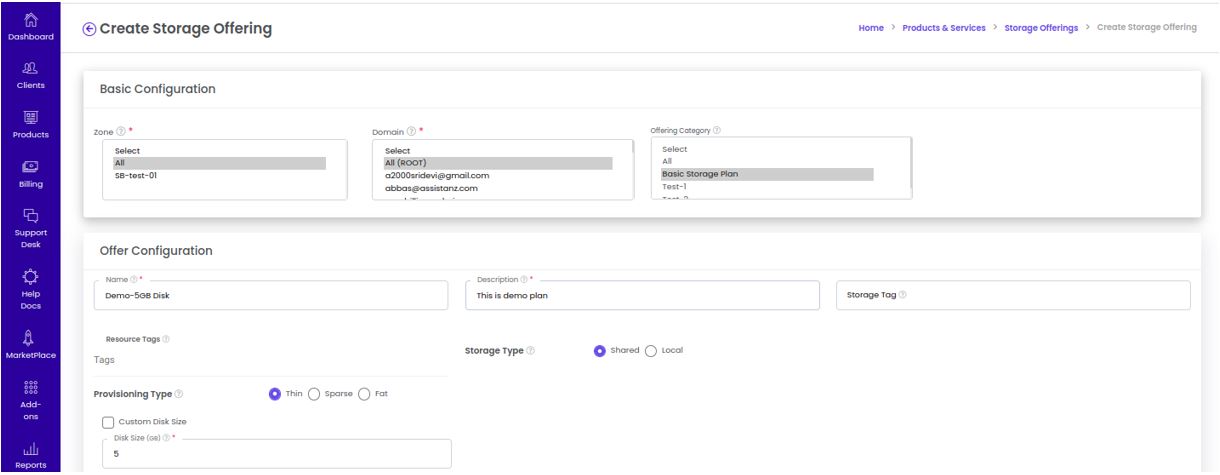
5. Enter Basic Information :
- Provide a name and description for the storage offer, which will help users identify and understand the purpose of this storage plan.
6. Configure other Fields :
- Storage Tag: Assign specific tags to the storage offer for easier identification and filtering later.
- Resource Tags: Add additional tags to further categorize or identify the storage offer.
- Storage Type: Define the type of storage either shared or local
- Provisioning Type: Select how the storage should be provisioned, which might be either Thin or Thick provisioning, depending on your infrastructure setup.
7. Define Disk Size :
- Enter the storage size (in GB) that this offer will provide. For example, you could set it to provide a storage disk of 100GB or more.
8. Enter Disk Cost :
-
After selecting the zone where the storage offer will apply, you need to specify the cost of the disk storage.
-
Enter the cost details for the storage, considering factors like disk space, and ensure the pricing is accurate for the plan you are creating.
9. Review and Add:
- After entering all necessary information, click the Add button to add the storage plan details.

10. Verify and Create:
- Review the storage plan details to make sure everything is correct.
- Once verified, click the Create button to finalize the storage offer.

11. Success Confirmation:
- After successful creation, the new storage plan will be added to the list of available storage offers in the portal. You can now see and manage this new plan from the Storage Offerings page.

12. User Portal Display:
- The new storage option will be visible during instance creation when the advance deploy option is used, as can be seen in the screenshot below.

Custom Size Storage Offer creation
1. Navigate to Storage Offerings :
- Log in to the Stackbill admin portal.
- Follow the path: Products > Storage Offerings > Create Storage Offer.
2. Select the Zone :
- Choose the zone where this storage plan will be available.
- You can either select a specific zone where the offer applies or choose the "All" option to apply it across all zones.
3. Select the Domain:
- Choose the domain where this storage offer will be available. Similar to zones, you can select a specific domain or apply the offer across all domains by selecting the "All" option.
4. Select the Offering Category :
-
You can categorize the storage offer by selecting an offering category.
-
you can select a specific category or leave it as "All" to apply across all categories.
5. Enter Name and Description:
- Provide a descriptive name for the storage plan that will help users identify it easily.
- Optionally, enter a description to give more context about the offer, its use cases, and what it provides.
6. Configure Other Fields:
- Storage Tag: You can assign tags for easier categorization or filtering.
- Resource Tags: Add additional tags related to the resources associated with the storage offer.
- Storage Type: Define the type of storage either shared or local.
- Provisioning Type: Choose between Thin or Thick provisioning, depending on your infrastructure needs.
7. Select Custom Disk Size Option:
- Choose the Custom Disk Size option, which allows users to specify the exact storage they need within a specified range, rather than a fixed size.
- This option gives users more flexibility to select storage that fits their requirements.
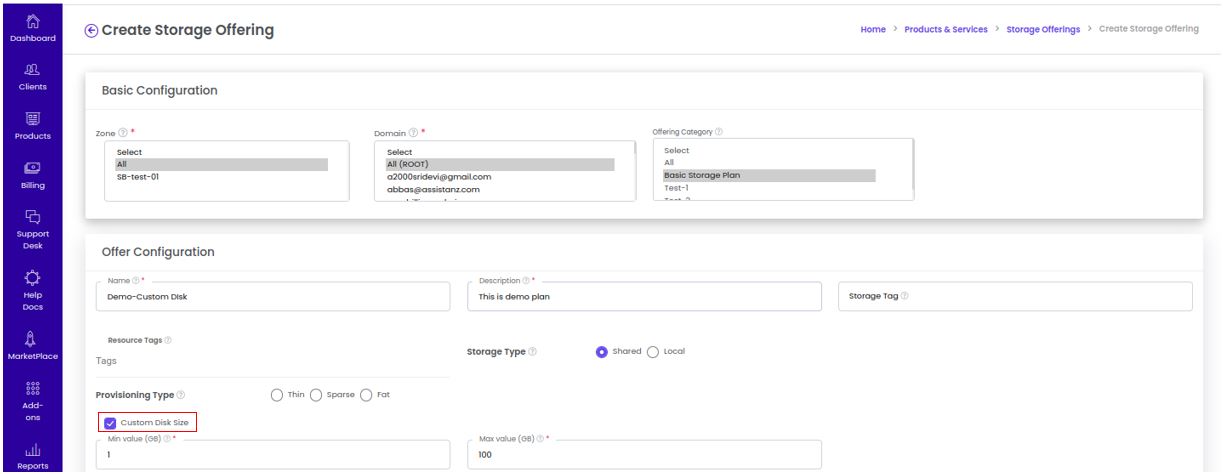
8. Enter Minimum & Maximum Disk Size (GB) :
- Set the Minimum Disk Size (in GB) that users can provision.
- Set the Maximum Disk Size (in GB) to define the upper limit for this plan. This range allows users to provision storage within the defined disk size limits.
9. Select the Zone :
- Select the zone for this storage plan. This could be a specific zone, or you can apply the offer across all zones by selecting "All."
10. Enter Disk Cost per GB :
- Define the cost per GB of storage for the selected custom storage range.
- This pricing structure will be applied based on how much disk space the user selects within the set minimum and maximum range.

11. Review and Add :
- Review all entered details and click the Add button to include the storage offer in the system.
12. Verify and Create :
- Double-check the pricing, configuration, and settings to make sure everything is correct.
- Once verified, click the Create button to finalize and create the custom storage plan.

13. Confirmation :
- The new custom storage offer will be successfully created and available for selection.
- Users will now be able to provision storage based on the specified custom disk size range and associated cost per GB.

14. User Portal Display:
- The new storage option will be visible during instance creation when the advance deploy option is used, as can be seen in the screenshot below.
