Invoice Configuration
Introduction
The Invoice Configuration section in Stackbill allows administrators to set up the details related to invoice generation, payment reminders, and invoice formatting. This ensures that the system automatically manages invoice due dates, reminders for overdue payments, payment failure handling, and branding of the invoices with logos and custom headers/footers.
1. Navigate to Invoice Configuration :
-
Login into the admin portal.
-
Navigate to the Billing section.
-
Select the Invoice Configuration option.
2. Select Default Language :
- Choose the default language for invoices. This language will be used for all generated invoices unless specified otherwise for individual customers.
3. Set Due Days :
-
In the "Due Days" field, enter the number of days after which an unpaid invoice becomes overdue.
-
Example: If you set the value to "5", the invoice will automatically be marked as Overdue after 5 days of non-payment.
4. Configure Email Reminder Interval :
-
In the "Email Reminder Interval" field, enter the number of days between invoice email reminders.
-
Example: If you set the value to "2", users will receive an email reminder every 2 days.
5. Set Payment Failure Attempt Limit :
-
In the "Payment Failure Attempt" field, enter the maximum number of payment failure attempts allowed before further action is taken.
-
Example: If set to "3", the system will allow the user three attempts to process a payment before flagging the account for manual review or escalation.
6. Set Application Base URL for Admin :
- Enter the Application Base URL for Admin. This URL is where administrators can manage the invoices and related configurations.
7. Upload the Invoice Logo :
-
Upload the company logo that you want to display on invoices.
-
This logo will appear on the top of each invoice, providing your brand's identity to customers.
8. Configure Invoice Header & Footer :
- Enter the header and footer text you want to include in the invoice. These fields are typically used to provide company information, disclaimers, or legal statements.
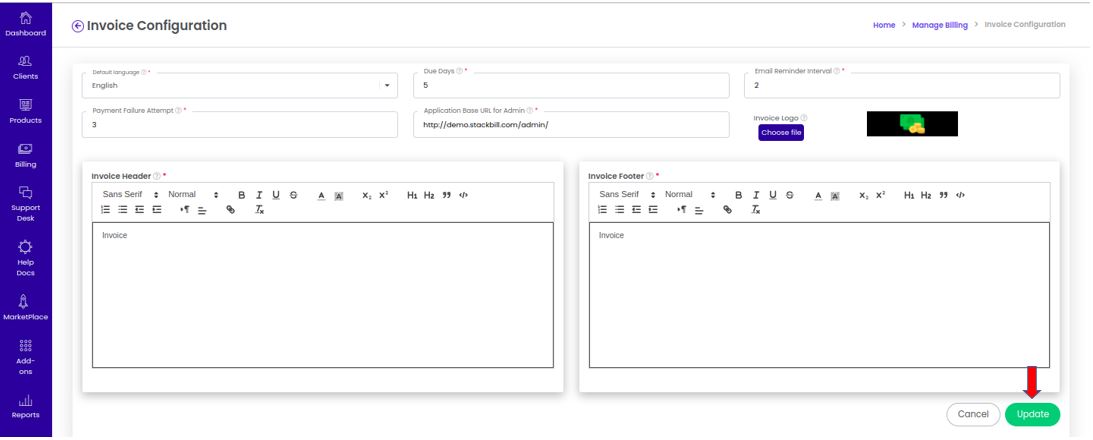
9. Finalize the Configuration :
- After setting all the parameters, click the Update button to save the configurations.
