Billing
Feature Configuration - Billing
Overview
The Billing Feature Configuration within the admin portal allows administrators to enable or disable specific billing-related functionalities in the system. This configuration process lets admins control which billing features are active for both the admin and user portals. It provides flexibility in defining which features should be available based on the organization's requirements, and also allows for customized billing processes and experiences for customers.
The Billing Feature Configuration involves configuring which billing-related features are available within the CMP portal for use by administrators and customers. Admins can select specific billing features that they want to enable or disable based on the needs of their organization.
Steps to Access the Billing Features
1. Navigation to Billing Features :
-
Login into the admin portal.
-
Navigate to the Config section by clicking on the Config icon in the portal menu.
-
Under CMP Config section, click on the Feature Configuration link.
-
Select the Billing tab to lists all the billing-related features available for configuration.
2. Select the Billing Feature :
-
Once you are in the Billing feature configuration section, a list of available billing features will be displayed.
-
Each feature will have a corresponding toggle switch.
3. Enable/Disable the Feature :
-
To enable a specific feature, toggle the switch to the "enabled" position.
-
To disable a feature, toggle the switch to the "disabled" position.
-
The toggled features will immediately reflect in both the admin portal and the user portal, depending on the permissions and configurations.
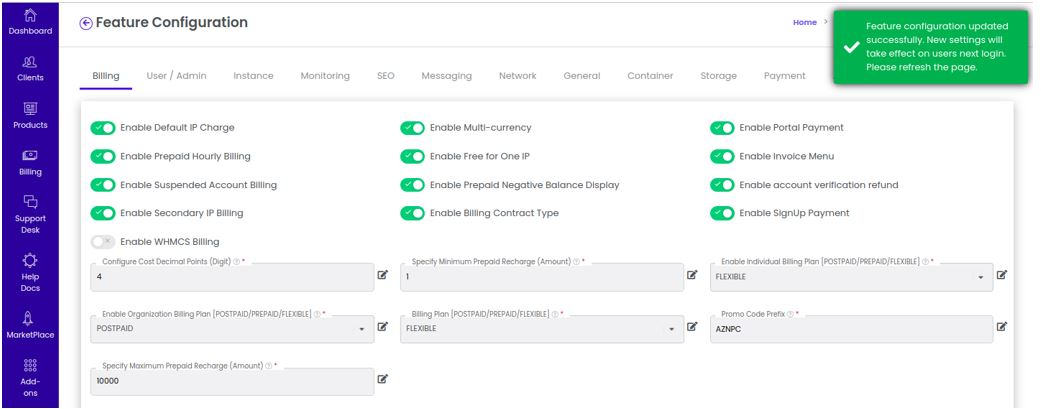
Enable Default IP Charge
-
The Enable Default IP Charge feature in the admin portal provides administrators with the ability to control whether a charge is applied when a customer acquires a default public IP address. This feature allows for the customization of cost settings based on organizational policies regarding the allocation of public IPs. It affects how customers are billed when they add new public IP addresses to their instances or network resources.
-
In cloud platforms, when users acquire public IP addresses, some systems may charge for the use of these IPs, depending on the organization's pricing policy. The Default IP Charge setting determines whether customers will incur a cost when they acquire a public IP address through the CMP (Cloud Management Portal).
-
This feature gives administrators the flexibility to either charge customers for acquiring public IPs or to provide them for free. The status of the option (enabled or disabled) directly impacts how customers are billed in the user portal.
1. Enable or Disable Default IP Charge :
-
When Enabled: Customers will be charged for acquiring a default public IP address. This charge will be included in their billing for cloud resources.
-
When Disabled: Customers will not be charged for acquiring a default public IP address, allowing them to acquire public IPs without additional costs.
-
This configuration can be toggled by administrators based on the organization’s pricing policy.

2. Impact on the User Portal :
- Once the administrator configures the Default IP Charge in the admin portal, the setting is reflected in the user portal, where customers interact with the system. Users will either see a charge for acquiring a public IP or not, based on the configuration.
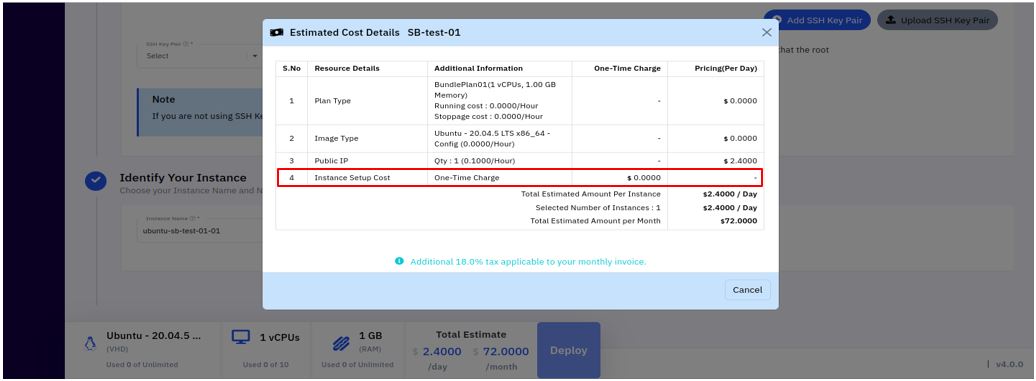
3. Instance Cost Estimation Screen :
-
Navigate to User Portal > Instance > Add Instance > Instance Cost Estimation screen.
-
You can view the estimated costs associated with the instance, including the charge for acquiring a public IP address (if the feature is enabled).
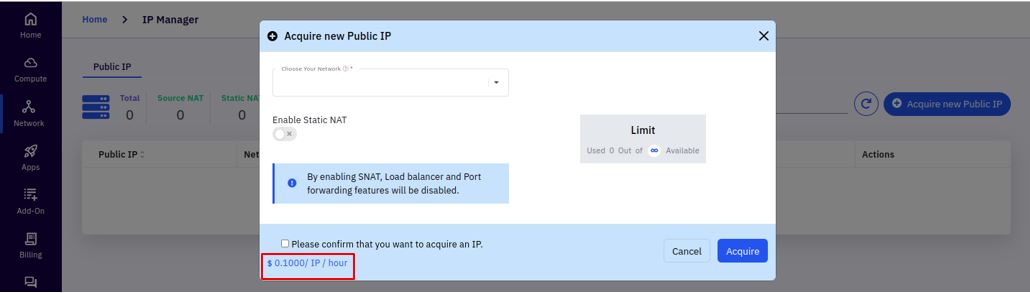
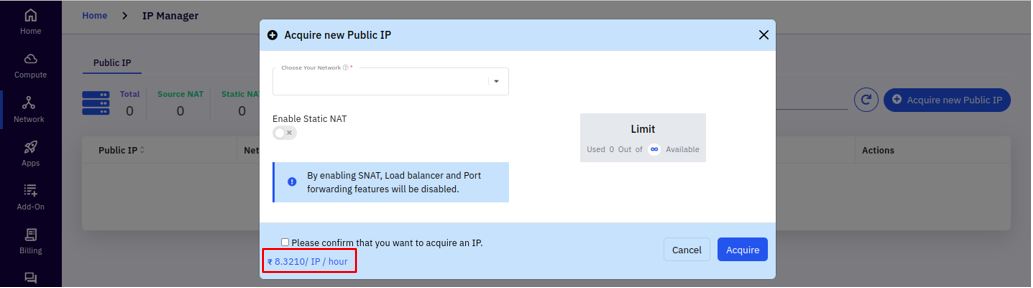
4. Acquire New Public IP Screen :
-
Navigate to User Portal > Network > IP Manager > Acquire New Public IP.
-
Users can view and manage their public IP addresses. If the Default IP Charge is enabled, users will be notified of the charge when they attempt to acquire a new public IP address.
Enable Multi-currency
The Enable Multi-Currency feature allows administrators to configure the Cloud Management Platform (CMP) to accept payments in multiple currencies, making it easier to serve a global customer base. This feature is particularly useful for businesses that operate internationally, as it allows customers to view and pay their bills in their preferred or local currency, enhancing convenience and user experience.
When Enabled:
-
The CMP portal will display and accept payments in various currencies.
-
Customers can select from a list of supported currencies
-
This option is beneficial for organizations looking to simplify payments for international clients and increase accessibility.
When Disabled:
-
The CMP portal will only display and accept payments in the default currency.
-
Customers from other regions may need to handle their own currency conversions when viewing invoices or making payments, which could lead to confusion or inconvenience.
-
Disabling this option may be suitable for organizations that primarily serve a local or single-currency customer base.
1. Steps to Enable Multi-Currency :
-
Login into the admin portal.
-
Navigate to the Config section by clicking on the Config icon in the portal menu.
-
Under CMP Config section, click on the Feature Configuration link.
-
Select the Billing tab to lists all the billing-related features available for configuration.
2. Enable or Disable Multi-Currency :
- Use the toggle or checkbox to enable or disable multi-currency support as per your organization’s requirement.

3. Changes Reflected in User and Admin Portals :
- When multi-currency is enabled, currency options will become available in both the Admin Portal and User Portal in relevant sections, such as billing and cost estimation.
4. Where the Multi-Currency Setting is Reflected in Admin Portal :
- Navigate to Admin Portal > Billing > Multi-Currency

- Once enabled, the multi-currency setting will be reflected in the billing section of the Admin Portal. This allows admins to see and manage invoices in different currencies based on customer preference.
5. Where the Multi-Currency Setting is Reflected in User Portal :
- Users can able to see the cost in different currencies for all resources in the cost estimate screen.
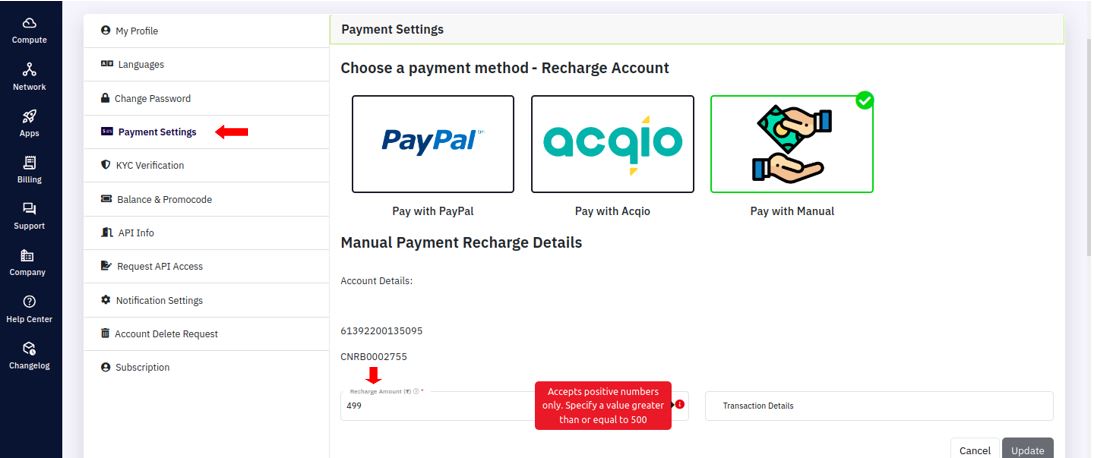
Enable Portal Payment
The Enable Portal Payment setting is a configuration option within the Cloud Management Platform (CMP) Admin Portal that controls whether customers can pay their invoices directly through the User Portal. By enabling or disabling this feature, administrators can manage the payment functionality available to users, providing flexibility based on business requirements.
1. Steps to Enable Portal Payment :��
-
Login into the admin portal.
-
Navigate to the Config section by clicking on the Config icon in the portal menu.
-
Under CMP Config section, click on the Feature Configuration link.
-
Select the Billing tab to lists all the billing-related features available for configuration.
2. Enable or Disable Portal Payment :
- Use the toggle or checkbox to enable or disable the portal payment feature according to your organization’s payment requirements.

- The portal will automatically update the changes.
3. Changes Reflected in the User Portal :
- Once enabled, the payment feature will be accessible in the User Portal under Company > Profile > Payment Settings.
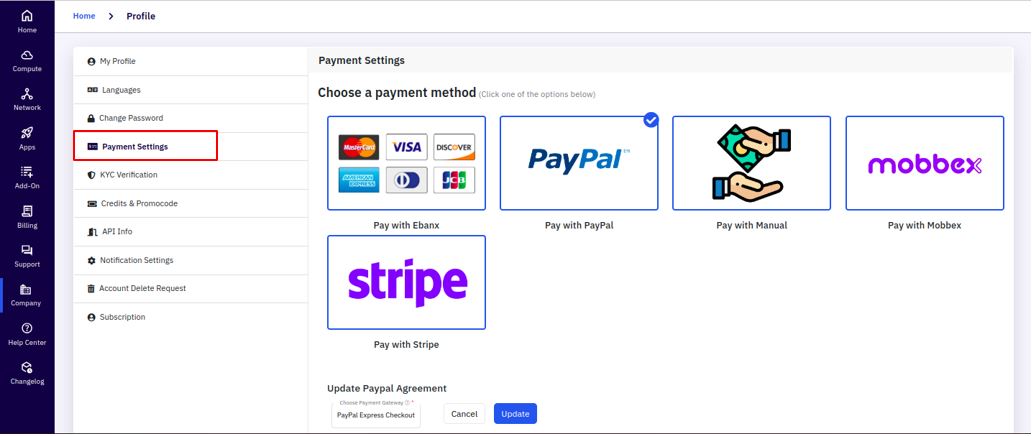
- When disabled, the payment functionality will be removed from the User Portal, and customers will not have the option to pay invoices directly within the CMP interface.
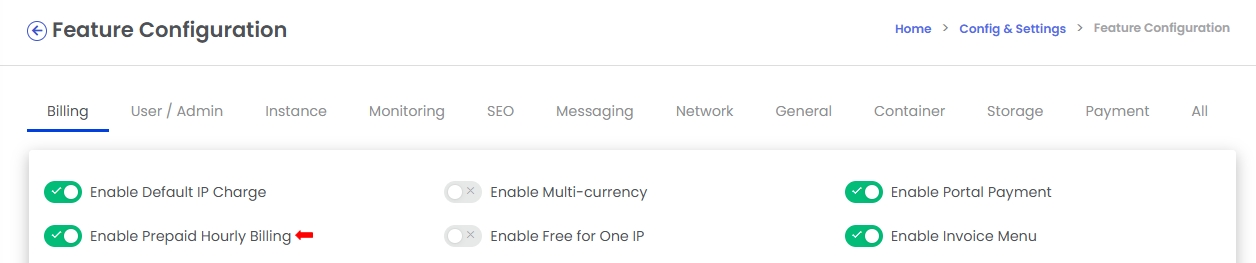
Enable Prepaid Hourly Billing
The Enable Prepaid Hourly Billing setting is a configuration option within the Cloud Management Platform (CMP) Admin Portal, specifically for managing how prepaid customers are billed. When this option is enabled, the billing cost for customers on a prepaid plan will be updated and displayed every hour. This feature ensures that prepaid customers have a more frequent view of their costs, allowing them to monitor their usage and remaining balance in near real-time.
Prepaid Hourly Billing is a billing method where the charges for resources are calculated and displayed on an hourly basis for customers on a prepaid plan. This feature is particularly useful for customers who want to keep a close watch on their resource usage and available balance, as the system updates their costs frequently.
In contrast, if hourly billing is disabled, prepaid charges might be displayed on a different schedule, such as daily or monthly, which might not provide as much immediacy for customers.
1. Steps to Enable Prepaid Hourly Billing :
-
Login into the admin portal.
-
Navigate to the Config section by clicking on the Config icon in the portal menu.
-
Under CMP Config section, click on the Feature Configuration link.
-
Select the Billing tab to lists all the billing-related features available for configuration.
2. Enable or Disable Prepaid Hourly Billing :
- Toggle the setting to enable or disable based on your organization’s requirements.
- The portal will automatically update the changes.
3. Changes Reflected in the User Portal :
-
Once enabled, prepaid customers will see hourly cost updates on their Dashboard and in the My Profile section of the User Portal.
Dashboard

My Profile

-
If disabled, the billing updates for prepaid users will not be reflected every hour, and they will need to check their usage and balance based on the portal's set billing frequency.
Enable Free for One IP
The Free for One IP feature is a billing policy that grants customers one complimentary public IP address. This option is often used as an incentive for customers or to reduce initial costs for basic connectivity needs. For customers who only require one public IP address, enabling this option can reduce their monthly expenses, making the service more affordable and appealing.
The Enable Free for One IP setting is a configuration option within the Admin Portal of the Cloud Management Platform (CMP). This feature allows administrators to offer the first acquired public IP address to a customer at no cost. When enabled, customers will not be charged for the first public IP they obtain. However, if the setting is disabled, all acquired public IPs, including the first one, will incur a charge.
1. Steps to Enable Free for One IP :
-
Login into the admin portal.
-
Navigate to the Config section by clicking on the Config icon in the portal menu.
-
Under CMP Config section, click on the Feature Configuration link.
-
Select the Billing tab to lists all the billing-related features available for configuration.
2. Enable or Disable the Free for One IP Option :
- Toggle the setting to enable or disable based on the organization's billing strategy.

- The portal will automatically update the changes.
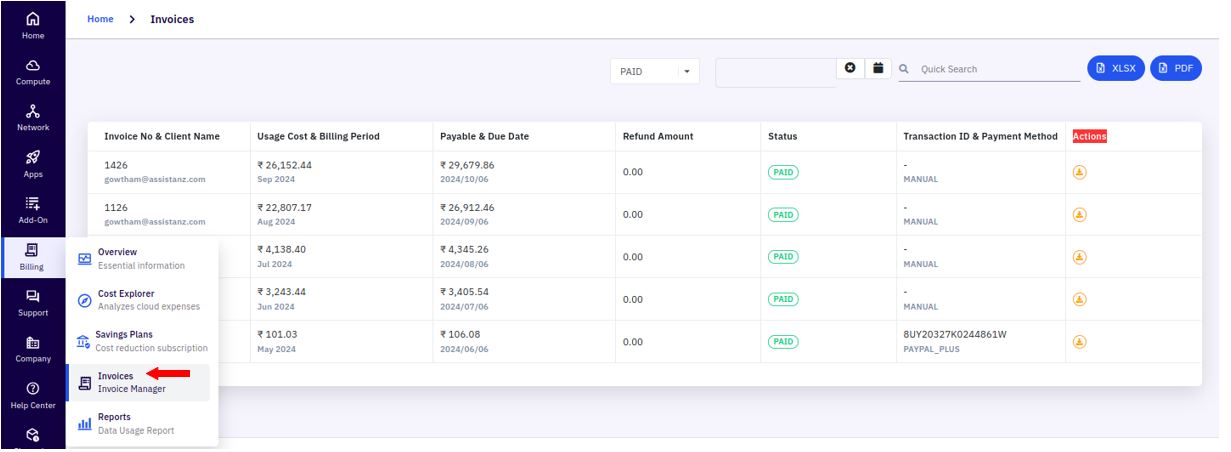
Changes Reflected in the Invoices:
-
Once enabled, users will see that their first public IP is not charged on their monthly invoice report.
-
If disabled, all public IPs, including the first one, will appear as a billed item on the user's monthly invoice report.

Enable Invoice Menu
The Enable Invoice Menu setting in the Admin Portal of the Cloud Management Platform (CMP) is a configuration option that controls the visibility of the Invoices section in the User Portal. This feature allows administrators to either display or hide the Invoices menu from the user’s view in the CMP portal. When enabled, users can access their billing history, view invoices, and monitor payment records. When disabled, the Invoices menu will not be available, hiding billing details from users.
1. Steps to Enable Invoice Menu :
-
Login into the admin portal.
-
Navigate to the Config section by clicking on the Config icon in the portal menu.
-
Under CMP Config section, click on the Feature Configuration link.
-
Select the Billing tab to lists all the billing-related features available for configuration.
2. Enable or Disable the Invoice Menu :
- Toggle the setting to enable or disable based on the organization’s requirements.

- The portal will automatically update the changes.
3. Changes Reflected in User Portal :
- Once the setting is enabled, users can view the Invoices menu under the Billing section.
- If the setting is disabled, the Invoices menu will no longer appear, and users will be unable to access their billing records from the User Portal.
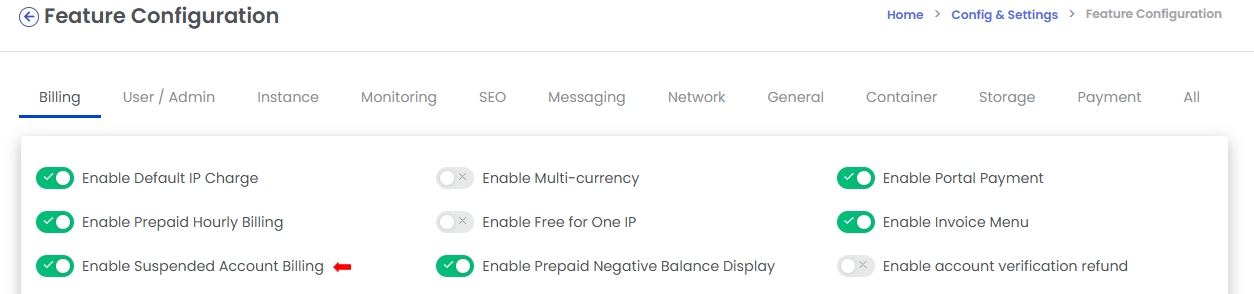
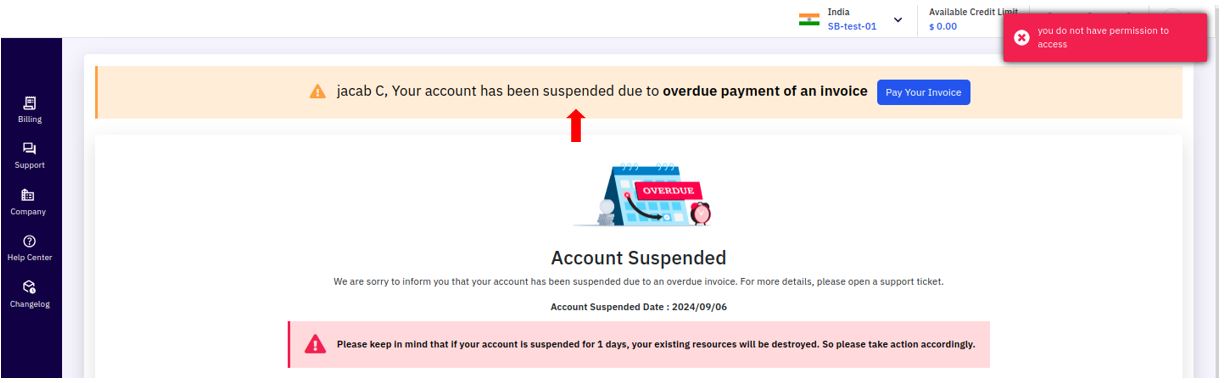
Enable Suspended Account Billing
The Enable Suspended Account Billing feature in the CMP Admin Portal is a configuration option that allows administrators to control whether customer accounts are automatically suspended when they have overdue or unpaid invoices. By enabling this feature, administrators ensure that customers who have outstanding balances or past-due invoices will have their accounts suspended until they settle their payments. This can be an effective measure to encourage timely payments and prevent resource usage without payment.
Suspended Account Billing refers to the practice of temporarily restricting access to a customer’s account when there are overdue or unpaid invoices. When an account is suspended:
-
The user will lose access to certain resources, from the portal until the overdue invoices are settled.
-
Resource consumption by the suspended account will be halted, to prevent further unpaid usage.
-
This can serve as a financial control measure for companies, as it encourages users to pay their invoices to avoid account suspension.
1. Steps to Enable Suspended Account Billing :
-
Login into the admin portal.
-
Navigate to the Config section by clicking on the Config icon in the portal menu.
-
Under CMP Config section, click on the Feature Configuration link.
-
Select the Billing tab to lists all the billing-related features available for configuration.
2. Enable or Disable the Feature :
- Toggle the setting to enable or disable based on the organization’s billing policy.
- The portal will automatically update the changes.
3. Changes Reflected in Both Admin and User Portals :
When enabled, any account with overdue payments will be automatically suspended, which will be visible in both the Admin and User Portals.
4. Changes Reflected in Admin Portal :
-
Navigate to Clients > Create & Manage User Accounts
-
When this feature is enabled, admins can see which accounts have been suspended due to overdue invoices under the Manage User Accounts section.
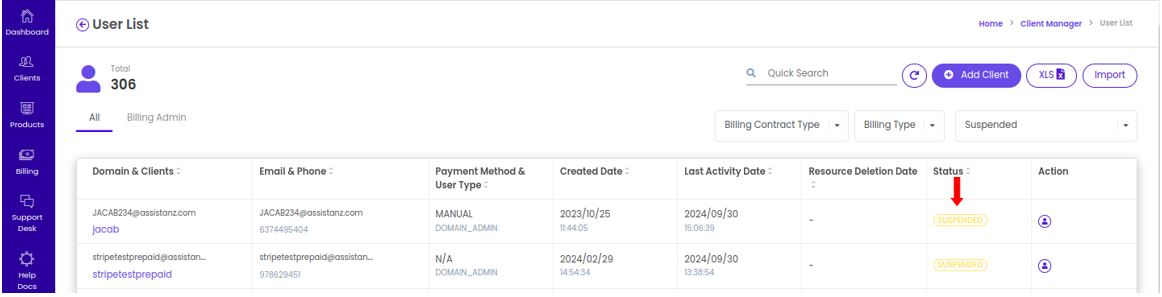
- Suspended accounts will be highlighted as such, allowing administrators to keep track of which users have been restricted due to unpaid bills.
5. Changes Reflected in User Portal :
- If a user attempts to log in with a suspended account, they will likely receive a notification or message informing them of their suspended status and urging them to clear outstanding invoices.
Enable Prepaid Negative Balance Display
The Enable Prepaid Negative Balance Display feature in the CMP Admin Portal is a configuration setting that determines whether prepaid customers’ account balances can show a negative value. This setting is particularly useful for organizations offering prepaid billing, as it allows visibility of any negative balances that may accrue when prepaid funds are exhausted but services continue to be used.
When enabled, this feature helps both the customer and the admin monitor and manage the balance for prepaid billing accounts, ensuring users are aware when they have exceeded their prepaid balance.
1. Steps to Enable Prepaid Negative Balance Display :
-
Login into the admin portal.
-
Navigate to the Config section by clicking on the Config icon in the portal menu.
-
Under CMP Config section, click on the Feature Configuration link.
-
Select the Billing tab to lists all the billing-related features available for configuration.
2. Enable or Disable the Feature :
- Enable the setting to display negative balances for prepaid billing accounts or disable it if you don’t want negative balances to be shown.
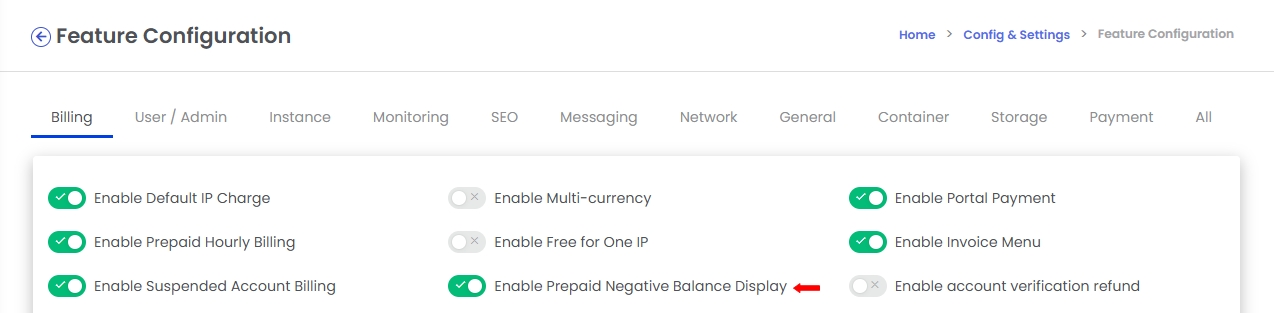
- The portal will automatically update the changes.
3. Effect on Admin and User Portals :
- Once enabled, negative balances for prepaid accounts will be displayed on both the Admin and User CMP Portals, allowing for transparency and facilitating balance management.
4. Changes Reflected in Admin Portal :
-
Navigate to Clients > Create & Manage User Accounts > Select any Prepaid Billing Suspended Customer > Profile tab
-
Admins can view the negative balance under the Profile tab for any prepaid billing customer whose account has been suspended or is in a negative state.

- This information helps the admin track and manage accounts that have exceeded their prepaid balance, enabling more effective communication and balance recovery efforts.
5. Changes Reflected in User Portal :
-
Login any prepaid billing suspended account.
-
If a prepaid customer’s account is in a negative balance, this information will be displayed when they log into their account in the User Portal.

- The negative balance visibility alerts the customer that their prepaid funds have been exhausted, prompting them to add funds or resolve the outstanding balance to continue using services without restrictions.
Enable Account Verification Refund
The Account Verification Refund Process feature in the CMP Admin Portal is a configuration option that determines whether a refund will be provided to customers upon successful account verification. This feature is typically used in scenarios where customers are required to make an initial deposit or payment as part of the account creation and verification process. Once the customer’s account is verified, the deposit can be refunded if this feature is enabled.
This setting offers flexibility for organizations that wish to implement refundable verification deposits to reduce the risk of fraudulent accounts while providing reassurance to genuine users that they will get their deposit back after successful verification.
The Account Verification Refund Process includes:
-
Initial Deposit Requirement: Customers pay a deposit during account signup, which serves as a form of verification.
-
Refund Upon Verification: If the account is successfully verified, the deposit is refunded, either fully or partially, depending on the organization's policy.
-
No Refund if Unverified: If the account is not successfully verified, the deposit may not be refunded, or it may be held until verification is complete.
1. Steps to Enable Account Verification Refund :
-
Login into the admin portal.
-
Navigate to the Config section by clicking on the Config icon in the portal menu.
-
Under CMP Config section, click on the Feature Configuration link.
-
Select the Billing tab to lists all the billing-related features available for configuration.
2. Enable or Disable the Feature :
- Enable the setting if you want to refund the initial deposit after successful account verification, or disable it if no refund will be provided.

- The portal will automatically update the changes.
3. Effect on User Signup Page :
-
Once enabled, this option will be reflected in the user CMP portal’s signup page, notifying new users that they will receive a refund after verification.
-
If disabled, the signup page will reflect that no refund is available for account verification.
4. Benefits of Enabling the Account Verification Refund Process:
-
Encourages Legitimate Signups: By providing a refund after successful verification, genuine users are encouraged to complete the signup process, while discouraging fraudulent accounts.
-
Increases User Trust: Knowing that they can receive a refund if their account is verified, users feel more assured about the integrity and transparency of the organization.
-
Reduces Verification Barriers: Users may be more willing to undergo the verification process if they know that their initial deposit will be refunded, making it easier to onboard new customers.
-
Streamlines Verification Workflow: This feature helps align the billing and verification processes, automatically processing refunds when verification is complete.
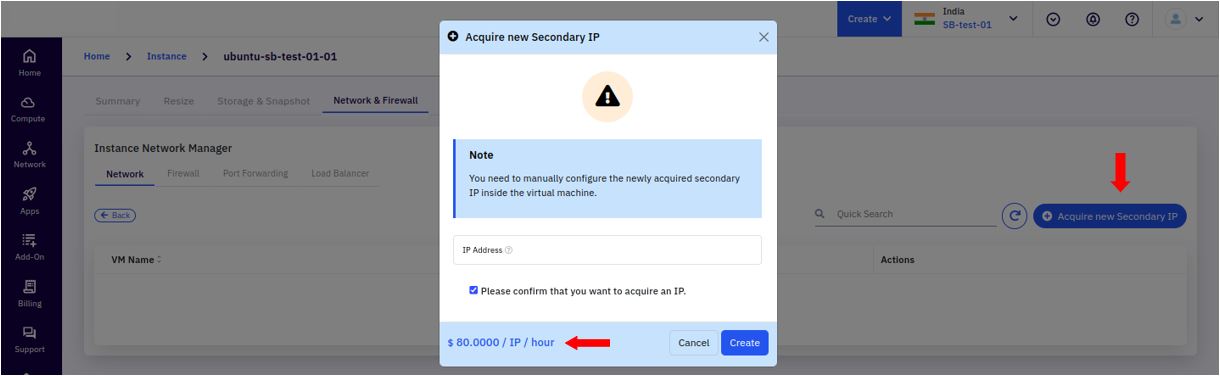
Enable Secondary IP Billing
The Enable Secondary IP Billing feature in the admin portal allows administrators to control whether or not customers will be billed for acquiring secondary IP addresses for their instances. This feature gives organizations the flexibility to either charge or provide secondary IPs at no additional cost, depending on business requirements and billing policies. This setting is particularly useful for businesses that wish to manage and monetize IP usage on a per-customer basis.
1. Steps to Enable Secondary IP Billing :
-
Login into the admin portal.
-
Navigate to the Config section by clicking on the Config icon in the portal menu.
-
Under CMP Config section, click on the Feature Configuration link.
-
Select the Billing tab to lists all the billing-related features available for configuration.
2. Enable or Disable the Feature :
- Use the toggle switch to Enable or Disable the Secondary IP Billing feature.

- The portal will automatically update the changes.
3. Effect in User Portal :
-
Once configured, this option will be reflected in the User Portal under the Network & Firewall section of an instance’s settings.
-
Users will see an indicator of whether acquiring a secondary IP is a paid service or free based on the admin portal’s configuration.
Enable Billing Contract Type
The Enable Billing Contract Type feature in the admin portal provides flexibility in setting up different billing options for new customers based on the organization’s payment model. This feature allows administrators to choose the preferred billing contract type for each customer during account creation, helping to align the billing method with customer needs and business objectives.
What is the Billing Contract Type?
The Billing Contract Type determines the method by which a customer is billed for the services they use. Common contract types include:
-
Pay-As-You-Go (PAYG): Customers are billed based on actual usage. This type of contract is ideal for customers who require flexibility and may have fluctuating resource demands. The bill is calculated based on the exact resources consumed over a specified period.
-
Fixed Payment: Customers are billed a set amount regardless of usage, often based on a pre-determined limit of resources or a fixed plan. This is suitable for customers who prefer predictable billing or have a fixed budget for resources.
1. Steps to Enable Billing Contract Type :
-
Login into the admin portal.
-
Navigate to the Config section by clicking on the Config icon in the portal menu.
-
Under CMP Config section, click on the Feature Configuration link.
-
Select the Billing tab to lists all the billing-related features available for configuration.
2. Enable or Disable the Feature :
- Use the toggle switch to Enable or Disable the billing contract type option.

- The portal will automatically update the changes.
3. Effect in the Admin Portal :
- When enabled, the Billing Contract Type selection dropdown will appear on this page, giving administrators the option to select between Pay-As-You-Go and Fixed Payment for the new customer.

- When disabled, the dropdown will not be visible, and new customers will default to the Pay-As-You-Go billing model.
Enable SignUp Payment
The Enable SignUp Payment feature in the admin portal controls whether users are required to make an initial payment during the account signup process. This feature is useful for businesses that want to collect a registration fee or an initial deposit from new users upon account activation. Enabling or disabling this feature affects the visibility of payment configuration options on the user portal's signup activation page.
This option allows administrators to configure a signup payment requirement. When enabled, this feature prompts new users to provide payment details and complete a payment as part of the activation process for their account. This functionality helps ensure that only verified, paid accounts are activated, which can improve user commitment and reduce spam or fraudulent signups.
1. Steps to Enable SignUp Payment :
-
Login into the admin portal.
-
Navigate to the Config section by clicking on the Config icon in the portal menu.
-
Under CMP Config section, click on the Feature Configuration link.
-
Select the Billing tab to lists all the billing-related features available for configuration.
2. Enable or Disable the Feature :
- Use the toggle switch to Enable or Disable the signup payment option.

- The portal will automatically update the changes.
3. Effect in the User Portal :
- Once configured, this setting will immediately affect the Signup Activation page in the user CMP portal.
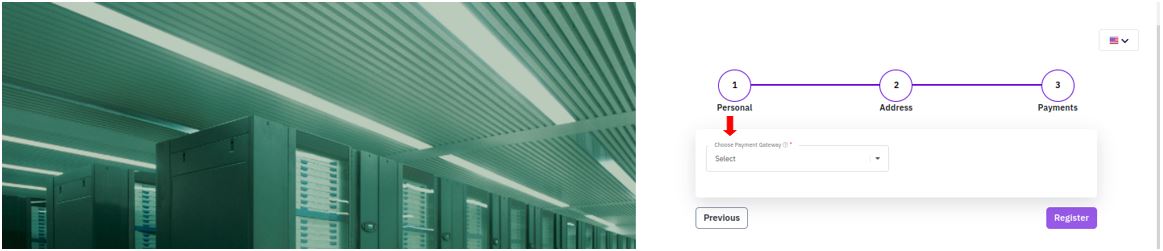
-
If enabled, the Choose payment Gateway configuration field will appear, allowing users to complete payment as part of account activation.
-
If disabled, no payment field will be visible, and users can signup their accounts without payment.
Enable WHMCS Billing
The Enable WHMCS Billing feature in the admin portal allows integration with WHMCS, a widely-used web hosting billing and automation platform. Enabling this feature links the WHMCS billing portal with the Cloud Management Platform (CMP) portal, enabling streamlined billing, invoicing, and customer management for services offered via the CMP.
Enabling WHMCS Billing allows organizations to leverage WHMCS’s billing automation and customer management features directly within their CMP environment. This integration can be beneficial for companies that rely on WHMCS to handle billing, automate recurring payments, manage customer accounts, and perform other billing-related functions. When integrated, WHMCS can manage various aspects of the billing lifecycle, such as invoices, payment processing, and subscription management, while synchronizing with the CMP portal for seamless operation.
1. Steps to Enable WHMCS Billing :
-
Login into the admin portal.
-
Navigate to the Config section by clicking on the Config icon in the portal menu.
-
Under CMP Config section, click on the Feature Configuration link.
-
Select the Billing tab to lists all the billing-related features available for configuration.
2. Enable or Disable the Feature :
- Toggle the setting to either Enable or Disable WHMCS Billing integration.

- The portal will automatically update the changes.
3. Effect on the CMP and WHMCS Portal :
-
If enabled, the CMP portal will connect with the WHMCS billing portal, making billing information and features accessible in the CMP.
-
If disabled, WHMCS-related features and information will be unavailable in the CMP.
Configure Cost Decimal Points (Digit) :
The Configure Cost Decimal Points (Digit) feature allows administrators to set the number of decimal places displayed for cost values in the CMP portal. This impacts the cost estimation screens, billing summaries, and invoices that users see, helping provide accurate and standardized cost displays based on the admin's preference for readability or precision. Whether billing to multiple decimal points for detailed accuracy or rounding values for simplicity, this feature ensures users receive a consistent cost presentation.
1. Steps to Enable Cost Decimal Points :
-
Login into the admin portal.
-
Navigate to the Config section by clicking on the Config icon in the portal menu.
-
Under CMP Config section, click on the Feature Configuration link.
-
Select the Billing tab to lists all the billing-related features available for configuration.
2. Edit the setting:
-
To add the desired value, click the Edit button.
-
Add the desired number of digits (e.g., 2, 3, or 4 decimal places).
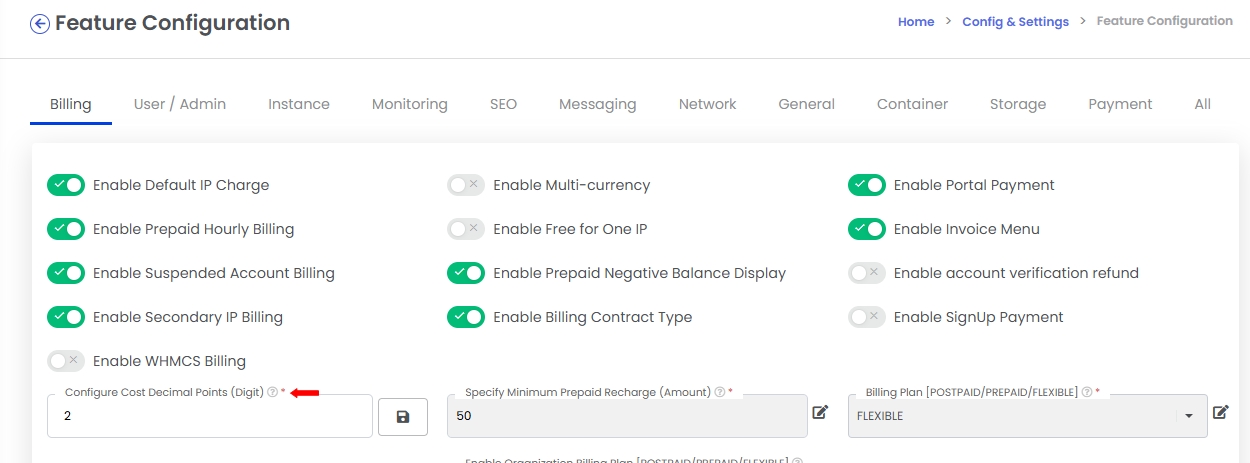
- To save the modifications, click the Save button.
3. Effect in the User Portal :
- After adjusting this setting, users in the CMP portal will see the updated decimal precision when they view cost estimates for their resources.
Specify Minimum Prepaid Recharge
This feature allows the administrator to set a minimum recharge amount that users must adhere to when adding funds to their accounts in the Cloud Management Portal (CMP). It is particularly useful for prepaid billing type customers, where users must maintain a positive balance to continue accessing services.
Setting a minimum recharge amount ensures that users top up their accounts with sufficient funds, helping to maintain uninterrupted service access and avoid frequent small transactions.
1. Steps to Enable Minimum Prepaid Recharge :
-
Login into the admin portal.
-
Navigate to the Config section by clicking on the Config icon in the portal menu.
-
Under CMP Config section, click on the Feature Configuration link.
-
Select the Billing tab to lists all the billing-related features available for configuration.
2. Edit the setting:
-
In the Billing section, locate the Minimum Prepaid Recharge field.
-
Specify the desired minimum recharge amount (e.g., $10, $50).
-
Click Save to apply the changes.

3. Effect on the User Portal :
- After setting this amount, users in the CMP portal will be required to recharge their accounts with at least the specified minimum amount.
- This ensures that when users select the recharge option, the payment amount cannot be set below the predefined threshold.
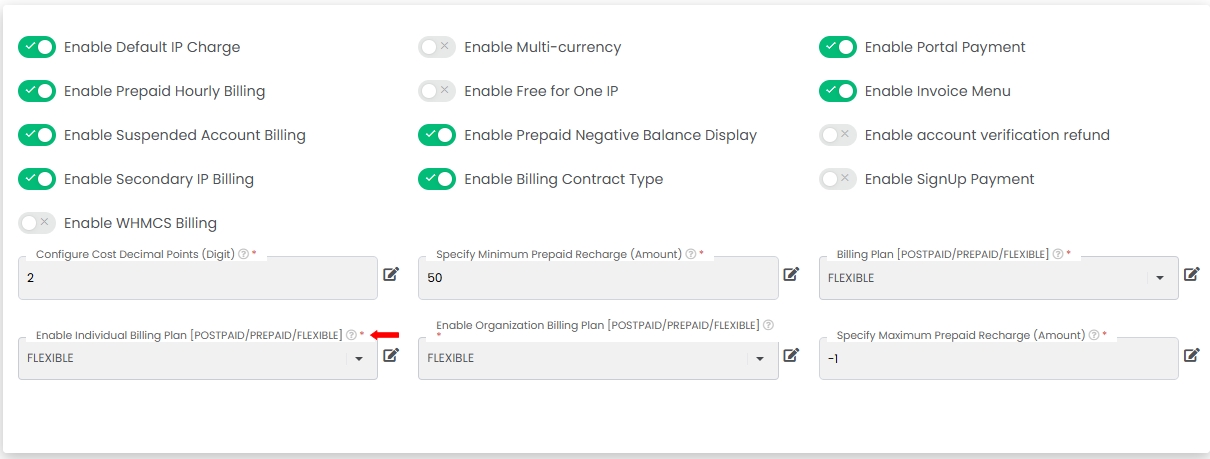
Enable Individual Billing Plan [POSTPAID/PREPAID/FLEXIBLE]
This feature provides flexibility in selecting a billing type—Postpaid, Prepaid, or Flexible—based on the needs of the customer. The Flexible option allows users to operate under both Postpaid and Prepaid billing models, offering the most adaptability.
Available Billing Plan Options:
-
Postpaid: Customers are billed after they have consumed the services. They receive invoices based on their usage at the end of a billing cycle.
-
Prepaid: Customers must add funds to their account in advance. Service usage deducts funds from their balance until it is depleted.
-
Flexible: This plan combines both Postpaid and Prepaid models, allowing customers to switch between them or use a combination of the two, depending on their account setup.
1. Steps to Enable Individual Billing Plan :
-
Login into the admin portal.
-
Navigate to the Config section by clicking on the Config icon in the portal menu.
-
Under CMP Config section, click on the Feature Configuration link.
-
Select the Billing tab to lists all the billing-related features available for configuration.
2. Edit the setting:
-
In the Billing section, locate the Enable Individual Billing Plan [POSTPAID/PREPAID/FLEXIBLE] field.
-
Select the desire billing model from the drop-down list.
-
Click Save to apply the changes.
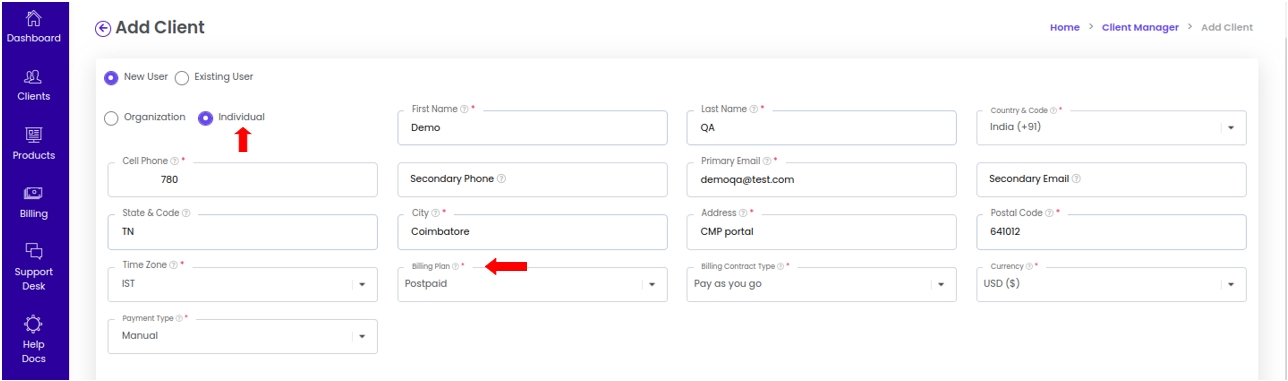
3. Effect on the Admin Portal :
-
Navigate to Portal > Clients > Create & Manage User Accounts.
-
Click on Add Client to add a new customer or select an existing customer to update their billing plan.
-
During the client creation process, select the Individual type as the client category.
-
You can Choose the desired Billing Plan from the drop-down list.
4. Effect on the User Portal :
- When a customer signs up through the User Portal, the selected billing plan becomes available during their Signup process.

- This allows customers to review and confirm their billing plan type as part of their account signup process.
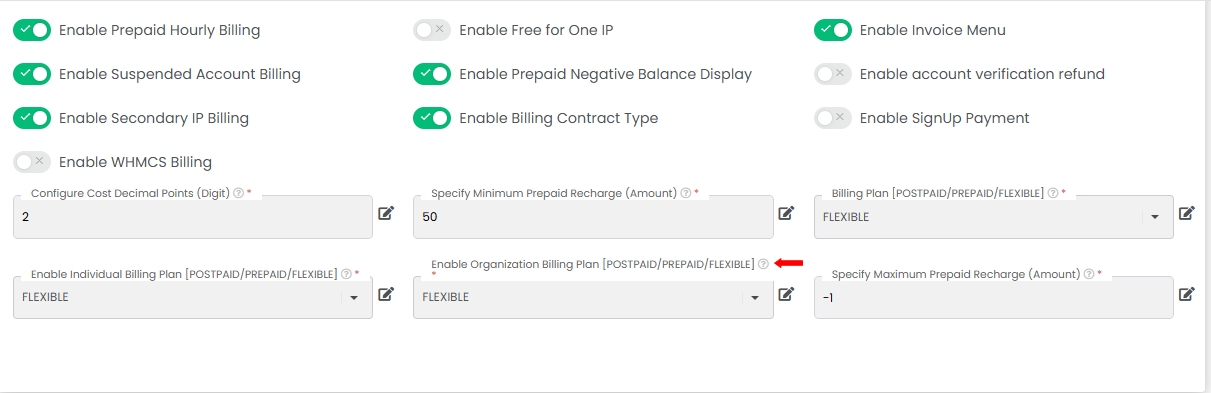
Enable Organization Billing Plan [POSTPAID/PREPAID/FLEXIBLE]
This feature enables the administrator to configure and assign a billing plan for organization-type customer accounts. It provides flexibility in selecting a billing method—Postpaid, Prepaid, or Flexible—based on the organization's needs.
The Flexible billing option allows an organization to operate under both Postpaid and Prepaid models, offering versatility in payment and billing methods.
1. Steps to Enable Organization Billing Plan :
-
Login into the admin portal.
-
Navigate to the Config section by clicking on the Config icon in the portal menu.
-
Under CMP Config section, click on the Feature Configuration link.
-
Select the Billing tab to lists all the billing-related features available for configuration.
2. Edit the setting:
-
In the Billing section, locate the Enable Organization Billing Plan [POSTPAID/PREPAID/FLEXIBLE] field.
-
Select the desire billing model from the drop-down list.
-
Click Save to apply the changes.
3. Effect on the Admin Portal :
-
Navigate to Portal > Clients > Create & Manage User Accounts.
-
Click on Add Client to add a new customer or select an existing customer to update their billing plan.
-
During the client creation process, select the Organization type as the client category.
-
You can Choose the desired Billing Plan from the drop-down list.
4. Effect on the User Portal :
- When an organization signs up through the User Portal, the selected billing plan is available during the Signup process.
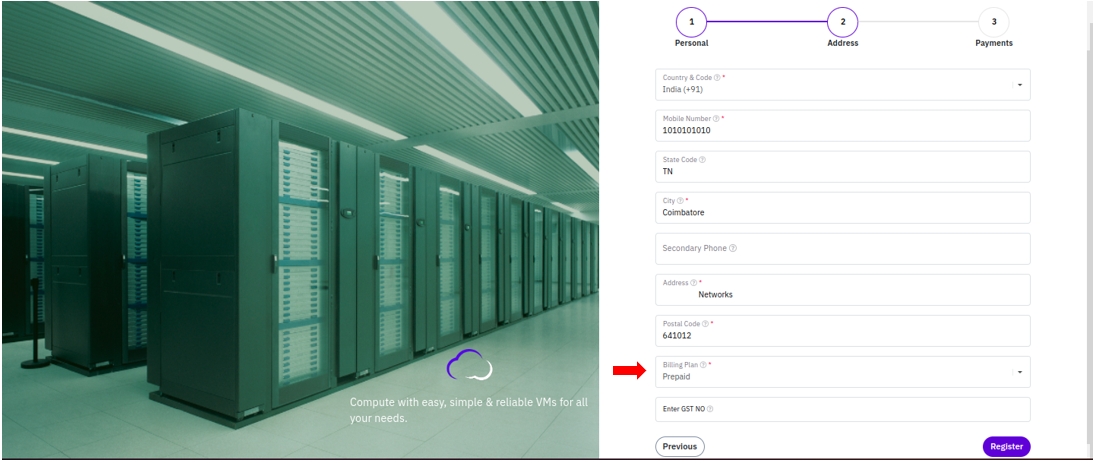
- This allows the organization to review and confirm their billing plan type as part of the account setup.
Billing Plan [POSTPAID/PREPAID/FLEXIBLE]
- This feature allows administrators to configure different billing plans for their customers based on their needs. It provides three options for billing plans: Postpaid, Prepaid, and Flexible. The Flexible option allows customers to use both Postpaid and Prepaid methods, giving them the flexibility to manage their payments and billing as required.
1. Steps to Enable Billing Plan :
-
Login into the admin portal.
-
Navigate to the Config section by clicking on the Config icon in the portal menu.
-
Under CMP Config section, click on the Feature Configuration link.
-
Select the Billing tab to lists all the billing-related features available for configuration.
2. Edit the setting:
-
In the Billing section, locate the Enable Billing Plan [POSTPAID/PREPAID/FLEXIBLE] field.
-
Select the desire billing model from the drop-down list.
-
Click Save to apply the changes.
3. Effect on the Admin Portal :
-
Navigate to Portal > Clients > Create & Manage User Accounts.
-
Click on Add Client to add a new customer.
-
In the Billing Plan section, select the appropriate billing type for the customer such as Postpaid, Prepaid & Flexible.
-
Save the changes to apply the selected billing plan to the customer's account.
4. Effect on the User Portal :
-
When customers sign up through the User Portal, they will encounter their assigned billing plan during the Signup process.
-
This allows them to understand their payment method and billing cycle as part of the account setup, ensuring clarity on how they will be billed for the services.
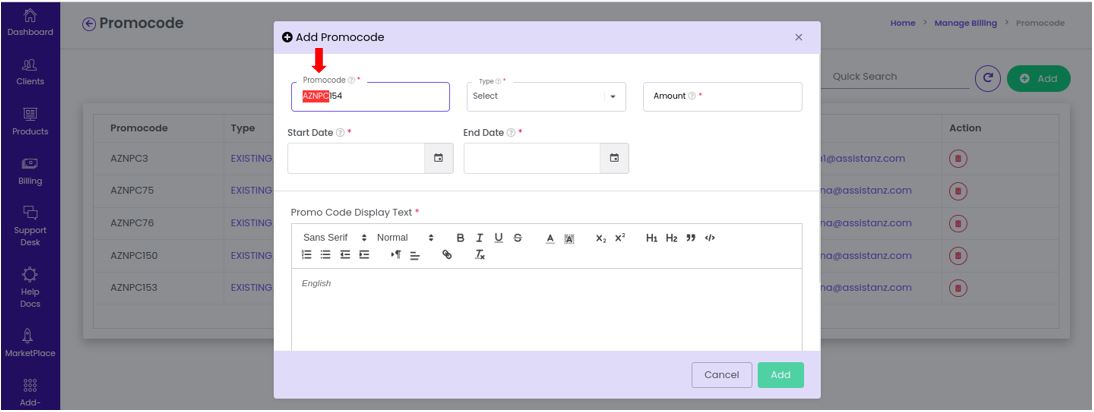
Promo Code Prefix
The Promo Code Prefix feature allows administrators to specify a prefix that will be used for generating promotional codes. This prefix helps in identifying and categorizing different promo codes, making it easier for admins and customers to recognize the type or source of a promotion. For example, a prefix like "SUMMER20" could be used for a summer campaign, or "NEWUSER" for promotions targeting new customers.
1. Steps to set Promocode Prefix :
-
Login into the admin portal.
-
Navigate to the Config section by clicking on the Config icon in the portal menu.
-
Under CMP Config section, click on the Feature Configuration link.
-
Select the Billing tab to lists all the billing-related features available for configuration.
2. Edit the setting:
-
In the Billing section, locate the Promo Code Prefix field.
-
To add the desired prefix, click the Edit button.
-
In the Promo Code Prefix field, enter the desired prefix for the promo code
-
Click Save to apply the changes.

3. Effect on the Admin Portal :
-
Navigate to Portal > Billing > Promo Code > Add
-
The prefix value is seen in the promocode area.
Specify Maximum Prepaid Recharge (Amount)
The Maximum Prepaid Recharge (Amount) feature allows administrators to set a cap on the maximum amount that a prepaid customer can recharge in a single transaction. This is specifically applicable to prepaid billing type customers and helps in managing how much credit a user can add to their account at once. The feature ensures that users don't exceed a certain recharge limit, which can help in managing risk, preventing overspending, and controlling credit balances.
1. Steps to set Promocode Prefix :
-
Login into the admin portal.
-
Navigate to the Config section by clicking on the Config icon in the portal menu.
-
Under CMP Config section, click on the Feature Configuration link.
-
Select the Billing tab to lists all the billing-related features available for configuration.
2. Edit the setting:
-
In the Billing section, locate the Specify Maximum Prepaid Recharge field.
-
To add the desired value, click the Edit button.
-
In the Specify Maximum Prepaid Recharge field, enter the desired value.
-
Click Save to apply the changes.

3. Effect on the User Portal :
-
Navigate to User Portal > Company > My profile
-
Go to the Payment Settings section.
-
Look for the Specify Maximum Prepaid Recharge (Amount) field.
-
Enter the desired maximum recharge amount that users are allowed to top up.
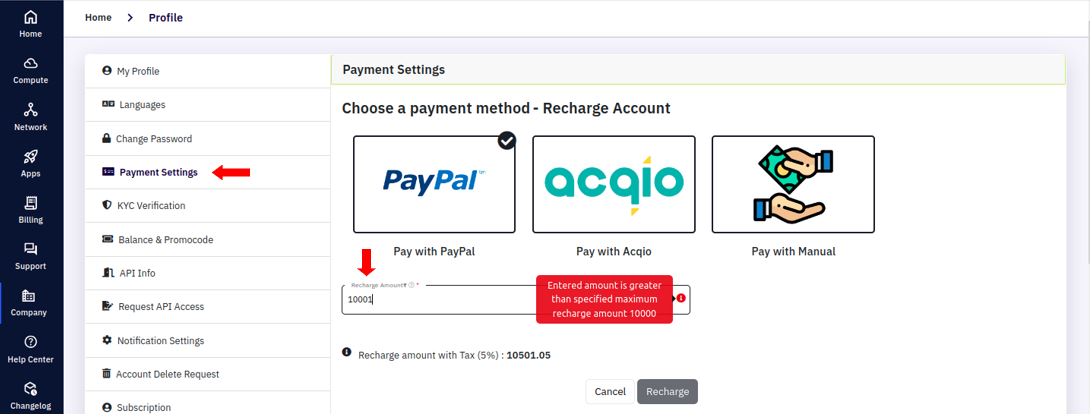
- Save the changes to apply the new maximum limit.