Instance
Instance Configuration
The Instance Tab within the Feature Configuration section allows administrators to manage settings and options related to virtual machine instances. It provides control over instance management, and customization options available to users. Through this tab, admins can enable or disable specific features, such as resource allocation, and other configuration settings, ensuring that users have access to the appropriate tools for managing their virtual instances effectively. This helps in standardizing instance settings across the platform and aligning them with organizational policies.
Enable Template Creation from Volume
The Enable Template Creation from Volume setting in the admin portal allows users in the Cloud Management Platform (CMP) to create their own custom templates based on existing volumes. This feature can be particularly useful for users who want to replicate specific configurations, operating systems, or application setups across multiple instances. By creating a template from a volume, users can easily spin up new instances that mirror the volume's configuration, streamlining deployment and saving time.
1. Steps to Enable Template Creation from Volume :
-
Login into the admin portal.
-
Navigate to the Config section by clicking on the Config icon in the portal menu.
-
Under CMP Config section, click on the Feature Configuration link.
-
Select the Instance tab to lists all the instance related features available for configuration.
2. Enable or Disable the Feature :
-
Look for the option labeled Enable Template Creation from Volume in the list of feature configurations.
-
Use the toggle switch to Enable or Disable the Feature.
-
The portal will automatically update the changes.

3. Effect in User Portal :
- Navigate to User Portal > Compute > Volume > Action > Create Template.

- When this feature is enabled, users will see the Create Template action in the Volume section, allowing them to easily convert volumes into templates.
Enable VM Native Console:
The Enable VM Native Console setting in the CMP (Cloud Management Platform) admin portal allows users to access the native console of their virtual machines (VMs). This feature is useful for accessing the backend of a VM directly, giving users more control over their instances and enabling troubleshooting or configuration at a deeper level. The native console provides direct access to the VM’s server backend, which can be critical for system administration tasks, especially in situations where remote SSH or RDP access is unavailable.
1. Steps to Enable VM Native Console :
-
Login into the admin portal.
-
Navigate to the Config section by clicking on the Config icon in the portal menu.
-
Under CMP Config section, click on the Feature Configuration link.
-
Select the Instance tab to lists all the instance related features available for configuration.
2. Enable or Disable the Feature :
-
Look for the option labeled Enable VM Native Console in the list of feature configurations.
-
Use the toggle switch to Enable or Disable the Feature.

- The portal will automatically update the changes.
3. Effect in the User Portal :
-
There are two locations where this console will appear. Here they are:
- Navigate to Portal > Compute > Instance > Actions > Native Console

- Compute > Instance > Select Instance > Console
Enable VM noVNC Console
The Enable VM noVNC Console setting in the CMP (Cloud Management Platform) admin portal allows users to access the backend console of their virtual machines (VMs) via noVNC (an HTML5-based VNC client). This feature enables users to interact with their VM consoles directly from the browser without needing additional VNC client software, providing a simple and convenient way to access the VM's backend for configuration, troubleshooting, and maintenance tasks.
1. Steps to Enable VM noVNC Console :
-
Login into the admin portal.
-
Navigate to the Config section by clicking on the Config icon in the portal menu.
-
Under CMP Config section, click on the Feature Configuration link.
-
Select the Instance tab to lists all the instance related features available for configuration.
2. Enable or Disable the Feature :
-
Look for the option labeled Enable VM noVNC Console in the list of feature configurations.
-
Use the toggle switch to Enable or Disable the Feature.

- The portal will automatically update the changes.
3. Effect in the User Portal :
- Navigate to User Portal > Compute > Instance > Actions > noVNC Console

- When enabled, users will see the noVNC Console option in the actions menu for each VM, enabling them to access the VM’s console directly from the browser without the need for additional VNC software.
Enable Instance Scheduler
The Enable Instance Scheduler setting in the CMP (Cloud Management Platform) admin portal allows users to schedule specific actions (such as starting or stopping) for their virtual machine (VM) instances at predefined times. This feature is particularly useful for optimizing resource usage and cost by automatically managing instance activity based on user-defined schedules.
1. Steps to Enable Instance Scheduler :
-
Login into the admin portal.
-
Navigate to the Config section by clicking on the Config icon in the portal menu.
-
Under CMP Config section, click on the Feature Configuration link.
-
Select the Instance tab to lists all the instance related features available for configuration.
2. Enable or Disable the Feature :
-
Look for the option labeled Enable Instance Scheduler in the list of feature configurations.
-
Use the toggle switch to Enable or Disable the Feature.

- The portal will automatically update the changes.
3. Effect in the User Portal :
- Navigate to Portal > Compute > Instance > Select Instance > VM Scheduler > Create
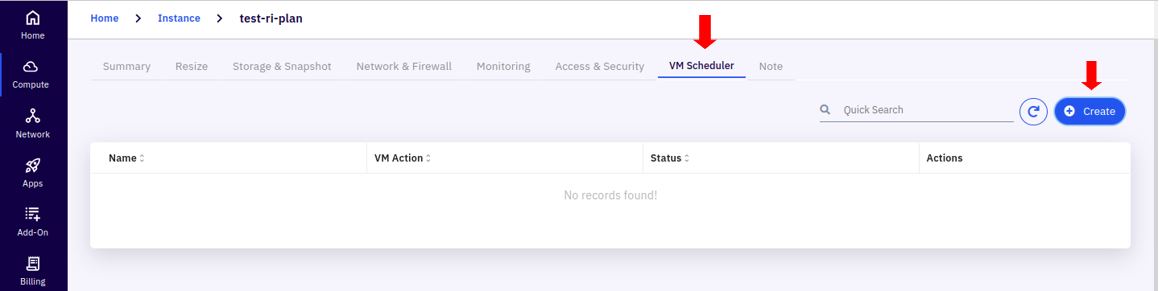
- When enabled, users will see the VM Scheduler option in the actions menu for each instance, allowing them to set automated schedules for their VMs.
Enable VM Auto-scaling
The Enable VM Auto-scaling feature in the CMP (Cloud Management Platform) admin portal allows users to set up automated scaling for their virtual machines (VMs) in response to changing resource demands. When enabled, this feature helps to automatically manage the resources allocated to a VM by scaling up or down based on CPU and memory usage thresholds, ensuring optimal performance without manual intervention.
1. Steps to Enable VM Auto-scaling :
-
Login into the admin portal.
-
Navigate to the Config section by clicking on the Config icon in the portal menu.
-
Under CMP Config section, click on the Feature Configuration link.
-
Select the Instance tab to lists all the instance related features available for configuration.
2. Enable or Disable the Feature :
-
Look for the option labeled **Enable Instance Scheduler ** in the list of feature configurations.
-
Use the toggle switch to Enable or Disable the Feature.

- The portal will automatically update the changes.
3. Effect in the User Portal :
- Navigate to User Portal > Compute > Autoscaling > Add Autoscale
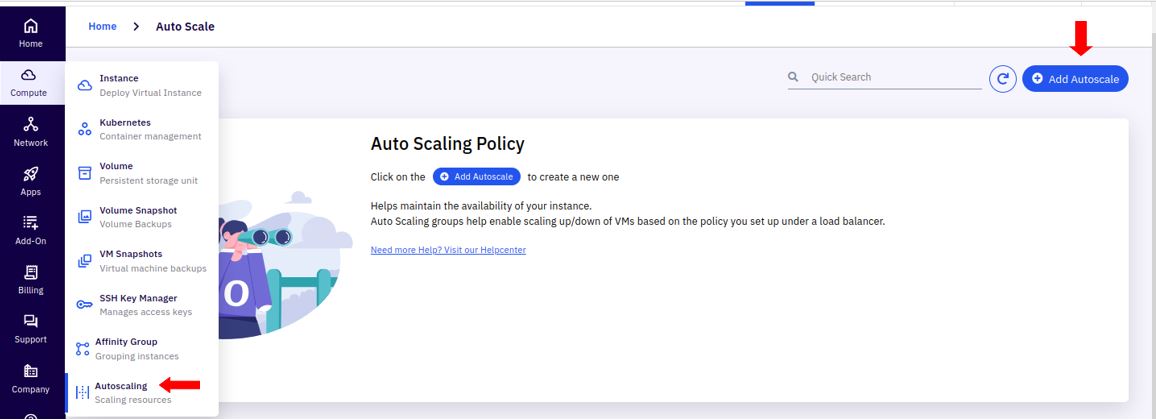
- Once the Enable VM Auto-scaling feature is enabled, users will see the Autoscaling option under the Compute section, allowing them to configure auto-scaling policies for their instances.
Enable SSH key Mandatory for VM Creation
The Enable SSH Key Mandatory for VM Creation setting in the Cloud Management Platform (CMP) admin portal allows administrators to enforce SSH key-based authentication for virtual machine (VM) creation. When enabled, this feature ensures that users must provide an SSH key when creating a VM. This enhances security by requiring users to use key-based authentication to access the VM instead of relying solely on username-password authentication, which is more vulnerable to security threats.
1. Steps to Enable SSH key Mandatory for VM Creation :
-
Login into the admin portal.
-
Navigate to the Config section by clicking on the Config icon in the portal menu.
-
Under CMP Config section, click on the Feature Configuration link.
-
Select the Instance tab to lists all the instance related features available for configuration.
2. Enable or Disable the Feature :
-
Look for the option labeled Enable SSH key Mandatory for VM Creation in the list of feature configurations.
-
Use the toggle switch to Enable or Disable the Feature.

- The portal will automatically update the changes.
3. Effect in the User Portal :
- Navigate to User Portal > Compute > Instance > Add Instance > Quick Deploy / Advanced Deploy
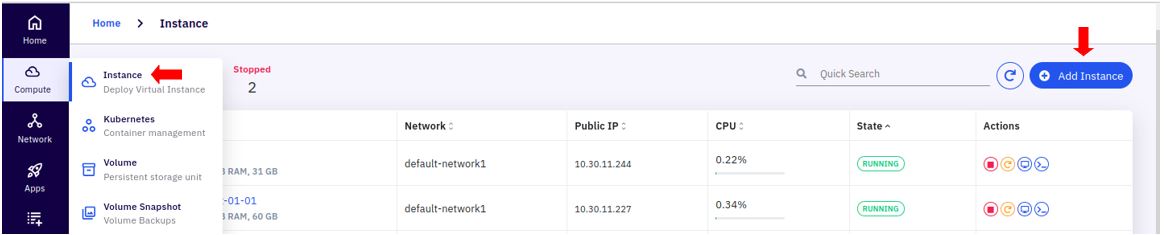
- When the Enable SSH Key Mandatory for VM Creation feature is enabled, users will see a required SSH Key field during the VM creation process, either in Quick Deploy or Advanced Deploy mode.

- This ensures that all VMs created under these modes are configured with SSH key-based authentication.
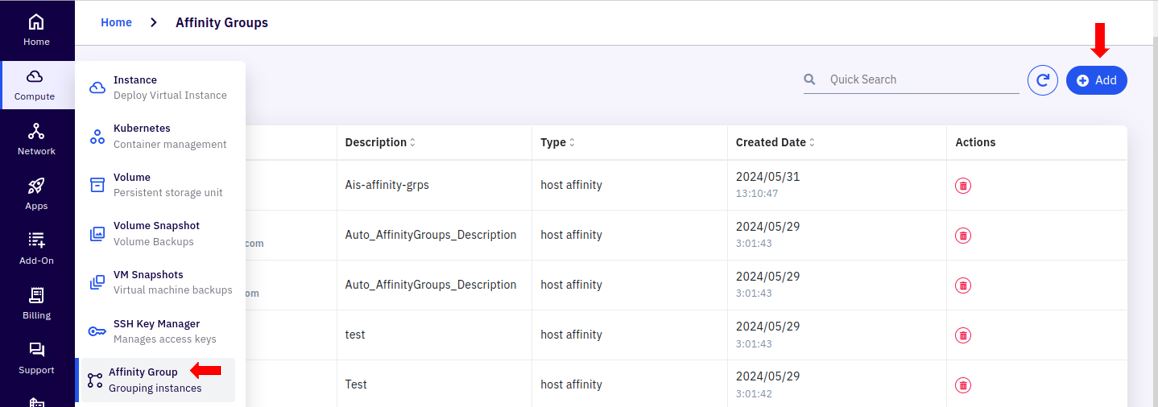
Enable Affinity Group
The Enable Affinity Group feature in the Cloud Management Platform (CMP) admin portal allows administrators to control the use of Affinity Groups within the user portal. Affinity Groups are configurations that define the relationship between virtual machines (VMs) and their host servers (hypervisors). By using Affinity Groups, users can specify preferences for where VMs should run—whether on the same host (Host Affinity) or on different hosts (Host Anti-Affinity). This is useful for organizing VM workloads based on performance, reliability, or specific application needs.
1. Steps to Enable Affinity Group :
-
Login into the admin portal.
-
Navigate to the Config section by clicking on the Config icon in the portal menu.
-
Under CMP Config section, click on the Feature Configuration link.
-
Select the Instance tab to lists all the instance related features available for configuration.
2. Enable or Disable the Feature :
- Look for the option labeled Enable Affinity Group in the list of feature configurations.
- Use the toggle switch to Enable or Disable the Feature.
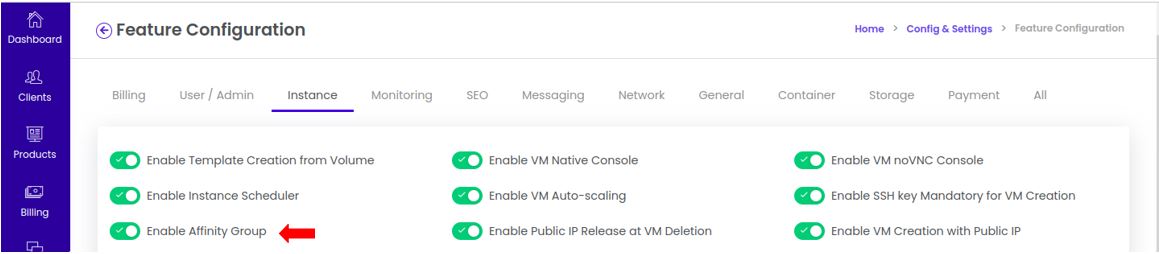
- The portal will automatically update the changes.
3. Effect in the User Portal :
-
In the User Portal, go to Compute > Affinity Group.
-
Click Add to create a new Affinity Group.
Enable Public IP Release at VM Deletion
The Enable Public IP Release at VM Deletion feature in the Cloud Management Platform (CMP) admin portal allows administrators to control the automatic release of public IP addresses associated with virtual machines (VMs) upon their deletion. This setting is particularly useful for managing IP resources effectively and reducing unnecessary costs associated with unused public IP addresses.
This feature provides administrators with control over whether public IP addresses should be automatically released back to the available IP pool when a VM is deleted. Public IP addresses are typically a limited and sometimes costly resource, so enabling this feature can help optimize IP allocation and avoid retaining IPs that are no longer in use.
1. Steps to Enable Public IP Release at VM Deletion :
-
Login into the admin portal.
-
Navigate to the Config section by clicking on the Config icon in the portal menu.
-
Under CMP Config section, click on the Feature Configuration link.
-
Select the Instance tab to lists all the instance related features available for configuration.
2. Enable or Disable the Feature :
-
Look for the option labeled Enable Public IP Release at VM Deletion in the list of feature configurations.
-
Use the toggle switch to Enable or Disable the Feature.
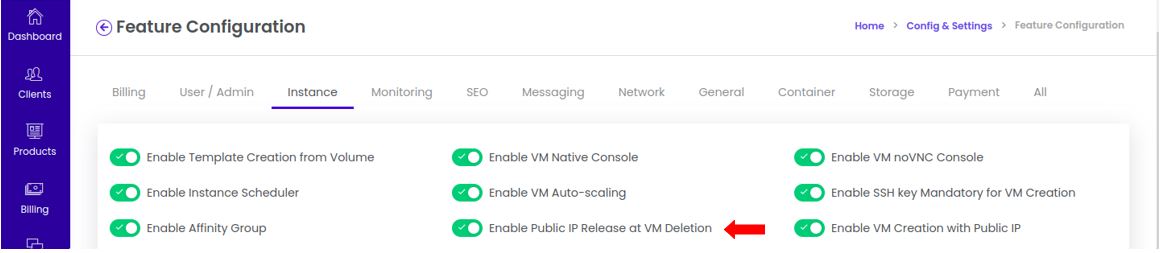
- The portal will automatically update the changes.
3. Effect in the User Portal :
-
In the User Portal, go to Compute > Instance.
-
Locate and select the VM that you want to delete.
-
Click on the Delete option for the selected VM. This will open the deletion confirmation screen.
-
On the confirmation screen, click on Show Associated Resources to display any resources tied to the VM, including the public IP address.
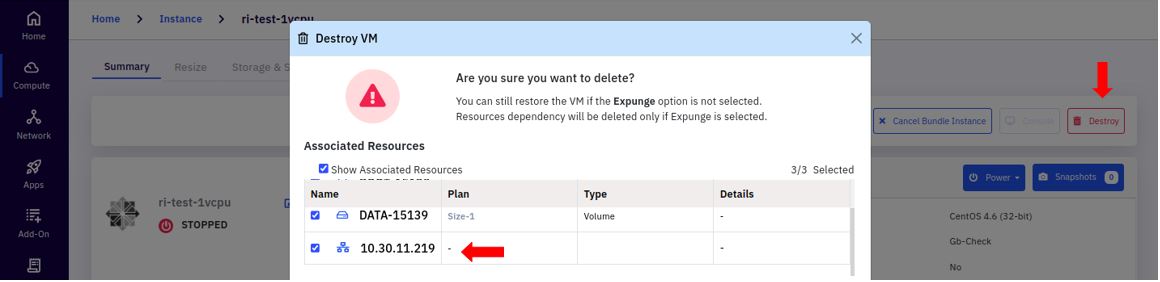
-
If the Enable Public IP Release at VM Deletion feature is enabled by the admin, the "Release Public IP" option will be automatically pre-selected. This means that when you confirm the deletion of the VM, the public IP will also be released back to the available pool.
-
If the feature is disabled, the "Release Public IP" option will not be pre-selected, and you will need to manually select it if you want to release the IP address upon VM deletion.
Enable VM Creation with Public IP
The Enable VM Creation with Public IP feature in the admin portal is a configuration option that allows administrators to control whether users can automatically associate a public IP address with a new virtual machine (VM) during the creation process in the Cloud Management Platform (CMP) user portal. Enabling this feature can streamline network setup for new VMs, providing public internet access by default when needed.
1. Steps to Enable VM Creation with Public IP :
-
Login into the admin portal.
-
Navigate to the Config section by clicking on the Config icon in the portal menu.
-
Under CMP Config section, click on the Feature Configuration link.
-
Select the Instance tab to lists all the instance related features available for configuration.
2. Enable or Disable the Feature :
-
Look for the option labeled Enable VM Creation with Public IP in the list of feature configurations.
-
Use the toggle switch to Enable or Disable the Feature.

- The portal will automatically update the changes.
3. Effect in the User Portal :
- Navigate to User Portal > Compute > Instance > Add Instance > Quick Deploy > Choose Your Network

- When Enable VM Creation with Public IP is enabled, users will see the "Create Public IP" option automatically selected under Choose Your Network during the VM setup process. This ensures that new VMs are automatically configured with public IPs if this is the organization’s standard practice.
Enable VM Creation with Auto Firewall
The Enable VM Creation with Auto Firewall feature in the admin portal is a configuration option that allows administrators to control whether a default firewall configuration (security policy) is automatically applied when a new virtual machine (VM) is created in the Cloud Management Platform (CMP) user portal. This feature is designed to simplify the process of securing new VMs by automatically setting up a firewall, which helps protect VMs from unauthorized access and improves network security.
1. Steps to Enable VM Creation with Auto Firewall :
-
Login into the admin portal.
-
Navigate to the Config section by clicking on the Config icon in the portal menu.
-
Under CMP Config section, click on the Feature Configuration link.
-
Select the Instance tab to lists all the instance related features available for configuration.
2. Enable or Disable the Feature :
-
Look for the option labeled Enable VM Creation with Auto Firewall in the list of feature configurations.
-
Use the toggle switch to Enable or Disable the Feature.
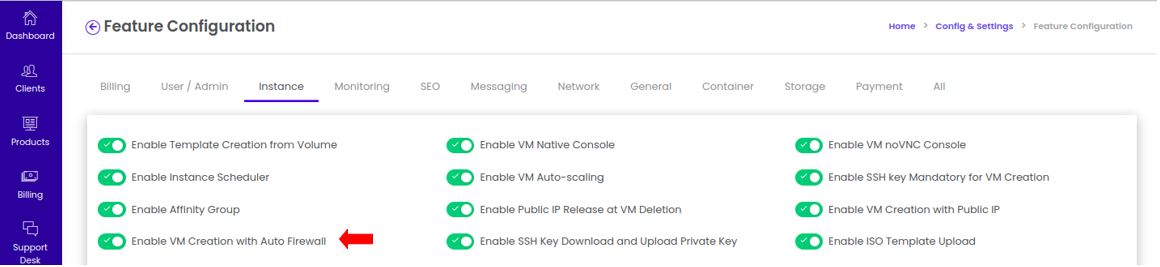
- The portal will automatically update the changes.
3. Effect in the User Portal :
- Navigate to User Portal > Compute > Instance > Add Instance > Quick Deploy > Setup Cloud Firewall (Security Policy)
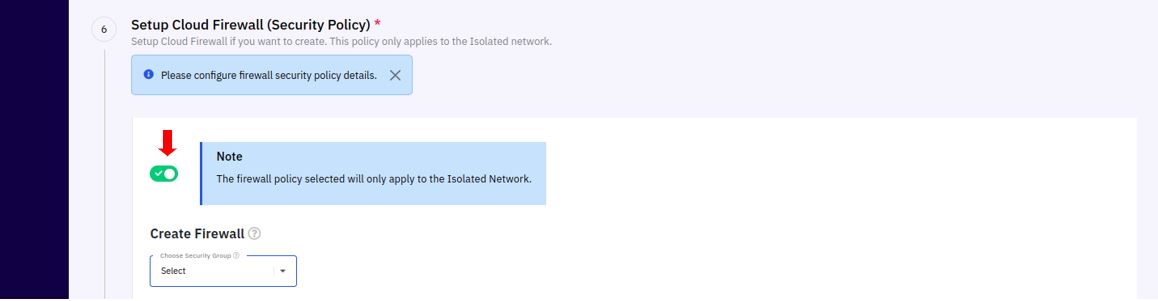
- When Enable VM Creation with Auto Firewall is enabled, users will see the "Auto Firewall" option automatically selected under Setup Cloud Firewall during the VM setup process. This ensures that new VMs are automatically configured with firewall rules to protect them from unauthorized access.
Enable SSH Key Download and Upload Private Key:
The Enable SSH Key Download and Upload Private Key feature in the admin portal allows administrators to configure whether users in the Cloud Management Platform (CMP) user portal can download and upload SSH private keys associated with their virtual machine (VM) instances. This feature is beneficial for users who need secure, direct access to their instances via SSH, as it provides options to manage SSH keys conveniently within the CMP interface
1. Steps to Enable SSH Key Download and Upload Private Key :
-
Login into the admin portal.
-
Navigate to the Config section by clicking on the Config icon in the portal menu.
-
Under CMP Config section, click on the Feature Configuration link.
-
Select the Instance tab to lists all the instance related features available for configuration.
2. Enable or Disable the Feature :
-
Look for the option labeled Enable SSH Key Download and Upload Private Key in the list of feature configurations.
-
Use the toggle switch to Enable or Disable the Feature.
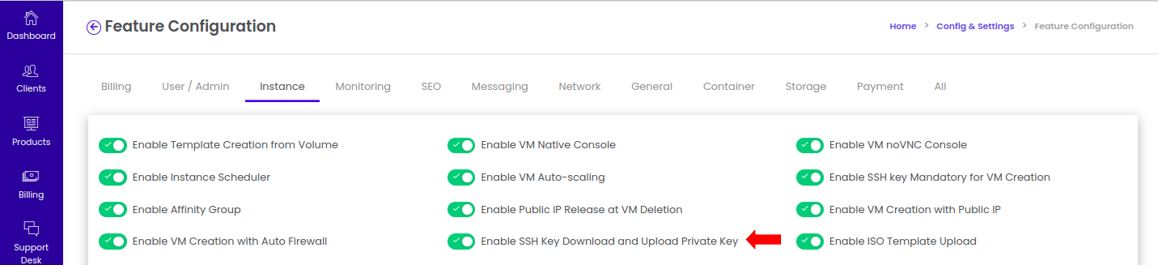
- The portal will automatically update the changes.
3. Effect in the User Portal :
- Navigate to User Portal > Compute > Instance > Select Instance > Access & Security > Actions
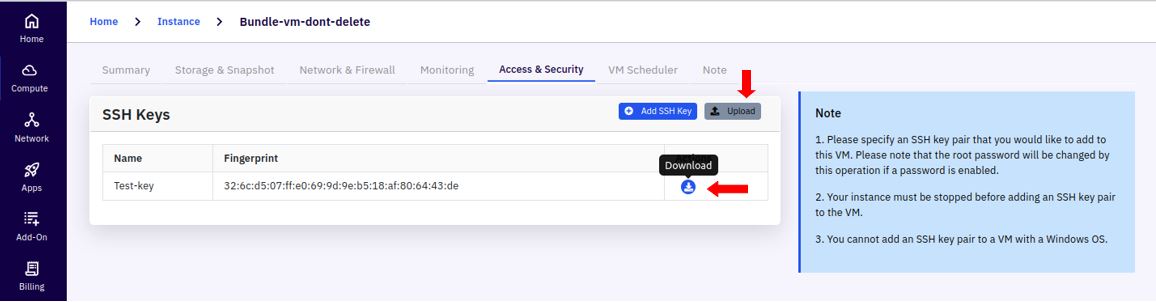
- When Enable SSH Key Download and Upload Private Key is enabled, users will see options to download and upload SSH keys in the Actions menu under Access & Security for their selected instance.
Enable ISO Template Upload:
The Enable ISO Template Upload feature in the admin portal allows administrators to control whether users in the Cloud Management Platform (CMP) portal can upload ISO templates. ISO templates are commonly used for installing operating systems or specific software configurations onto virtual machines (VMs). Enabling this feature allows users to customize their VM deployments by using their own ISO files directly through the CMP portal.
1. Steps to Enable ISO Template Upload :
-
Login into the admin portal.
-
Navigate to the Config section by clicking on the Config icon in the portal menu.
-
Under CMP Config section, click on the Feature Configuration link.
-
Select the Instance tab to lists all the instance related features available for configuration.
2. Enable or Disable the Feature :
-
Look for the option labeled Enable ISO Template Upload in the list of feature configurations.
-
Use the toggle switch to Enable or Disable the Feature.
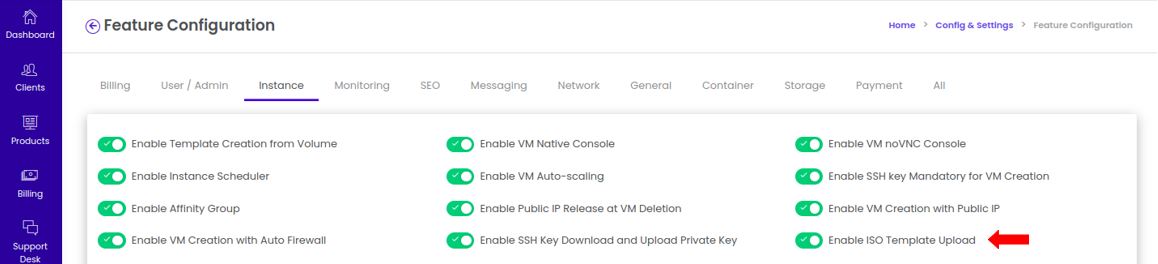
- The portal will automatically update the changes.
3. Effect in the User Portal :
- Navigate to User Portal > Apps > My Images & ISO > ISO > Upload ISO Template
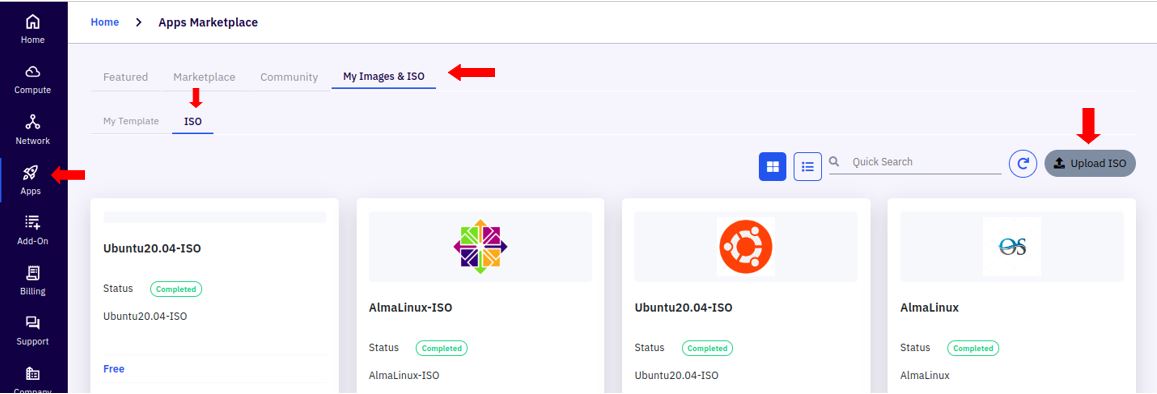
- When Enable ISO Template Upload is enabled, users will see an Upload ISO Template option in the ISO section under My Images & ISO. This allows users to quickly upload and manage their own ISO templates for VM deployments.
Enable OS Template Upload
The Enable OS Template Upload feature in the admin portal allows administrators to control whether users can upload their own Operating System (OS) templates in the Cloud Management Platform (CMP) user portal. This feature is particularly useful for users who need to deploy virtual machines (VMs) with specific OS configurations that may not be available in the standard template catalog provided by the CMP. Enabling this feature provides users with the flexibility to create custom VM environments tailored to their specific needs.
1. Steps to Enable OS Template Upload :
-
Login into the admin portal.
-
Navigate to the Config section by clicking on the Config icon in the portal menu.
-
Under CMP Config section, click on the Feature Configuration link.
-
Select the Instance tab to lists all the instance related features available for configuration.
2. Enable or Disable the Feature :
-
Look for the option labeled Enable OS Template Upload in the list of feature configurations.
-
Use the toggle switch to Enable or Disable the Feature.
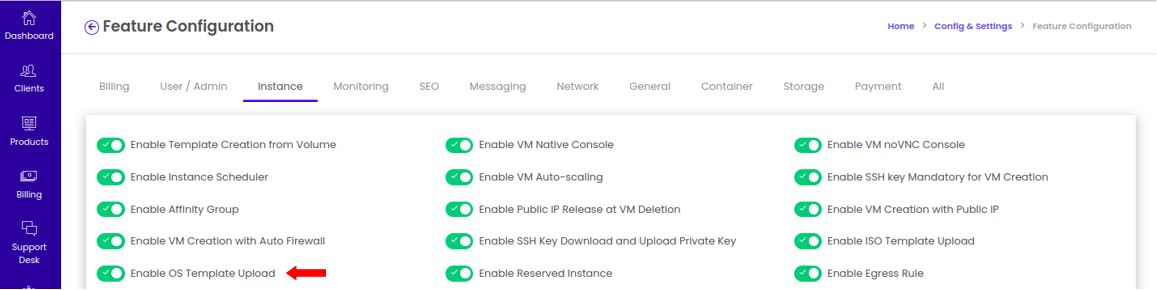
- The portal will automatically update the changes.
3. Effect in the User Portal :
- Navigate to User Portal > Apps > My Images & ISO > My Template > Upload OS Template
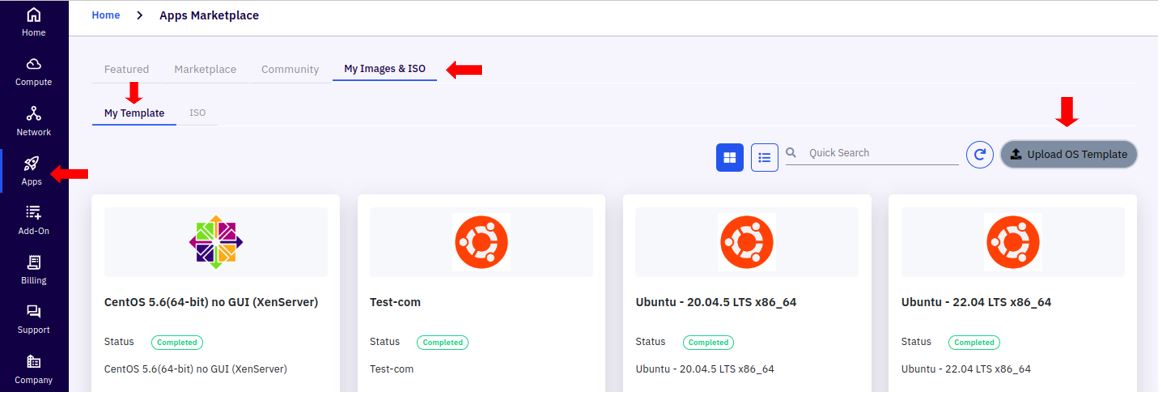
- When Enable OS Template Upload is enabled, users will see an Upload OS Template option under the My Template section in My Images & ISO. This allows users to manage and deploy custom OS templates as part of their VM deployment options.
Enable Reserved Instance
The Enable Reserved Instance feature in the admin portal is designed to allow administrators to create and manage Reserved Instance (RI) offerings within the Cloud Management Platform (CMP). Reserved Instances are a cost-effective way to offer compute resources by allowing customers to commit to longer-term contracts for instances at discounted rates. This feature is especially useful for customers who need reliable, consistent access to specific instance types and are willing to commit to using them over an extended period, often leading to cost savings compared to on-demand instances.
1. Steps to Enable Reserved Instance :
-
Login into the admin portal.
-
Navigate to the Config section by clicking on the Config icon in the portal menu.
-
Under CMP Config section, click on the Feature Configuration link.
-
Select the Instance tab to lists all the instance related features available for configuration.
2. Enable or Disable the Feature :
-
Look for the option labeled Enable Reserved Instance in the list of feature configurations.
-
Use the toggle switch to Enable or Disable the Feature.
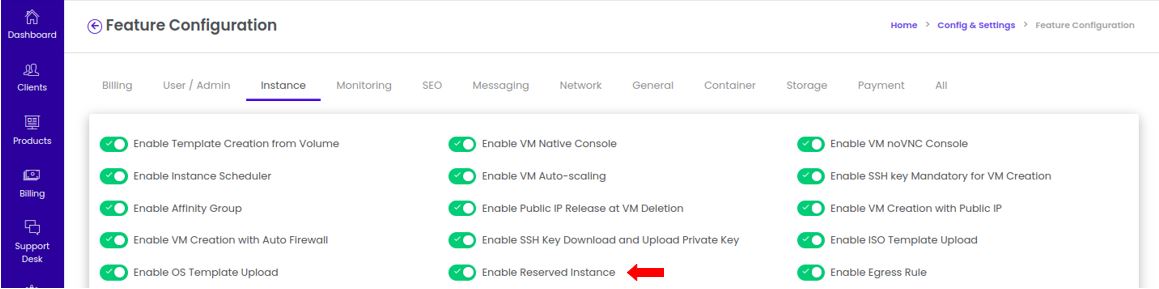
- The portal will automatically update the changes.
3. Effect in the Admin Portal :
-
Navigate to Admin Portal > Products > Compute / Instance Offerings
-
Select Create Instance Offer to start a new instance offering.
-
Under Offer Configuration section, there is an checkbox to enable the Reserved Instance offering.
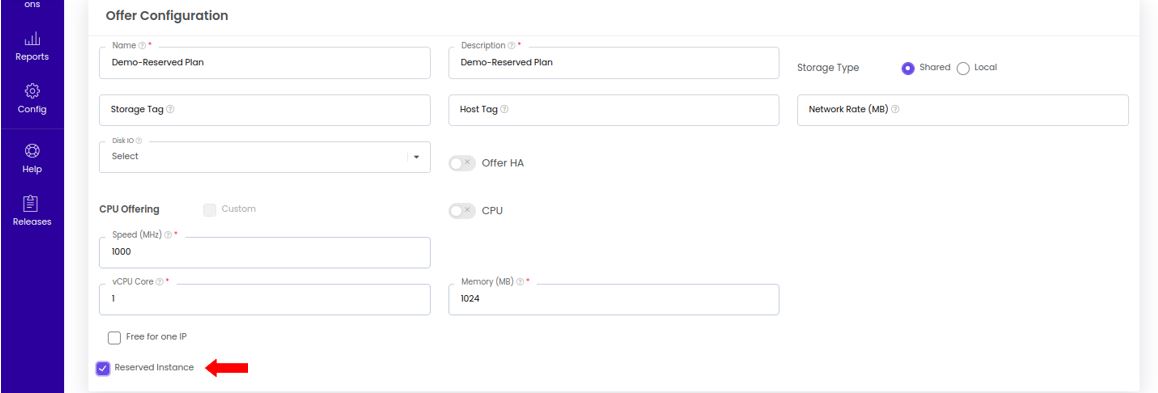
- Save the configuration to make the reserved instance offering available for selection by users.
4. Effect in the User Portal :
-
Navigate to User portal > Compute > Instance > Add Instance > Advanced Deploy
-
When adding a new instance, users will be prompted to select an instance plan. Reserved Instance options, if available, will be listed here.
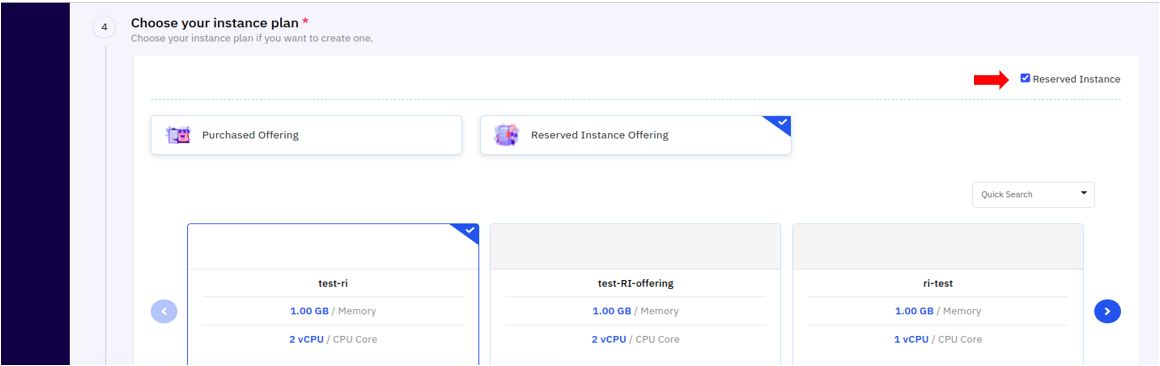
-
Users can choose the reserved instance plan that best suits their needs, completing the deployment with the discounted pricing and commitment term.
-
In addition, you can convert an Existing On-Demand Instance to a Reserved Instance Plan.
-
For this, navigate to User portal > Compute > Instance > Select any Stopped State Instance > Resize > Purchase Savings Plans.

- By selecting the “Purchase Savings Plans” option, users can lock in the instance as a reserved instance, benefiting from reduced rates moving forward.
Enable Egress Rule
The Enable Egress Rule feature in the admin portal allows administrators to configure default egress (outbound) firewall rules for virtual machine (VM) instances during the creation process within the Cloud Management Platform (CMP). Egress rules control the outbound network traffic from a VM to external networks, ensuring that only authorized traffic is allowed to leave the instance. This feature is particularly useful for enhancing security by enforcing strict network access policies by default.
1. Steps to Enable Egress Rule :
-
Login into the admin portal.
-
Navigate to the Config section by clicking on the Config icon in the portal menu.
-
Under CMP Config section, click on the Feature Configuration link.
-
Select the Instance tab to lists all the instance related features available for configuration.
2. Enable or Disable the Feature :
-
Look for the option labeled Enable Egress Rule in the list of feature configurations.
-
Use the toggle switch to Enable or Disable the Feature.
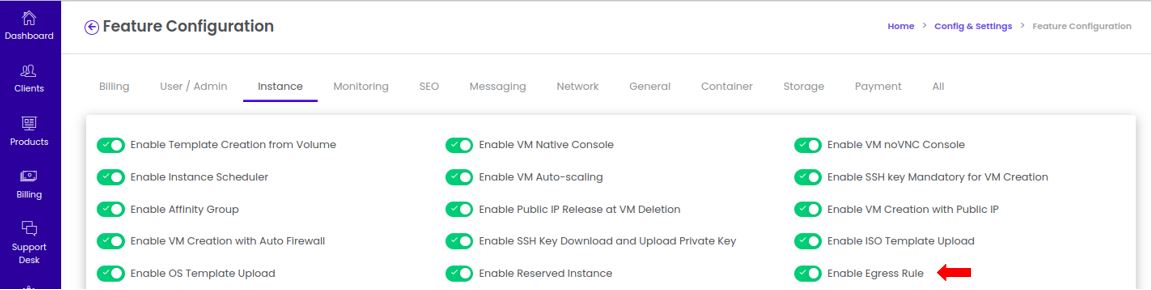
- The portal will automatically update the changes.
3. Effect in the User Portal :
- Navigate to User Portal > Network > Basic Network > Select Network > Egress Rule.
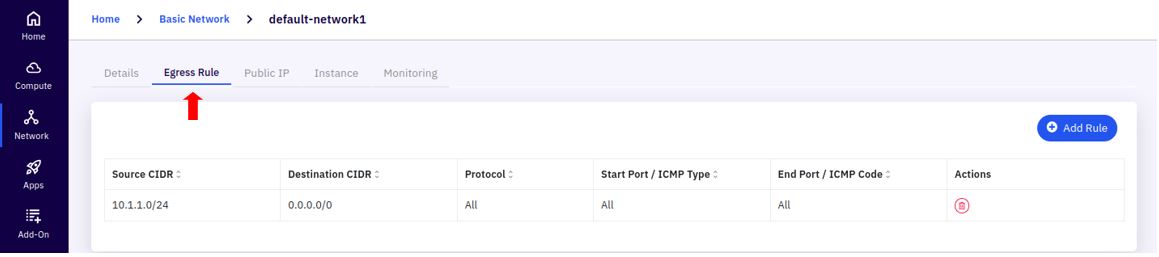
- With the Enable Egress Rule feature activated, users can manage and view the egress rules applied to their network configurations.
Configure Auto-scaling Type [Native/CMP]
-
The Auto-scaling Type configuration allows administrators to set the preferred type of auto-scaling for instances and resources.
-
There are two types of auto-scaling options available:
-
Native Auto-scaling: Directly utilizes the underlying cloud provider’s auto-scaling capabilities.
-
CMP (Customer Management Platform) Auto-scaling: Utilizes the custom auto-scaling logic provided by the CMP, which may include additional controls and customized scaling parameters tailored to specific requirements.
-
1. Steps to Configure Auto-scaling Type [Native/CMP] :
-
Login into the admin portal.
-
Navigate to the Config section by clicking on the Config icon in the portal menu.
-
Under CMP Config section, click on the Feature Configuration link.
-
Select the Instance tab to lists all the instance related features available for configuration.
2. Enable the Feature :
-
Look for the option labeled Configure Auto-scaling Type [Native/CMP] in the list of feature configurations.
-
Click on the edit button and select the desire type from the drop-down list.
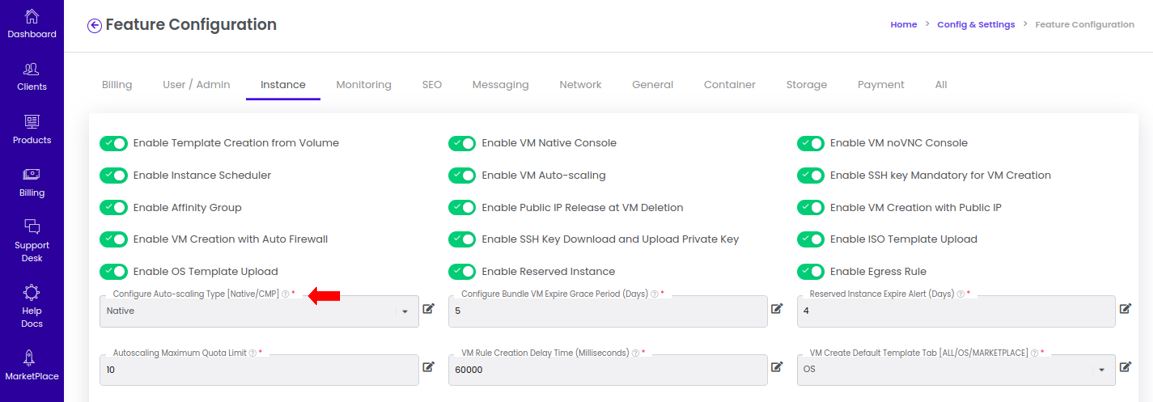
- Click Save to apply the changes.
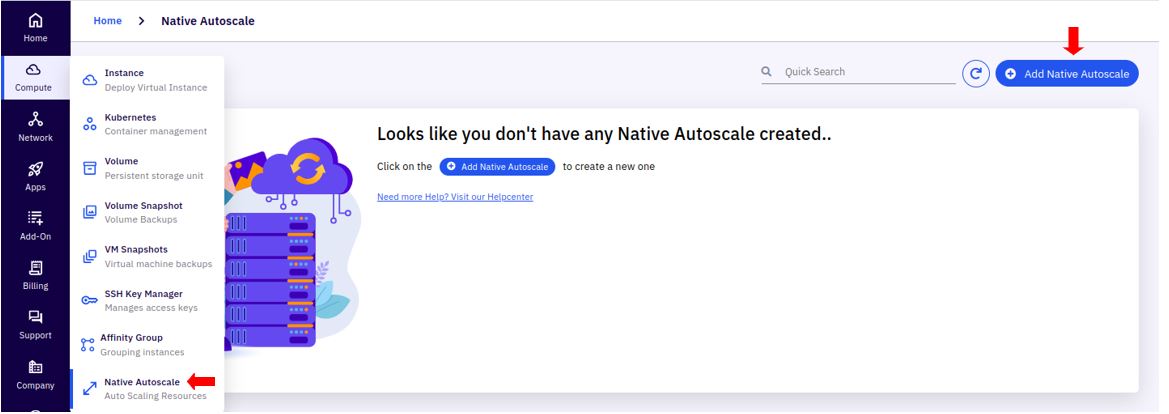
3. Effect in the User Portal :
-
Navigate to User Portal > Compute > Native Autoscale > Add Native Autoscale
-
Once configured, the selected auto-scaling type is reflected in the User CMP Portal.
Configure Bundle VM Expire Grace Period (Days)
The Bundle VM Expire Grace Period configuration allows administrators to set a grace period, in days, for bundled virtual machines (VMs) after their intended expiration date. This feature helps prevent immediate termination of VMs after their expiration date, giving users extra time to complete tasks, retrieve data, or extend their usage if needed.
1. Steps to Configure Bundle VM Expire Grace Period (Days) :
-
Login into the admin portal.
-
Navigate to the Config section by clicking on the Config icon in the portal menu.
-
Under CMP Config section, click on the Feature Configuration link.
-
Select the Instance tab to lists all the instance related features available for configuration.
2. Enable the Feature :
-
Look for the option labeled Configure Bundle VM Expire Grace Period (Days) in the list of feature configurations.
-
Click on the edit button and type the desire days in the text box.

- Click Save to apply the changes.
3. How It Works :
-
When a bundle VM reaches its original expiration date, the configured grace period kicks in, providing users with additional time before the VM is fully deactivated or deleted.
-
During this grace period, users are typically allowed to access the VM, but they are often notified about the impending expiration and may be advised to extend their resources if needed.
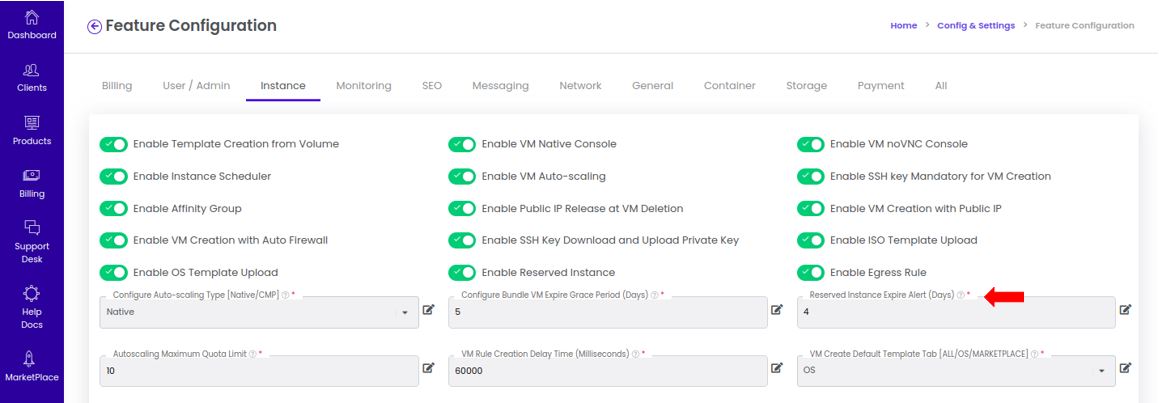
Reserved Instance Expire Alert (Days)
The Reserved Instance Expire Alert (Days) feature allows administrators to configure an alert notification for reserved instances that are about to expire. Reserved instances are virtual machines (VMs) that customers reserve for a set period to take advantage of cost savings. This feature ensures that users are notified in advance when their reserved instance is nearing the end of its reserved term, allowing them time to make necessary decisions, such as renewing or switching to a different instance plan.
1. Steps to Configure Reserved Instance Expire Alert (Days) :
-
Login into the admin portal.
-
Navigate to the Config section by clicking on the Config icon in the portal menu.
-
Under CMP Config section, click on the Feature Configuration link.
-
Select the Instance tab to lists all the instance related features available for configuration.
2. Enable the Feature :
-
Look for the option labeled Reserved Instance Expire Alert (Days) in the list of feature configurations.
-
Click on the edit button and type the desire days in the text box.
-
Click Save to apply the changes.
- For example, if this feature is configured with a value of 4 days, users will receive an alert 4 days before their reserved instance term ends.
3. Effect in the User Portal :
- Navigate to User Portal > Compute > Instance > Select any Reserved Instance > Resize > Actions > Reserved Offering Details.
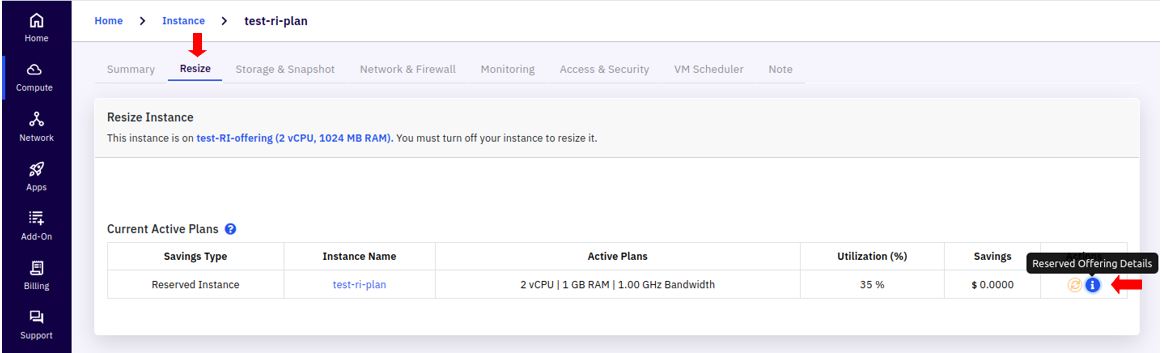
- On the Reserved Offering Details page, users will see the expiration date of their reserved instance, along with any active notifications alerting them to the approaching expiration.
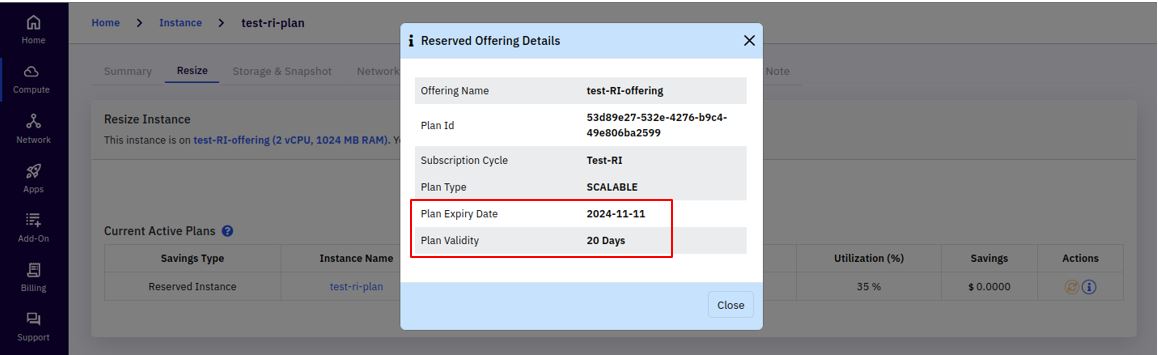
- Users have the option to renew, convert, or terminate the reserved instance based on their needs, ensuring continuity and cost management.
Autoscaling Maximum Quota Limit
The Autoscaling Maximum Quota Limit feature allows administrators to set a maximum limit on the number of virtual machines (VMs) that can be created automatically through the autoscaling feature in the user CMP (Cloud Management Platform) portal. Autoscaling enables the system to automatically adjust the number of VMs based on the workload demand, creating additional VMs when resource usage, such as CPU or memory, reaches a defined threshold.
This limit ensures that the autoscaling feature remains within the specified boundaries, preventing excessive VM creation, which could lead to resource overconsumption or unexpected costs.
1. Steps to Configure Autoscaling Maximum Quota Limit
-
Login into the admin portal.
-
Navigate to the Config section by clicking on the Config icon in the portal menu.
-
Under CMP Config section, click on the Feature Configuration link.
-
Select the Instance tab to lists all the instance related features available for configuration.
2. Enable the Feature :
-
Look for the option labeled Autoscaling Maximum Quota Limit in the list of feature configurations.
-
Click on the edit button and type the desire value in the text box.

- Click Save to apply the changes.
3. User Experience in the User Portal :
-
For example, if the Autoscaling Maximum Quota Limit is set to 10, autoscaling can create up to 10 VMs automatically for that account. Beyond this limit, no additional VMs will be created, even if resource thresholds are met.
-
Once the maximum quota is reached, autoscaling will no longer create new VMs unless existing VMs are scaled down or removed.
VM Rule Creation Delay Time (Milliseconds)
The VM Rule Creation Delay Time setting allows administrators to configure a delay time (in milliseconds) between the initiation of virtual machine (VM) rule creation actions within the CMP (Cloud Management Platform) portal. This delay applies to various automated rules or configurations related to VM creation, such as firewall rules, network policies, or other configurations that might be applied to a VM upon its setup.
By setting this delay, administrators can control the timing of rule application during the VM provisioning process. This delay can help manage potential resource congestion, ensure system stability, or give enough time for prior actions to complete before additional configurations are applied to a new VM.
1. Steps to Configure VM Rule Creation Delay Time (Milliseconds)
-
Login into the admin portal.
-
Navigate to the Config section by clicking on the Config icon in the portal menu.
-
Under CMP Config section, click on the Feature Configuration link.
-
Select the Instance tab to lists all the instance related features available for configuration.
2. Enable the Feature :
-
Look for the option labeled Configure VM Rule Creation Delay Time (Milliseconds) in the list of feature configurations.
-
Click on the edit button and type the desire value in the text box.
-
Click Save to apply the changes.
3. User Experience in the User Portal :
-
Suppose an admin sets a VM Rule Creation Delay Time of 60000 ms (60 seconds).
-
When a user creates a VM, the system waits for 60 seconds before it begins applying associated rules (like network and security configurations) to the newly created VM.
-
This 60-second delay gives the system enough time to handle other tasks and ensures that rules are applied in an orderly manner, especially useful in environments with high VM creation rates.
VM Create Default Template Tab [ALL/OS/MARKETPLACE]
The VM Create Default Template Tab feature allows administrators to configure the default category tab that users will see when they are creating a new virtual machine (VM) in the CMP (Cloud Management Platform) portal. This setting determines which template category (tab) is displayed by default on the Choose Your Distribution screen, where users select an operating system or application template to deploy on their VM.
1. Steps to Configure VM Create Default Template Tab [ALL/OS/MARKETPLACE]
-
Login into the admin portal.
-
Navigate to the Config section by clicking on the Config icon in the portal menu.
-
Under CMP Config section, click on the Feature Configuration link.
-
Select the Instance tab to lists all the instance related features available for configuration.
2. Enable the Feature :
-
Look for the option labeled VM Create Default Template Tab [ALL/OS/MARKETPLACE] in the list of feature configurations.
-
Click on the edit button and select the desire type from the drop-down list.
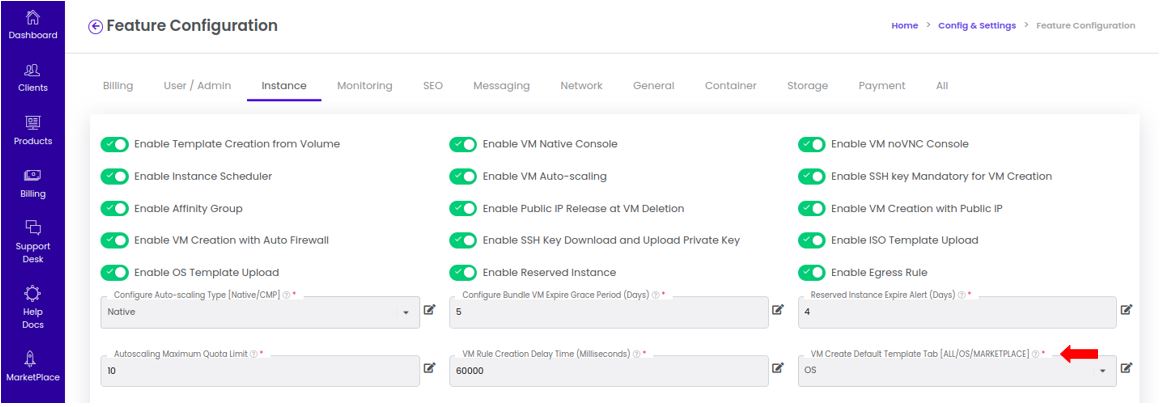
- Click Save to apply the changes.
3. Effect in the User Portal :
-
Navigate to User Portal > Compute > Instance > Add Instance > Quick / Advanced Deploy
-
Users will see the default tab as set by the admin (ALL, OS, or MARKETPLACE) when they reach the Choose Your Distribution screen.
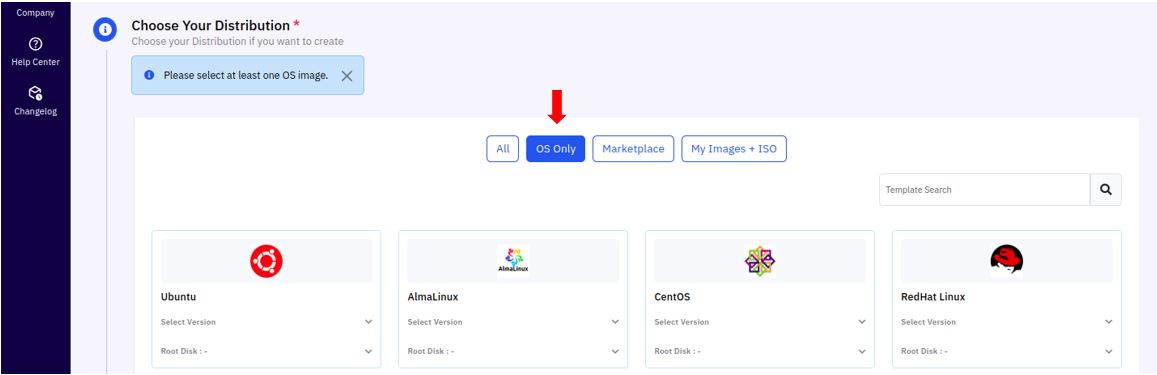
- This default setting helps guide users to the most relevant template category based on the organization's configuration.