User & Admin
User & Admin Feature Configuration
The User & Admin Feature Configuration feature allows administrators to manage and customize the functionalities available to both users and admins within a platform.
Enable Domain Creation
The Enable Domain Creation by Admin feature in the CMP (Cloud Management Platform) portal allows administrators to control whether new domains can be created within the admin portal. This feature is part of the CMP configuration settings and is especially useful in environments where the creation of domains needs to be controlled centrally by the administrator.
Domains in a cloud management system are often used to create isolated sections of resources that may represent different business units, customer accounts, or organizational groups. By enabling or disabling this feature, the admin can manage the capability to add new domains as needed, ensuring the right level of organizational segmentation and management within the portal.
1. Steps to Enable Domain Creation:
-
Login into the admin portal.
-
Navigate to the Config section by clicking on the Config icon in the portal menu.
-
Under CMP Config section, click on the Feature Configuration link.
-
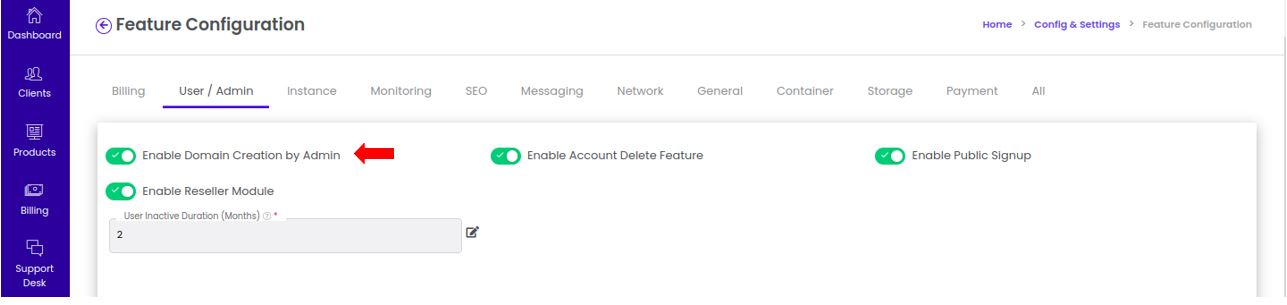
Select the User/Admin tab to lists all the user & admin features available for configuration.
2. Locate the Domain Creation Setting :
- Find the option labeled Enable Domain Creation by Admin in the configuration list.
3. Enable or Disable the Setting :
-
Toggle the setting to enable or disable based on your organization’s requirements.
-
The portal will automatically update the changes.
4. Changes Reflected in the Admin Portal :
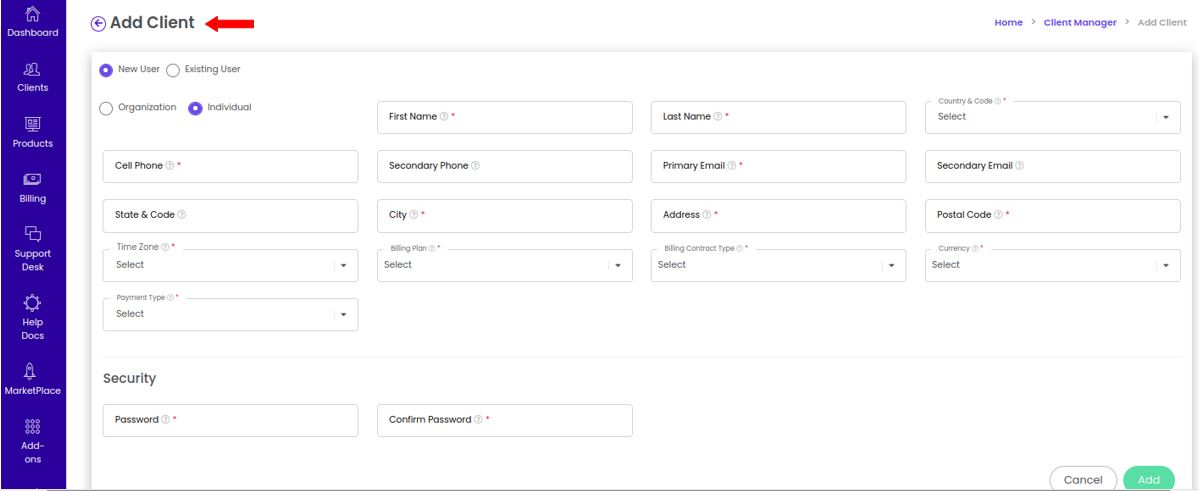
- Go to Admin Portal > Clients > Create & Manage User Accounts > Add Client
-
When the feature is enabled, admins will see the option to create a new domain while setting up or managing client accounts.
-
When the feature is disabled, this domain creation option will be hidden or unavailable, limiting the admin’s ability to add new domains.
Enable Account Delete Feature
The Enable Account Delete Feature in the CMP (Cloud Management Platform) portal provides administrators with control over whether users can initiate an account deletion request from within the user portal. This feature is essential for organizations that want to allow users the flexibility to close or delete their accounts, while also retaining control over when and how such requests are processed.
This setting can be enabled or disabled based on the organization’s account management policies and user autonomy requirements.
1. Steps to Enable Account Delete Feature :
-
Login into the admin portal.
-
Navigate to the Config section by clicking on the Config icon in the portal menu.
-
Under CMP Config section, click on the Feature Configuration link.
-
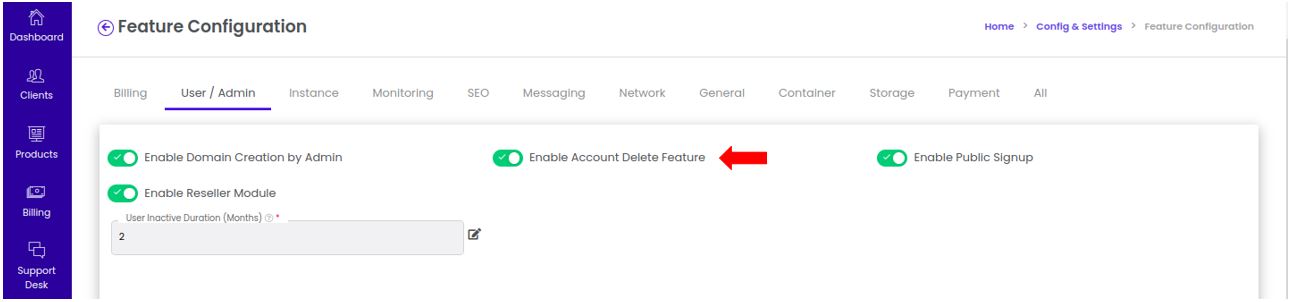
Select the User/Admin tab to lists all the user & admin features available for configuration.
2. Locate the Account Delete Setting :
- Find the option labeled Enable Account Delete Feature in the list of feature configurations.
3. Enable or Disable the Setting :
-
Toggle the setting to enable or disable based on your organization’s requirements.
-
The portal will automatically update the changes.
4. Changes Reflected in the User Portal :
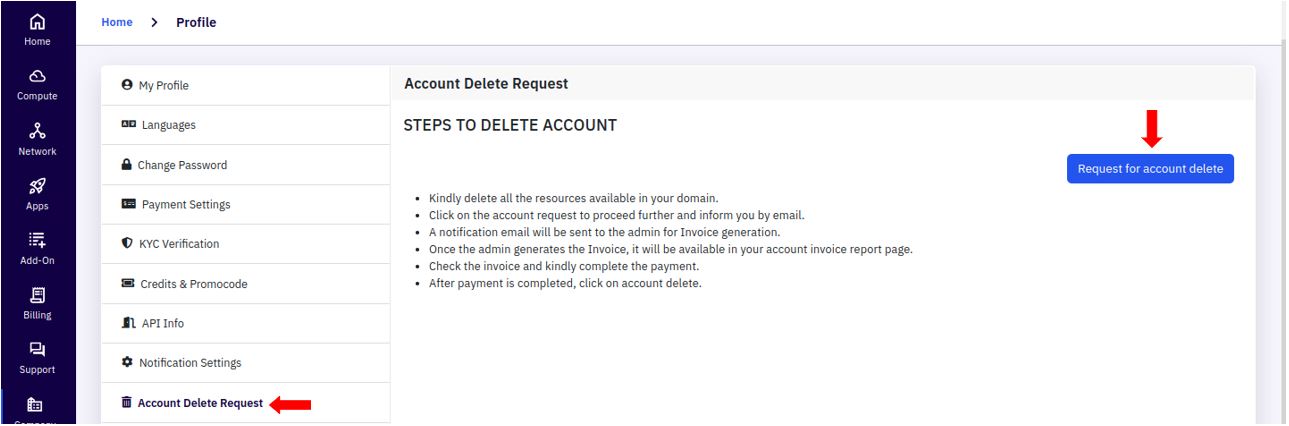
- Go to User Portal > Company > Profile > Account Delete Request
-
When enabled, users will see a Request for Account Delete button in this section, allowing them to initiate an account deletion request.
-
When disabled, this option will not appear in the user portal, and users will not have the capability to request account deletion.
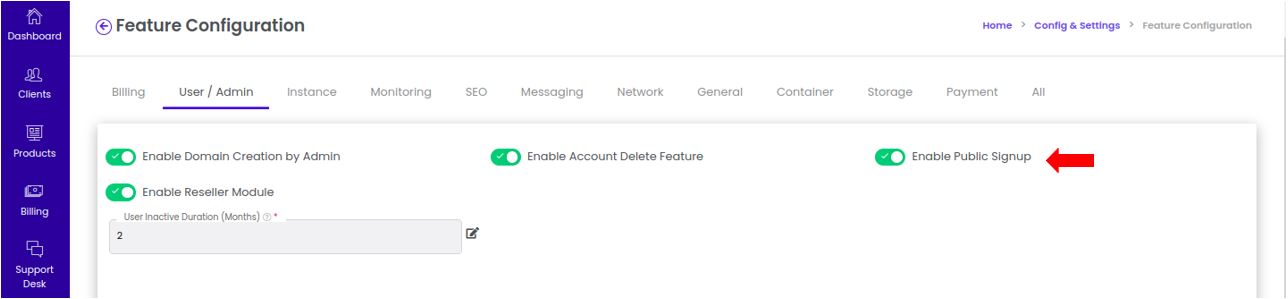
Enable Public Signup :
The Enable Public Signup feature in the Cloud Management Platform (CMP) admin portal controls whether new users can register accounts through a public signup option in the user portal. Enabling or disabling this option allows organizations to manage how users access and onboard onto the platform.
With this setting, the organization can decide if they want to allow any user to create an account or restrict account creation to internal or pre-approved users only.
1. Steps to Enable Public Signup :
-
Login into the admin portal.
-
Navigate to the Config section by clicking on the Config icon in the portal menu.
-
Under CMP Config section, click on the Feature Configuration link.
-
Select the User/Admin tab to lists all the user & admin features available for configuration.
2. Locate the Public Signup Setting :
- Find the option labeled Enable Public Signup in the list of feature configurations.
3. Enable or Disable the Setting :
-
Toggle the setting to enable or disable based on your organization’s requirements.
-
The portal will automatically update the changes.
4. Changes Reflected in the User Portal :
- Users will see a Signup or Register button on the login page, allowing them to create a new account.
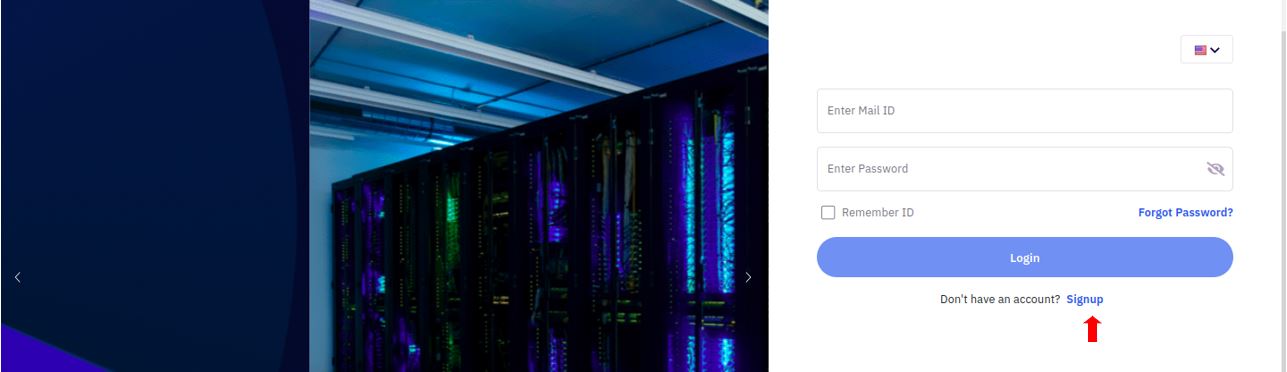
-
Users can click this button to open the registration form and submit their details to create an account.
-
When this feature is disabled, the signup option will be removed from the login page, and users will not have the ability to self-register. In this case, only accounts created directly by the admin team.
Enable Reseller Module
The Enable Reseller Module feature in the Cloud Management Platform (CMP) admin portal allows administrators to activate or deactivate reseller functionality. When enabled, this feature allows for the creation, management, and customization of reseller plans directly from the admin portal, enabling administrators to expand the platform’s reach by empowering resellers to offer cloud services to their own clients.
The Enable Reseller Module feature is designed to support a multi-tier distribution model. By enabling this feature, the platform can be used by resellers who can then create their own sub-accounts and manage cloud services for their clients. This is ideal for businesses that have a partner or reseller network and want to extend their service offerings through additional sales channels.
1. Steps to Enable Reseller Module :
-
Login into the admin portal.
-
Navigate to the Config section by clicking on the Config icon in the portal menu.
-
Under CMP Config section, click on the Feature Configuration link.
-
Select the User/Admin tab to lists all the user & admin features available for configuration.
2. Locate the Reseller Module Setting :
- Look for the option labeled Enable Reseller Module in the list of feature configurations.
3. Enable or Disable the Setting :
-
Toggle the setting to enable or disable based on your organization’s requirements.
-
The portal will automatically update the changes.
4. Changes Reflected in the Admin Portal :
-
Navigate to Clients > Reseller Plans > Create Reseller Plan.
-
Admins can configure various aspects of reseller plans such as Pricing and Discounts, Available Services , Usage Limits and Quotas, etc..,
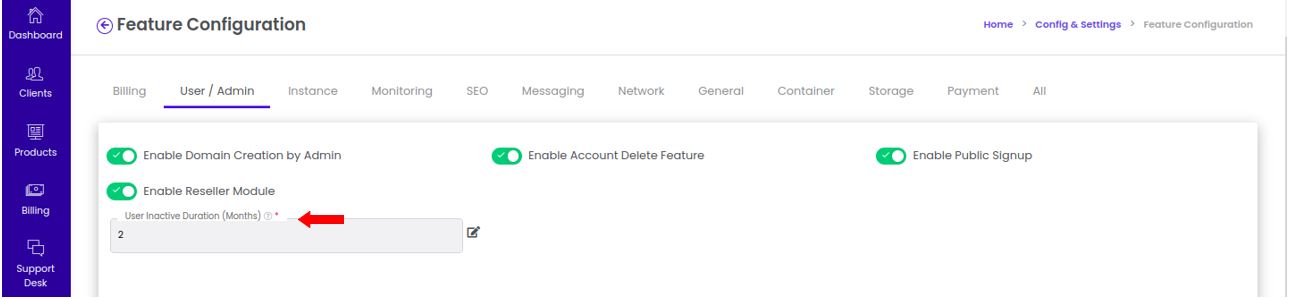
User Inactive Duration (Months) :
The User Inactive Duration (Months) setting in the Cloud Management Platform (CMP) admin portal is used to automatically manage and identify user accounts that have been inactive for a specified period. This feature is useful for organizations to maintain an up-to-date list of active users, remove inactive accounts, or apply specific actions (such as suspending or disabling accounts) based on user inactivity.
This feature is designed to automatically move user accounts to an Inactive status if they have not logged in within a defined number of months. The admin can set a threshold (e.g., 2 months, 3 months, etc.), after which any user account that has not been active will be flagged as inactive.
1. Steps to Enable User Inactive Duration :
-
Login into the admin portal.
-
Navigate to the Config section by clicking on the Config icon in the portal menu.
-
Under CMP Config section, click on the Feature Configuration link.
-
Select the User/Admin tab to lists all the user & admin features available for configuration.
2. Locate the User Inactive Duration :
- Look for the option labeled Locate the User Inactive Duration in the list of feature configurations.
3. Edit the Setting :
-
To add the desired value, click the Edit button.
-
Add the desired months, For example, 2, 3, or 4.
-
To save the modifications, click the Save button.
3. Effect in the Admin Portal :
-
Navigate to Portal > Clients > Create & Manage User Accounts
-
Under the Status filter, select Inactive Client to view a list of users who have been marked inactive based on the inactivity threshold.
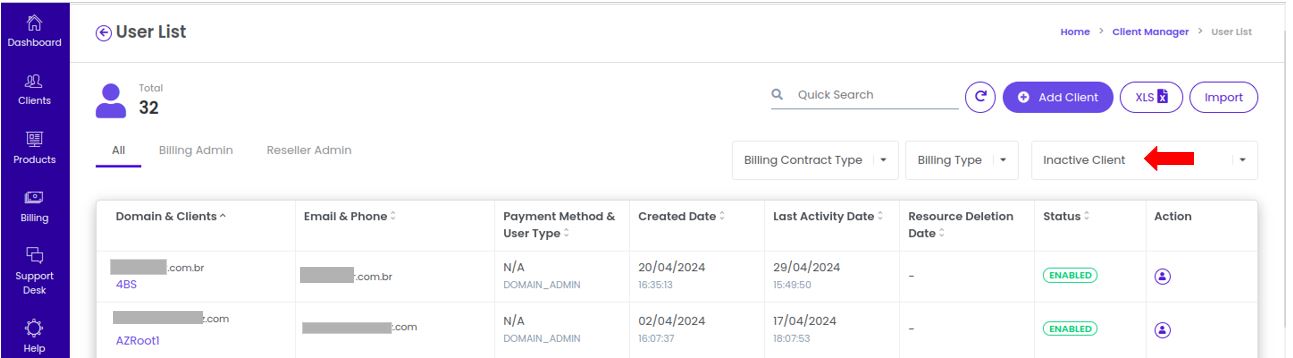
- Once in the Inactive Client list, select a user account to view details and decide on appropriate actions (suspend, disable, or delete the account).